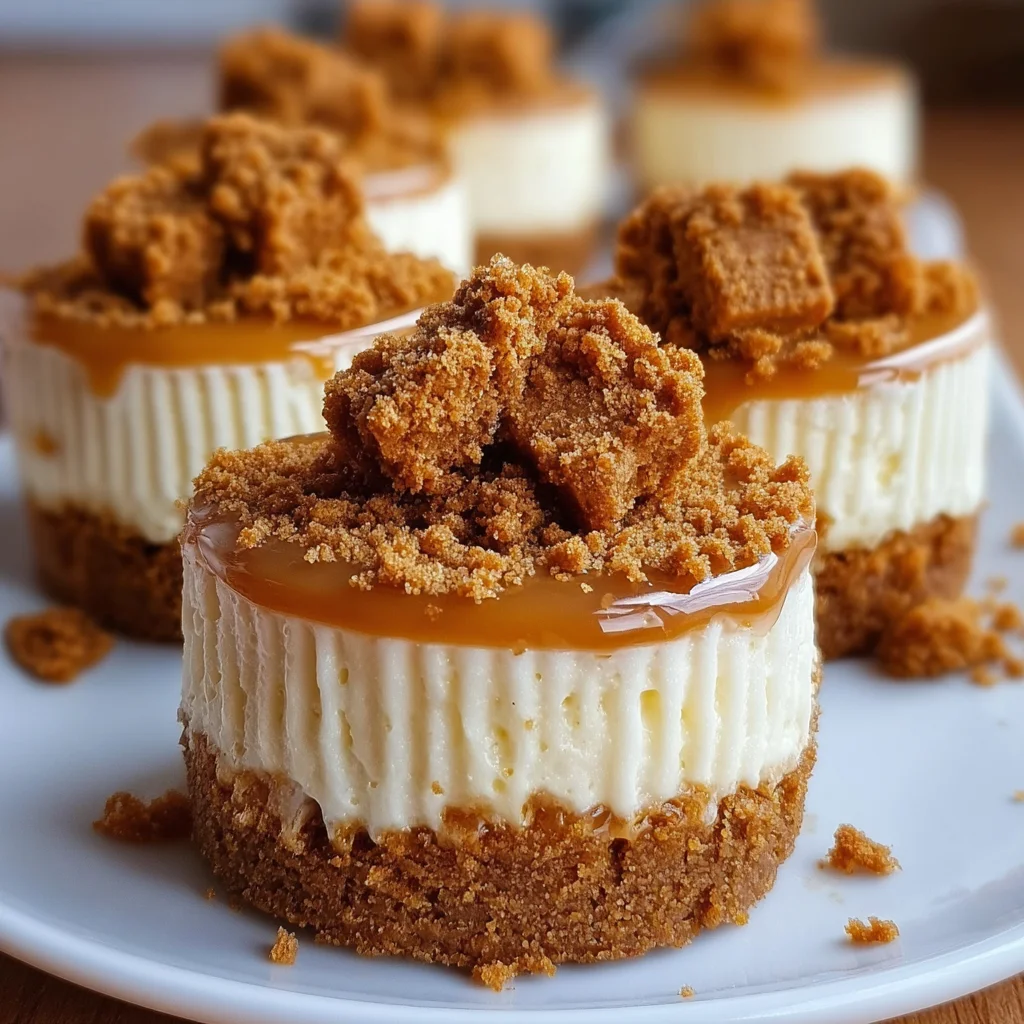
Introduction to Mini Biscoff Cheesecakes
There’s something truly magical about desserts that can whisk us away from our hectic days. Mini Biscoff Cheesecakes are just that! These delightful little treats combine the rich, buttery flavors of Biscoff cookies with a creamy cheesecake filling, making them perfect for busy moms and professionals like us. Whether you need a quick solution for a last-minute gathering or a sweet way to show love to your family, these mini cheesecakes are sure to impress. Let’s dive in and discover how easy it is to bring a bit of bliss into our lives!
Why You’ll Love This Mini Biscoff Cheesecakes
These Mini Biscoff Cheesecakes are a dream come true for busy cooks. They’re quick to whip up and require minimal baking time, allowing you to spend less time in the kitchen and more time enjoying sweet moments with your loved ones. Plus, the combination of creamy cheesecake and crunchy Biscoff goodness is pure bliss! Trust me, these cheesecakes will satisfy your sweet tooth without adding stress to your busy day.
Ingredients for Mini Biscoff Cheesecakes
Gathering quality ingredients is the first step towards creating these delightful Mini Biscoff Cheesecakes. Here’s what you’ll need:
- Biscoff cookie crumbs: The heart of our crust, they add a rich, caramelized flavor.
- Melted butter: This binds the crumbs together, creating a delicious and solid base.
- Cream cheese: For that classic cheesecake texture, creamy and rich.
- Heavy cream: Whipped into the mixture, it adds lightness and richness we all crave.
- Powdered sugar: This sweetens our filling and gives it that smooth, silky consistency.
- Vanilla extract: A splash of vanilla enhances the overall flavor profile and adds warmth.
- Biscoff spread: For that extra burst of Biscoff goodness, making every bite irresistible.
- Crumble Biscoff cookies: For topping, they add a delightful crunch and more flavor.
Don’t worry about exact measurements; you’ll find them at the bottom of the article and they’re available for printing! This simple list not only represents the base of your cheesecake but also opens the door for creative substitutions. For instance, if you’re looking for a lighter option, using Greek yogurt can add creaminess while reducing fat. Or swap out Biscoff for your favorite cookies to make a unique variation. The options are truly endless!

How to Make Mini Biscoff Cheesecakes
Step 1: Preheat and Prepare
Start by preheating your oven to 350°F (175°C). This ensures that our cookie crust bakes evenly. While the oven warms up, line a 12-cup muffin tin with paper liners. This step is key to keeping our mini cheesecakes intact and easy to serve!
Step 2: Make the Cookie Crust
In a medium bowl, mix the Biscoff cookie crumbs with melted butter. Use a fork to combine them until the crumbs are well-coated and look like wet sand. This creates a solid base for our cheesecakes. Press about one tablespoon of this mixture into each muffin cup. Getting a firm, even base will ensure your cheesecakes hold their shape when they’re served.
Step 3: Bake the Crust
Once your crusts are pressed firmly, pop the muffin tin in the oven for just 5 minutes. This quick baking time helps set the crust. Afterward, take them out and let them cool completely. Patience here is essential for that perfect texture!
Step 4: Prepare the Cheesecake Filling
Next, in a large mixing bowl, beat the cream cheese with an electric mixer until it’s silky smooth. Then, slowly add the heavy cream, powdered sugar, and vanilla extract. Continue mixing until everything is well blended and thick. This step is crucial for that creamy texture we all love in cheesecakes!
Step 5: Fill the Cups
Spoon or pipe the luscious cheesecake filling onto each cooled crust, filling them almost to the top. Aim for an even layer, smoothing the tops with a spatula if needed. It’s like frosting a cupcake but way easier in this lovely mini form!
Step 6: Chill and Set
Now, place the filled muffin tin in the fridge and let those beauties chill for at least 3 hours. This time allows the cheesecakes to set properly, so they achieve that perfect, creamy consistency!
Step 7: Serve and Enjoy
Once chilled, it’s time for the grand reveal! Remove the mini cheesecakes from the fridge, topping each one with crumbled Biscoff cookies. You can serve them immediately or store them in an airtight container for later. Either way, they’re bound to delight!
Tips for Success
- Press the cookie crust firmly to avoid a crumbly base.
- Chill the cheesecakes for the full 3 hours to ensure they set perfectly.
- For a richer flavor, consider adding an extra tablespoon of Biscoff spread.
- Use an electric mixer for a smooth, creamy filling.
- If using cupcake liners, ensure they’re non-stick for easier removal!
Equipment Needed
- Muffin tin: A standard 12-cup muffin tin works wonders, but a mini cheesecake pan can also be used for smaller treats.
- Mixing bowls: Having at least two—one for crust and another for the filling—makes things smooth and easy.
- Electric mixer: This tool is key for achieving that perfect creamy texture.
- Spatula: A rubber spatula helps you fill and smooth the cheesecake layers nicely.
Variations of Mini Biscoff Cheesecakes
- Nutty Delight: Add a layer of crushed nuts like walnuts or pecans in the crust for a delightful crunch and nutty flavor.
- Chocolate Lovers: Mix in some cocoa powder or chocolate chips to the cheesecake filling for a rich chocolate version.
- Fruit Twist: Top your cheesecakes with fresh fruit like berries or sliced bananas for a refreshing contrast to the creamy filling.
- Vegan Option: Swap out cream cheese for cashew cream and heavy cream for coconut cream for a plant-based treat everyone can enjoy!
- Gluten-Free Version: Use gluten-free cookie crumbs for the crust to make these cheesecakes suitable for gluten-sensitive friends.
Serving Suggestions
- Pair with Coffee: A warm cup of coffee or espresso complements the creamy flavors perfectly.
- Add Whipped Cream: A dollop of whipped cream on top adds extra indulgence to each cheesecake.
- Garnish with Chocolate: Drizzle with chocolate sauce for a decadent touch.
- Fresh Berries: Serve with raspberries or strawberries for a pop of color and freshness.
- Elegant Plating: Arrange on a beautiful platter for stunning presentation at gatherings.
FAQs about Mini Biscoff Cheesecakes
Can I make Mini Biscoff Cheesecakes ahead of time?
Absolutely! These cheesecakes actually taste better after a day in the fridge as the flavors meld. Just make sure to keep them covered to maintain freshness. They can be prepared up to two days in advance, giving you one less thing to worry about on the day of your gathering.
What can I use instead of Biscoff cookies?
If you’re looking for alternatives, try using graham crackers or any of your favorite cookies. Just be sure to crush them into fine crumbs, ideally resembling the texture of Biscoff cookies for that buttery flavor.
How long can I store Mini Biscoff Cheesecakes?
You can store these delicious mini treats in an airtight container in the refrigerator for up to five days. However, I doubt they’ll last that long once your family gets a taste!
Can I use a different type of cream cheese?
Of course! Low-fat cream cheese or even a flavored cream cheese could add a twist to your Mini Biscoff Cheesecakes. Just keep in mind that the texture and flavor may change slightly.
Are Mini Biscoff Cheesecakes suitable for vegetarians?
Yes, these mini desserts are totally vegetarian-friendly! They don’t contain any meat products, making them a lovely treat for your vegetarian friends and family. Enjoying cheesecake has never been so inclusive!
Final Thoughts
Creating Mini Biscoff Cheesecakes is not just about baking; it’s about indulging in sweet moments that brighten our busy lives. These delightful little cheesecakes bring joy with every creamy bite, reminding us of the special connection food creates. Whether it’s a simple family gathering or an intimate celebration, these treats are the perfect companion. I cherish the smiles they bring and the memories created around the table. So go ahead and treat yourself and those you love to a taste of bliss that’s as simple as it is satisfying. You deserve it!
PrintMini Biscoff Cheesecakes

Mini Biscoff Cheesecakes are deliciously creamy and rich desserts that combine the flavors of Biscoff cookies with a smooth cheesecake filling, perfect for any dessert lover.
- Prep Time: 20 minutes
- Cook Time: 5 minutes
- Total Time: 3 hours 25 minutes
- Yield: 12 mini cheesecakes 1x
- Category: Dessert
- Method: Baking and Chilling
- Cuisine: American
- Diet: Vegetarian
Ingredients
- 1 1/2 cups Biscoff cookie crumbs
- 1/4 cup melted butter
- 2 cups cream cheese
- 1 cup heavy cream
- 1/2 cup powdered sugar
- 1 teaspoon vanilla extract
- 1/2 cup Biscoff spread
- 1/4 cup Biscoff cookies, crumbled
Instructions
- Preheat your oven to 350°F (175°C) and prepare a 12-cup muffin tin by lining each cup with paper liners.
- In a medium bowl, combine the Biscoff cookie crumbs and melted butter, stirring until the crumbs are evenly coated and the mixture begins to hold together.
- Spoon about one tablespoon of the cookie crumb mixture into each muffin cup and press it down firmly with the back of a spoon to create a solid crust.
- Place the muffin tin in the oven and bake for 5 minutes to set the crust. After baking, remove the tin from the oven and allow the crusts to cool completely.
- While the crusts cool, beat the cream cheese in a large mixing bowl with an electric mixer until smooth and creamy.
- Add the heavy cream, powdered sugar, and vanilla extract to the cream cheese and beat on medium speed until the mixture thickens and becomes smooth.
- Add the Biscoff spread to the mixture and beat again until fully incorporated and the filling is thick and smooth.
- Spoon or pipe the Biscoff cheesecake mixture onto each cooled cookie crust, filling each cup almost to the top.
- Smooth the tops of the cheesecakes with a spatula, making sure they are even.
- Place the mini cheesecakes in the fridge to chill for at least 3 hours, or until fully set.
- Once chilled, remove the cheesecakes from the fridge and top each one with crumbled Biscoff cookies.
- Serve immediately or store the cheesecakes in an airtight container in the refrigerator until ready to enjoy.
Notes
- Make sure to press the cookie crust firmly to avoid a crumbly base.
- For a richer flavor, you can add an extra tablespoon of Biscoff spread to the filling.
- If you don’t have a muffin tin, use a mini cheesecake pan or a standard cupcake tin.
- Allow the cheesecakes to chill for the full 3 hours to ensure they set properly.
- Top the cheesecakes with whipped cream or caramel sauce for an extra indulgent touch.
Nutrition
- Serving Size: 1 cheesecake
- Calories: 300
- Sugar: 15g
- Sodium: 200mg
- Fat: 22g
- Saturated Fat: 12g
- Unsaturated Fat: 8g
- Trans Fat: 0g
- Carbohydrates: 25g
- Fiber: 1g
- Protein: 3g
- Cholesterol: 60mg