
Introduction to Frozen Banana Snickers
Have you ever craved something sweet yet healthy after a long day? Enter my favorite treat: Frozen Banana Snickers! This delightful snack is not only creamy and satisfying, but it also brings joy without the guilt. Life gets busy, and we often find ourselves reaching for unhealthy options. That’s why I created this simple recipe. It offers a quick, delicious solution that you can whip up in no time. Plus, the kids will love it! You’ll feel like a culinary rockstar when you serve these creamy frozen bites to your family or friends!
Why You’ll Love This Frozen Banana Snickers
These Frozen Banana Snickers are a dream come true for anyone juggling a hectic lifestyle. They come together in just a few minutes, and you can store them for later, which means less time in the kitchen and more time enjoying life. The blend of creamy banana, crunchy peanuts, and rich chocolate is simply irresistible! Plus, they’re a healthier alternative to traditional desserts, making it easy to indulge without any guilt.
Ingredients for Frozen Banana Snickers
Let’s dive into the delightful ingredients that make up these Frozen Banana Snickers! You’ll find that most of these are simple, healthy staples you might already have at home. Here’s what you need:
- Ripe Bananas: The star of our show! Look for large, ripe bananas since they become naturally sweet and creamy when frozen.
- Creamy Peanut Butter: This adds a rich and nutty flavor. Make sure it’s smooth for that perfect swirl in each bite.
- Honey or Maple Syrup: A touch of sweetness! You can swap this out based on preference—honey for a more traditional taste or maple syrup for a unique twist.
- Unsalted Peanuts: These provide a delightful crunch. You can chop them roughly or leave them whole, depending on your texture preference.
- Mini Chocolate Chips: These little bursts of chocolate goodness make every bite extra special. You could also use dark chocolate chips for a deeper flavor!
- Coconut Oil: This helps to thin out the chocolate for easier coating. Plus, it adds a subtle flavor that enhances the overall treat.
- Milk Chocolate Chips: Essential for that rich chocolate coating! If you prefer a dairy-free version, feel free to use dairy-free chocolate chips instead.
- Sea Salt Flakes (optional): A pinch of salt can elevate the dessert, contrasting beautifully with the sweetness.
- Wooden Skewers or Popsicle Sticks (optional): Great for serving! They make these treats easy to devour, especially for the kiddos.
For exact measurements, check the bottom of the article where you’ll find a handy print-friendly version of the recipe. Grab your ingredients, and let’s get started on this creamy adventure!

How to Make Frozen Banana Snickers
Now that we have our ingredients ready, let’s dive into the fun part—making these amazing Frozen Banana Snickers. This is where the magic happens! I’ll walk you through each step, ensuring a tasty and hassle-free experience.
Step 1: Prepare Peanut Butter Swirl
Start by grabbing a small bowl and combining your creamy peanut butter with honey or maple syrup. Mix them well until smooth and creamy. This swirl will add a delightful flavor to your bananas. The key here is to achieve a smooth consistency. It should be easy to dollop but not runny!
Step 2: Blend Frozen Bananas
Next, take your frozen bananas and cut them into chunks. This makes blending easier and helps prevent your blender from overheating. Toss the banana pieces into a powerful blender. Blend in short bursts, scraping down the sides as needed. If it gets too thick, add a tiny bit of milk—just a tablespoon or two. You want that creamy texture that feels indulgent!
Step 3: Swirl in Peanut Butter
Once your bananas are nice and smooth, it’s time to introduce the peanut butter swirl. Gently spoon dollops of the prepared peanut butter mixture into the banana blend. Be careful here—use short pulses to mix. You want to see distinct swirls of peanut butter throughout the creamy banana. Over-blending will lose that beautiful visual!
Step 4: Prepare Chocolate Coating
For the chocolate coating, melt together your milk chocolate chips and coconut oil. Grab a microwave-safe bowl, combine the two, and microwave in 30-second intervals. Stir in between each interval. You’ll want it melted and smooth, not burning! This chocolate coating will create a luscious finish that is hard to resist.
Step 5: Assemble the Treats
Now it’s time to bring it all together! Scoop the banana mixture onto a parchment-lined baking sheet. Feel free to insert wooden skewers or popsicle sticks into each scoop if you want easy handling. It’ll look like mini banana pops waiting to get dressed in chocolate!
Step 6: Dip and Decorate
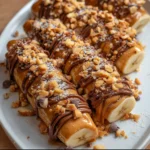
Once your bananas are firm enough, take them out of the freezer. Dip each scoop into your melted chocolate, ensuring they’re fully coated. While the chocolate is still warm, sprinkle mini chocolate chips and, if you wish, a dash of sea salt flakes. This adds a crunchy texture and flavor contrast that’s oh-so-delicious!
Step 7: Final Freeze
After decorating, place the coated banana scoops back on the baking sheet. Return them to the freezer for at least 15 minutes. This ensures the chocolate hardens completely. Patience is key here for that perfect bite!
Step 8: Serve the Delicious Treats
Once everything is properly set, serve up these Frozen Banana Snickers for the ultimate treat! For best taste and texture, enjoy them right after serving. Any leftovers? Store them in an airtight container in the freezer for up to a week. You’ll love having these handy for when that sweet craving hits!
Tips for Success
- Use a powerful blender for a smoother consistency—trust me, it makes a difference!
- Cut bananas into smaller chunks to prevent overheating your blender.
- Don’t over-blend the peanut butter swirl; distinct swirls are the goal!
- Freeze the banana mixture before dipping to help prevent melting.
- Feel free to experiment with different nut butters and chocolate types!
Equipment Needed
- Powerful Blender: Essential for achieving that creamy banana texture. A food processor can also work.
- Microwave-Safe Bowl: For melting the chocolate. A small saucepan on the stove can serve as an alternative.
- Parchment Paper: For lining your baking sheet. You can use a silicone mat if you have one!
- Baking Sheet: Needed for freezing the treats. A simple plate will suffice in a pinch.
Variations of Frozen Banana Snickers
- Nut-Free Version: Swap out peanut butter for sun butter or soy nut butter to keep it nut-free for school or allergy concerns.
- Different Chocolate Types: Try dark chocolate or white chocolate for a different flavor profile. Each brings a unique twist to the treat!
- Flavorful Additions: Add a teaspoon of vanilla extract to the banana mixture for an extra layer of flavor. You won’t be disappointed!
- Healthy Toppings: Top with shredded coconut or crushed freeze-dried fruits for added texture and nutrition.
- Dairy-Free Option: Use dairy-free chocolate chips and coconut milk for a fully vegan version of these treats.
Serving Suggestions for Frozen Banana Snickers
- Pair with Fresh Fruit: Serve alongside strawberries or blueberries for a colorful and fresh touch.
- Delicious Dips: Offer a little extra peanut butter or chocolate sauce for dipping. It’s a fun addition!
- Presentation: Use pretty dessert cups or platters for an eye-catching display at your next gathering.
- Refreshing Drinks: Complement these treats with a chilled glass of almond milk or a berry smoothie. Perfect for hot days!
FAQs about Frozen Banana Snickers
As I’ve enjoyed whipping up these Frozen Banana Snickers, I’ve come across some common questions. Let’s address a few so you can feel extra confident making them!
Can I use other nut butters instead of peanut butter?
Absolutely! Almond butter or cashew butter can work beautifully. Each nut butter brings its own flavor, so feel free to experiment to find your favorite!
How long can I store Frozen Banana Snickers?
You can keep these treats stored in an airtight container in the freezer for up to a week. Though I doubt they’ll last that long—they’re just too good!
Can I make these Frozen Banana Snickers vegan?
Yes, indeed! Just use dairy-free chocolate chips and maple syrup instead of honey. The taste will still be delightful!
What if I don’t have a powerful blender?
If you don’t own a high-powered blender, a food processor can do the trick as well. Just remember to keep the banana chunks small to make blending easier!
Can I make these treats in advance for a party?
Yes! In fact, these treats are perfect for making ahead. Just freeze them until you’re ready to serve, and you’ll impress your guests with minimal effort!
Final Thoughts on Frozen Banana Snickers
Creating these Frozen Banana Snickers is not just about making a healthy dessert; it’s about sharing joy with family and friends. Each creamy bite offers a satisfying blend of flavors and textures that promises to delight. Whether for a quick treat after dinner or a fun party snack, these treats are sure to impress. Plus, the ease of preparation means you can indulge without stress. So, why not bring some magic into your kitchen? This delightful recipe will become a go-to for satisfying those sweet cravings while keeping things wholesome and delicious!
PrintFrozen Banana Snickers: A Creamy, Healthy Delight!
A creamy and healthy frozen treat made from ripe bananas, peanut butter, and chocolate, combining delightful flavors for a guilt-free dessert.
- Prep Time: 10 minutes
- Cook Time: 0 minutes
- Total Time: 45 minutes
- Yield: 12 servings 1x
- Category: Dessert
- Method: Blending and Freezing
- Cuisine: American
- Diet: Vegan
Ingredients
- 4 large ripe bananas, peeled and frozen solid (at least 4 hours, preferably overnight)
- 1/2 cup creamy peanut butter
- 1/4 cup honey or maple syrup (adjust to taste)
- 1/4 cup unsalted peanuts, roughly chopped
- 1/4 cup mini chocolate chips
- 1/4 cup coconut oil
- 1 cup milk chocolate chips (for coating)
- Optional: Sea salt flakes for sprinkling
- Optional: Wooden skewers or popsicle sticks
Instructions
- Prepare Peanut Butter Swirl: In a small bowl, combine peanut butter and honey/maple syrup. Mix well until smooth. Stir in chopped peanuts and set aside.
- Blend Frozen Bananas: Cut frozen bananas into chunks. Add to a powerful blender. Blend in short bursts, scraping down sides. Add a tablespoon or two of milk if needed. Continue blending until smooth and creamy.
- Swirl Peanut Butter: Add dollops of peanut butter swirl to the blended banana mixture. Gently pulse the blender a few times to create swirls. Be careful not to over-blend.
- Prepare Chocolate Coating: In a microwave-safe bowl, combine milk chocolate chips and coconut oil. Microwave in 30-second intervals, stirring in between, until melted and smooth.
- Assemble: Scoop banana mixture onto a parchment-lined baking sheet. Insert skewers if desired. Freeze for at least 30 minutes until firm.
- Dip and Decorate: Dip frozen banana scoops into melted chocolate, coating completely. Sprinkle with mini chocolate chips and sea salt flakes (if using).
- Final Freeze: Return coated bananas to the baking sheet and freeze for at least 15 minutes, or until the chocolate is set.
- Serve: Serve immediately for best taste and texture.
Notes
- Use a powerful blender for best results.
- Cut bananas into smaller chunks before blending to prevent overheating the blender.
- Don’t over-blend the peanut butter swirl into the banana mixture; you want distinct swirls.
- Coconut oil thins the chocolate, making it easier to coat the bananas.
- Freeze banana scoops before dipping to prevent melting.
- Store leftovers in an airtight container in the freezer for up to a week.
- Experiment with different types of chocolate, toppings, and nut butters.
- For a vegan version, use dairy-free chocolate chips and maple syrup.
Nutrition
- Serving Size: 1 scoop
- Calories: 120
- Sugar: 10g
- Sodium: 50mg
- Fat: 7g
- Saturated Fat: 3g
- Unsaturated Fat: 3g
- Trans Fat: 0g
- Carbohydrates: 15g
- Fiber: 2g
- Protein: 3g
- Cholesterol: 0mg