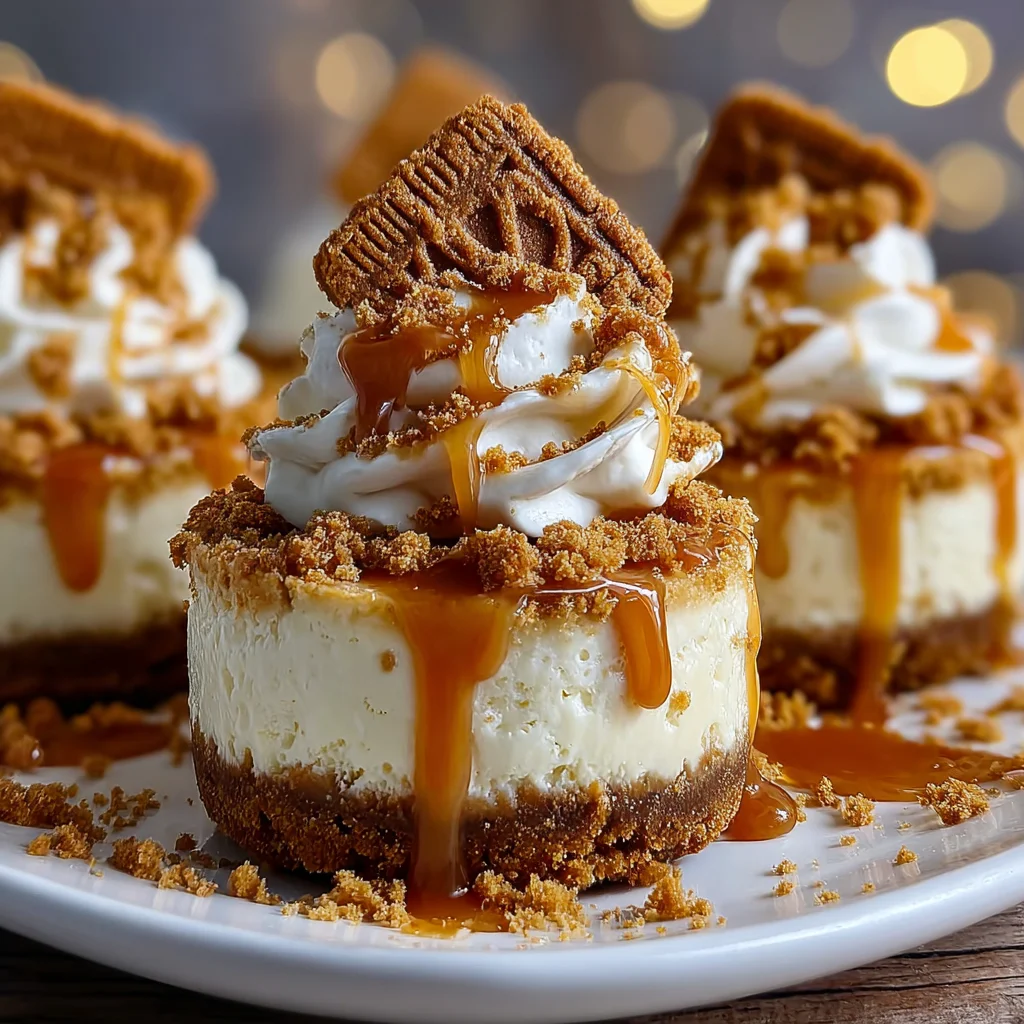
Introduction to Mini Biscoff Cheesecakes
Have you ever craved a dessert that feels like a warm hug on a busy day? Let me introduce you to the delightful world of Mini Biscoff Cheesecakes. These little gems offer the rich, creamy texture of cheesecake combined with the uniquely spiced flavor of Biscoff cookies. Perfect for a quick solution when you’re pressed for time or want to impress your friends at a gathering, each bite is heavenly. They’re truly a comforting treat that captures the hearts—and taste buds—of everyone at the table!
Why You’ll Love This Mini Biscoff Cheesecakes
These Mini Biscoff Cheesecakes are a delightful way to indulge without the hassle. They’re quick to prepare, making them a lifesaver for busy moms like us. With their creamy filling and crunchy Biscoff crust, they’re bursting with flavor. Plus, they’re perfectly portioned for sharing or enjoying all by yourself! It’s the ultimate treat that combines ease, taste, and satisfaction in every single bite!
Ingredients for Mini Biscoff Cheesecakes
When it comes to creating these heavenly Mini Biscoff Cheesecakes, having the right ingredients is crucial. Each component plays a special role in delivering that delightful taste and texture you’ll adore. Here’s what you’ll need:
- Biscoff cookies: These are your star! Their caramelized flavor is what makes this cheesecake exceptionally delicious.
- Unsalted butter: This helps bind the crust together and adds richness. If you’re in a pinch, you could use margarine, but I recommend sticking with butter for the best flavor.
- Granulated sugar: A touch of sweetness for the crust. You can omit it if you prefer a less sweet base.
- Cream cheese: It brings that creamy texture we’re all dreaming of. Make sure to use softened cream cheese for easy blending.
- Sour cream: This ingredient gives the cheesecake a slightly tangy flavor, balancing the sweetness perfectly.
- Vanilla extract: A tiny splash adds depth and enhances all the other flavors. I always choose pure vanilla over imitation for better quality.
- Eggs: They provide structure and help the cheesecake set beautifully. Room temperature eggs work best.
- Biscoff spread: Oh yes, this makes the filling even more indulgent. It’s like a dreamy, cookie-infused anthem for your taste buds!
- Whipped cream: Optional, but a dollop on top elevates everything, making it feel even more special.
- Crushed Biscoff cookies: Use as a topping to add a little crunch and visual appeal—who can resist that?
- Caramel sauce: Drizzling this on top will absolutely take your cheesecakes to another level of deliciousness.
For exact measurements, you can find them at the bottom of the article, ready for easy printing. Happy baking!

How to Make Mini Biscoff Cheesecakes
Now that we’ve gathered the ingredients, let’s dive into the heart of the matter! Making these Mini Biscoff Cheesecakes is straightforward and fun. I promise, your kitchen will be filled with heavenly aromas in no time. Follow these steps, and you’ll be well on your way to dessert bliss!
Step 1: Preheat the Oven
First things first, preheat your oven to 325°F (163°C). This step is crucial! A properly heated oven ensures that your cheesecakes cook evenly. It’s like giving them a warm welcome before they embark on their baking journey!
Step 2: Prepare the Crust
Next up, let’s whip up that delicious crust. In a medium bowl, mix the crushed Biscoff cookies with the melted unsalted butter and optional sugar. Make sure everything is combined nicely. It should resemble wet sand. This glorious mixture serves as the perfect crunchy foundation for your cheesecakes!
Step 3: Bake the Crust
Now, press the cookie mixture into the bottom of a muffin tin lined with cupcake liners. I like to use the back of a measuring cup for this—it makes pressing down so much easier! Bake the crusts for about 10 minutes. This little bake-time is essential for giving your crust that delightful, crispy texture.
Step 4: Make the Filling
While the crusts cool, it’s time to make the luscious filling! Using a large bowl, beat the softened cream cheese until it’s perfectly smooth. Then, add the sugar, sour cream, vanilla extract, and Biscoff spread. Mix everything until it’s creamy and well combined. You want to create a filling that tastes as dreamy as it sounds!
Step 5: Pour and Bake
Now, it’s showtime! Add the eggs to your filling one at a time. Mix on low speed after each addition just until blended. This helps avoid overmixing, which keeps your cheesecakes light and airy. Once the filling is ready, pour it over your cooled crusts, filling each cup about three-quarters full. Bake for 20 to 25 minutes until they are set but still slightly jiggly in the center. Timing is everything, so keep a close eye on them!
Step 6: Cool and Chill
After baking, let your cheesecakes cool in the oven (turned off) for about 30 minutes. This gradual cooling helps prevent cracks on the surface. Then, pop them into the fridge for at least two hours, or ideally, overnight. Just imagine the anticipation building as you wait! The chilling really enhances the flavors, allowing the Biscoff essence to shine through.
And there you have it! Follow these steps and watch as your Mini Biscoff Cheesecakes transform into a crowd-pleasing delight. Trust me, every crumb will be worth the effort!
Tips for Success
- Ensure your cream cheese is at room temperature for a smooth filling.
- Don’t overmix the batter; this keeps your cheesecakes light and fluffy.
- For best flavor, let them chill overnight before serving.
- Use a toothpick to check for doneness; it should come out clean.
- Customize toppings for a fun twist—nutty or fruity additions work wonders!
Equipment Needed
- Muffin tin: Essential for shaping your mini cheesecakes. A standard muffin tin works great. Alternatively, use silicone molds for easy removal.
- Cupcake liners: These keep things tidy and make serving a breeze. If you’re out, grease the tin directly.
- Mixing bowls: You’ll need a couple for combining ingredients. Any size will do!
- Electric mixer: Ideal for smooth batter, but you can use a whisk if you’re feeling adventurous!
Variations
- Gluten-free option: Substitute Biscoff cookies with gluten-free cookies to enjoy the same delightful flavor without the gluten.
- Dairy-free twist: Use dairy-free cream cheese and coconut cream in place of sour cream for a vegan-friendly treat.
- Chocolate lovers: Add a layer of chocolate ganache on top for an indulgent finish. Simply melt chocolate and pour it over before chilling.
- Nutty addition: Sprinkle crushed nuts, like almonds or pecans, on top for added crunch and texture.
- Flavor fusion: Incorporate pumpkin spice or cinnamon into the batter for a seasonal variation that’s perfect for fall!
Serving Suggestions
- Pair these Mini Biscoff Cheesecakes with a rich cup of coffee or a warm chai latte for a comforting treat.
- For an added pop of color, serve them on a vibrant platter topped with fresh berries.
- Drizzle a bit of caramel sauce on a plate for a beautiful presentation.
FAQs about Mini Biscoff Cheesecakes
As a passionate home cook, I understand that you might have some burning questions about these Mini Biscoff Cheesecakes. Let’s clear things up and ensure your baking adventure is a success!
Can I make Mini Biscoff Cheesecakes in advance?
Absolutely! In fact, making these cheesecakes a day in advance enhances their flavor. Just be sure to keep them covered in the fridge until you’re ready to serve.
What do I do if my cheesecakes crack?
Cracks can happen, but they don’t ruin the taste! To minimize cracks, make sure to let them cool gradually and avoid overmixing the batter.
Can I freeze Mini Biscoff Cheesecakes?
Yes, you can! Wrap them tightly in plastic wrap and store in an airtight container. They’ll stay fresh in the freezer for up to three months. When you’re ready to enjoy them, simply thaw in the fridge overnight.
What can I substitute for cream cheese?
If you’re looking for a lighter option or have a dairy restriction, you can use a vegan cream cheese alternative. It works beautifully and keeps the essence of these cheesecakes intact!
How can I customize the toppings for my Mini Biscoff Cheesecakes?
The sky’s the limit! You can top them with crushed Biscoff cookies, whipped cream, fresh fruit, or even chocolate drizzle. Get creative and make it your own!
Final Thoughts
Creating Mini Biscoff Cheesecakes isn’t just about making dessert; it’s about crafting a joyous experience that brings loved ones together. Each bite offers a symphony of flavors that dances on your palate, making every moment special. These little delights are perfect for any occasion, be it a cozy family night or a gathering with friends. The happiness derived from sharing them is truly priceless. So roll up your sleeves, and dive into this delightful recipe. I guarantee that once you take that first bite, you’ll be dreaming of making them again and again!
PrintMini Biscoff Cheesecakes: Delight in Every Bite!
Mini Biscoff Cheesecakes are a delightful treat that combines the creamy texture of cheesecake with the unique flavor of Biscoff cookies, making every bite a heavenly experience.
- Prep Time: 20 minutes
- Cook Time: 35 minutes
- Total Time: 2 hours 55 minutes
- Yield: 12 mini cheesecakes 1x
- Category: Dessert
- Method: Baking
- Cuisine: American
- Diet: Vegetarian
Ingredients
- 1 ½ cups Biscoff cookies (crushed)
- ½ cup unsalted butter (melted)
- 2 tablespoons granulated sugar (optional)
- 16 oz cream cheese (softened)
- ½ cup granulated sugar
- ½ cup sour cream
- 1 teaspoon vanilla extract
- 2 large eggs (room temperature)
- ½ cup Biscoff spread
- Whipped cream (optional topping)
- Crushed Biscoff cookies (optional topping)
- Caramel sauce (optional topping)
Instructions
- Preheat oven to 325°F (163°C).
- Mix crushed Biscoff cookies, melted butter, and optional sugar.
- Press the mixture into a muffin tin lined with cupcake liners.
- Bake for 10 minutes and let cool.
- Beat cream cheese until smooth.
- Add sugar, sour cream, vanilla, and Biscoff spread; mix well.
- Add eggs one at a time, mixing on low speed.
- Pour filling over cooled crusts, filling each cup ¾ full.
- Bake for 20-25 minutes until set but slightly jiggly.
- Cool in the oven for 30 minutes, then refrigerate.
- Refrigerate for at least 2 hours or overnight.
- Top with whipped cream, crushed Biscoff cookies, and caramel sauce before serving.
Notes
- For a firmer cheesecake, bake a little longer but ensure not to overbake.
- These can be made a day in advance for better flavor development.
- Feel free to customize toppings according to preference.
Nutrition
- Serving Size: 1 mini cheesecake
- Calories: 250
- Sugar: 18g
- Sodium: 150mg
- Fat: 18g
- Saturated Fat: 10g
- Unsaturated Fat: 6g
- Trans Fat: 0g
- Carbohydrates: 20g
- Fiber: 1g
- Protein: 4g
- Cholesterol: 50mg