Introduction to Chocolate Almond Layer Cake
Life can often feel like a whirlwind, especially for busy moms and professionals. That’s why I cherish recipes that make me feel like a superhero in the kitchen, and the Chocolate Almond Layer Cake is one of my go-to delights. It’s rich, indulgent, and oh-so-impressive—perfect for celebrations, but simple enough for a Friday night treat. With just a handful of ingredients, you can create a showstopper that’ll leave your loved ones begging for seconds. So, roll up your sleeves, and let’s turn those ordinary moments into extraordinary memories with this scrumptious cake!
Why You’ll Love This Chocolate Almond Layer Cake
This Chocolate Almond Layer Cake is not just a dessert; it’s a delicious escape. The ease of preparation means you’ll spend less time in the kitchen and more time with your loved ones. Each bite bursts with rich chocolate flavor, beautifully complemented by a hint of almond. Plus, it’s versatile enough for any occasion, whether a birthday, holiday, or simply because you deserve a treat! Trust me, your taste buds will thank you!
Ingredients List for Chocolate Almond Layer Cake
Gathering the right ingredients is the first step to baking this delightful Chocolate Almond Layer Cake. Here’s what you’ll need:
- All-purpose flour: The base for our cake, giving it structure.
- Unsweetened cocoa powder: This adds that rich chocolate flavor, making the cake indulgent.
- Baking powder and baking soda: These are our leavening agents, helping the cake rise perfectly.
- Salt: A pinch enhances the flavors, balancing the sweetness.
- Unsalted butter: Softened butter creates a silky texture and brings richness. Remember to use unsalted for better control over flavor.
- Granulated sugar: This sweetens our cake; its fine texture helps the cake rise when creamed with butter.
- Large eggs: Essential for binding; they add moisture and richness to our cake.
- Vanilla extract: This classic flavoring enhances the sweetness and pairs beautifully with chocolate.
- Almond extract: Just a hint of this gives the cake an unforgettable flavor note. A little goes a long way!
- Buttermilk: It adds tanginess and moisture, making the cake wonderfully tender. You can substitute with regular milk mixed with a dash of vinegar.
- Hot water or coffee: This is a secret weapon for intensifying the chocolate flavor. If you prefer, hot water does the trick too.
- Semi-sweet chocolate chips (optional): Adding these gives bursts of melted chocolate throughout the cake for extra indulgence.
- Powdered sugar: For the frosting, it provides sweetness and a smooth texture.
- Unsweetened cocoa powder (for frosting): Enhancing our frosting, this adds deep chocolate flavor.
- Milk or cream: These are used to adjust the frosting’s consistency—get it just right for easy spreading!
- Toasted sliced almonds: A delightful garnish that adds crunch and a touch of elegance!
These ingredients come together to create a stunning dessert that’s sure to impress. If you’re eager to dive into specifics, the exact measurements are at the bottom of this article, all neatly formatted for easy printing!

How to Make Chocolate Almond Layer Cake
Let’s dive into the delightful process of making the Chocolate Almond Layer Cake. This cake is as enjoyable to make as it is to eat! Follow these step-by-step instructions for a cake that brings smiles all around.
Step 1: Preheat and Prepare the Pans
First things first, preheat your oven to 350°F (175°C). This step is crucial for ensuring that your cakes rise perfectly.
Next, grease and flour two 9-inch round cake pans. Proper preparation means your cakes will slip out easily. Don’t skip this, or you might end up with a cake that doesn’t want to leave its pan!
Step 2: Mix Dry Ingredients
In a good-sized bowl, whisk together the flour, unsweetened cocoa powder, baking powder, baking soda, and salt.
This blend sets the foundation for our cake, giving it structure and flavor. Make sure there are no lumps; a smooth mix keeps your cake light and airy!
Step 3: Cream Butter and Sugar
In a large mixing bowl, cream the softened unsalted butter and granulated sugar together until the mixture is light and fluffy.
This usually takes about 3 to 5 minutes. The texture is key here. The more air you whip in, the fluffier your cake will be. Don’t rush this step; a good cream sets the stage for a gorgeous cake!
Step 4: Add Eggs and Extracts
Now, it’s time to add the eggs! Incorporate them one at a time, mixing well after each addition.
Next, stir in the vanilla and almond extracts. The aroma at this point is heavenly! Each of these elements boosts the overall flavor of your cake, creating that unforgettable taste.
Step 5: Combine Wet and Dry Ingredients
Now, let’s bring it all together. Alternately add the dry ingredients and the buttermilk to your butter mixture, beginning and ending with the dry.
This method helps ensure a smooth batter. Just after that, add in the hot water or coffee. It might seem odd, but this step enhances the chocolate flavor and makes your cake incredibly moist!
Step 6: Bake the Cakes
Divide the batter evenly between your prepared pans and pop them in the preheated oven.
Bake for 30-35 minutes. You can check for doneness by inserting a toothpick in the center. If it comes out clean, your cakes are ready! After baking, let them cool in the pans for about 10 minutes before transferring them to a wire rack. Cooling allows them to firm up perfectly.
Step 7: Make the Frosting
While the cakes cool, let’s whip up the glorious chocolate frosting! In a mixing bowl, beat the softened butter until smooth.
Gradually add both the powdered sugar and unsweetened cocoa powder. Mix in the almond extract next. To achieve the right consistency, slowly stir in enough milk or cream until it’s spreadable but not too runny. It should be fluffy and rich!
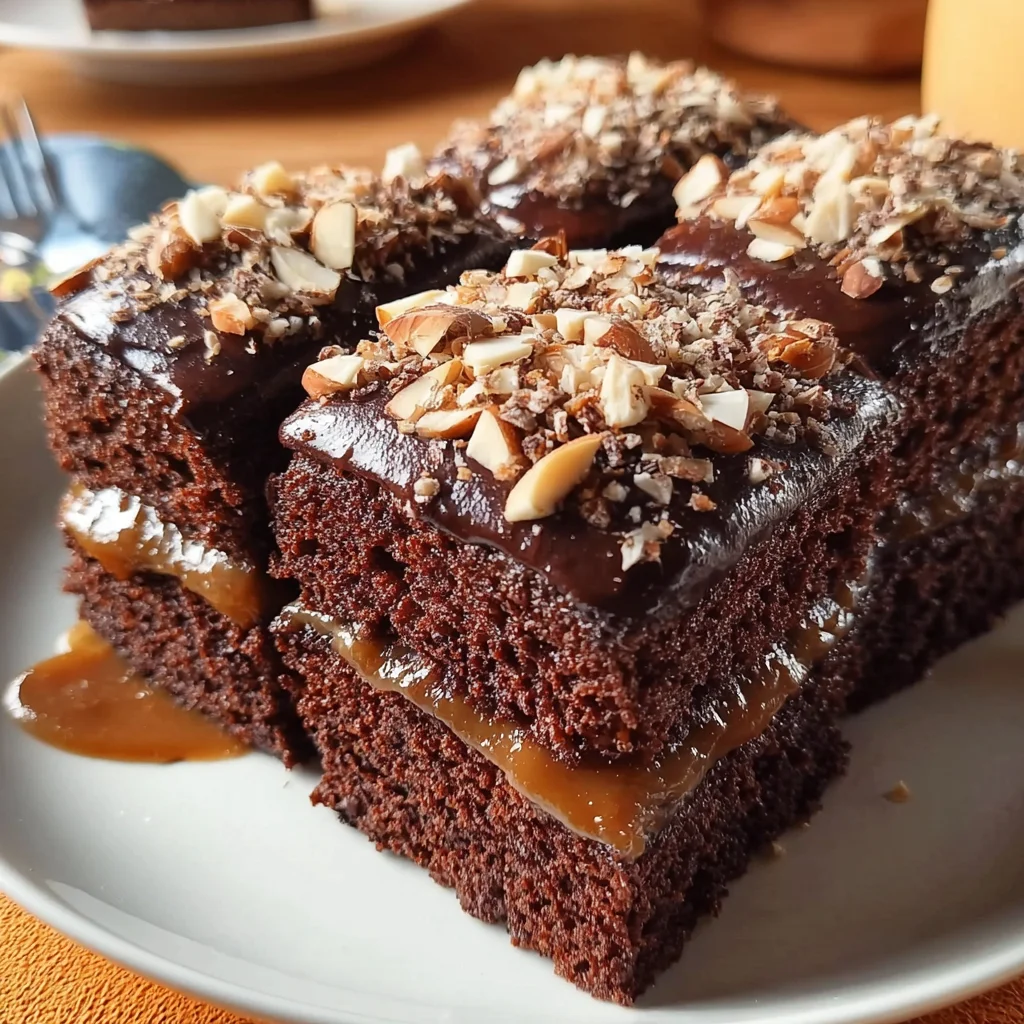
Step 8: Assemble the Cake
It’s time for the fun part—assembling the cake! Place one layer on a serving plate and spread a generous amount of frosting on top.
Add the second layer and frost the top and sides. For an elegant finish, sprinkle toasted sliced almonds along the edges or on top. This not only adds crunch but also makes your cake look stunning!
Tips for Success
- Be sure to measure your ingredients accurately; baking is a science!
- Use room temperature eggs and butter for a smoother batter.
- Don’t open the oven door while baking; it can cause the cakes to sink!
- For a cleaner cut, chill the cake before slicing.
- Store leftover cake in an airtight container to keep it fresh.
Equipment Needed
- Mixing bowls: Use large ones for easy mixing; alternatives are a stand mixer or hand mixer.
- 9-inch round cake pans: If you don’t have these, square pans will work just fine!
- Whisk: A hand whisk is great, or you can use an electric mixer.
- Spatula: A silicone or rubber spatula helps scrape every last bit of batter.
- Wire rack: Use it to cool your cakes; if not, a plate can work in a pinch!
Variations of Chocolate Almond Layer Cake
- Gluten-Free Version: Substitute all-purpose flour with a gluten-free flour blend to accommodate dietary needs while keeping the cake delicious.
- Vegan Option: Use flax eggs instead of regular eggs and non-dairy milk to create a vegan-friendly version. Opt for vegan butter for the frosting.
- Flavor Infusions: Experiment with adding orange zest or mint extract to the batter for an aromatic twist!
- Nut-Free Option: Omit almond extract and replace toasted almonds with sunflower seeds for crunch, perfect for school-friendly treats.
- Chocolate Espresso Twist: Mix in instant espresso powder with the dry ingredients for an enhanced chocolate flavor with a coffee kick!
Serving Suggestions
- Pair a slice with a dollop of whipped cream for extra creaminess!
- Serve alongside a scoop of vanilla ice cream; the contrast is heavenly.
- A cup of freshly brewed coffee complements the rich flavors beautifully.
- For presentation, place a few toasted almonds on the plate for elegance!
FAQs about Chocolate Almond Layer Cake
Curious about the Chocolate Almond Layer Cake? Here are some common questions I often hear, along with my delicious answers!
Can I use a different type of flour?
Yes! You can use a gluten-free flour blend as a substitute for all-purpose flour. Just ensure it has xanthan gum for good structure.
How can I make the cake less sweet?
You can reduce the sugar in the cake or frosting. Consider using dark cocoa powder instead of unsweetened cocoa for a more intense flavor without added sweetness.
Can I make this cake ahead of time?
Absolutely! You can bake the cake layers a day in advance. Wrap them tightly in plastic wrap and store them in the refrigerator. Frosting can be made and refrigerated too. Bring both to room temperature before serving.
How do I store leftover cake?
Store any leftover Chocolate Almond Layer Cake in an airtight container at room temperature for up to three days. For longer freshness, store it in the fridge!
Can I freeze this cake?
Yes! The cakes freeze beautifully. Wrap each layer tightly in plastic wrap and then in aluminum foil. They can be frozen for up to three months; just thaw them in the refrigerator before frosting.
Final Thoughts
Baking the Chocolate Almond Layer Cake is more than just a cooking task; it’s an experience filled with joy, memories, and sweet indulgence. Imagine the smiles on your loved ones’ faces as they savor each moist, chocolaty bite! This cake transforms ordinary gatherings into grand celebrations, creating moments that linger long after the last slice is gone. Whether it’s a birthday or a simple weeknight treat, sharing this cake brings warmth and connection to your table. So, grab those ingredients, unleash your inner baker, and let this delightful dessert work its magic in your kitchen!
PrintChocolate Almond Layer Cake: Indulge in This Delight!
Delicious and rich Chocolate Almond Layer Cake, perfect for celebrations and indulgent treats.
- Prep Time: 20 minutes
- Cook Time: 35 minutes
- Total Time: 1 hour 55 minutes
- Yield: 12 servings 1x
- Category: Dessert
- Method: Baking
- Cuisine: American
- Diet: Vegetarian
Ingredients
- 1 3/4 cups all-purpose flour
- 3/4 cup unsweetened cocoa powder
- 2 tsp baking powder
- 1/2 tsp baking soda
- 1/2 tsp salt
- 1 cup unsalted butter, softened
- 1 3/4 cups granulated sugar
- 4 large eggs
- 1 tsp vanilla extract
- 1/2 tsp almond extract
- 1 cup buttermilk
- 1/2 cup hot water or hot coffee
- 1 cup semi-sweet chocolate chips (optional)
- 1 cup unsalted butter (for frosting), softened
- 3 cups powdered sugar
- 1/2 cup unsweetened cocoa powder (for frosting)
- 2–4 tbsp milk or cream (for frosting)
- 1/2 tsp almond extract (for frosting)
- Toasted sliced almonds (for garnish)
Instructions
- Preheat oven to 350°F (175°C). Grease and flour two 9-inch round cake pans.
- In a bowl, whisk together flour, cocoa powder, baking powder, baking soda, and salt.
- In a large bowl, cream butter and sugar until light and fluffy.
- Beat in eggs one at a time, then add vanilla and almond extracts.
- Alternately add dry ingredients and buttermilk, mixing just until combined. Stir in hot water or coffee, then fold in chocolate chips if using.
- Divide batter evenly between pans. Bake 30–35 minutes, or until a toothpick inserted in the center comes out clean.
- Cool cakes in pans 10 minutes, then turn out onto wire racks to cool completely.
- To make frosting: Beat butter until smooth. Add powdered sugar, cocoa powder, almond extract, and enough milk to reach desired consistency. Beat until fluffy.
- Assemble the cake by spreading frosting between layers and over the top and sides.
- Garnish with toasted almonds along the edges or on top.
Notes
- Hot coffee enhances the chocolate flavor but can be replaced with hot water.
- Toasted almonds add crunch and flavor—toast them lightly in a dry pan or oven.
- Chill the cake before slicing for cleaner cuts.
- Frosting can be made ahead and refrigerated for up to 3 days.
Nutrition
- Serving Size: 1 slice
- Calories: 430
- Sugar: 38g
- Sodium: 220mg
- Fat: 22g
- Saturated Fat: 12g
- Unsaturated Fat: 8g
- Trans Fat: 0g
- Carbohydrates: 52g
- Fiber: 3g
- Protein: 6g
- Cholesterol: 85mg