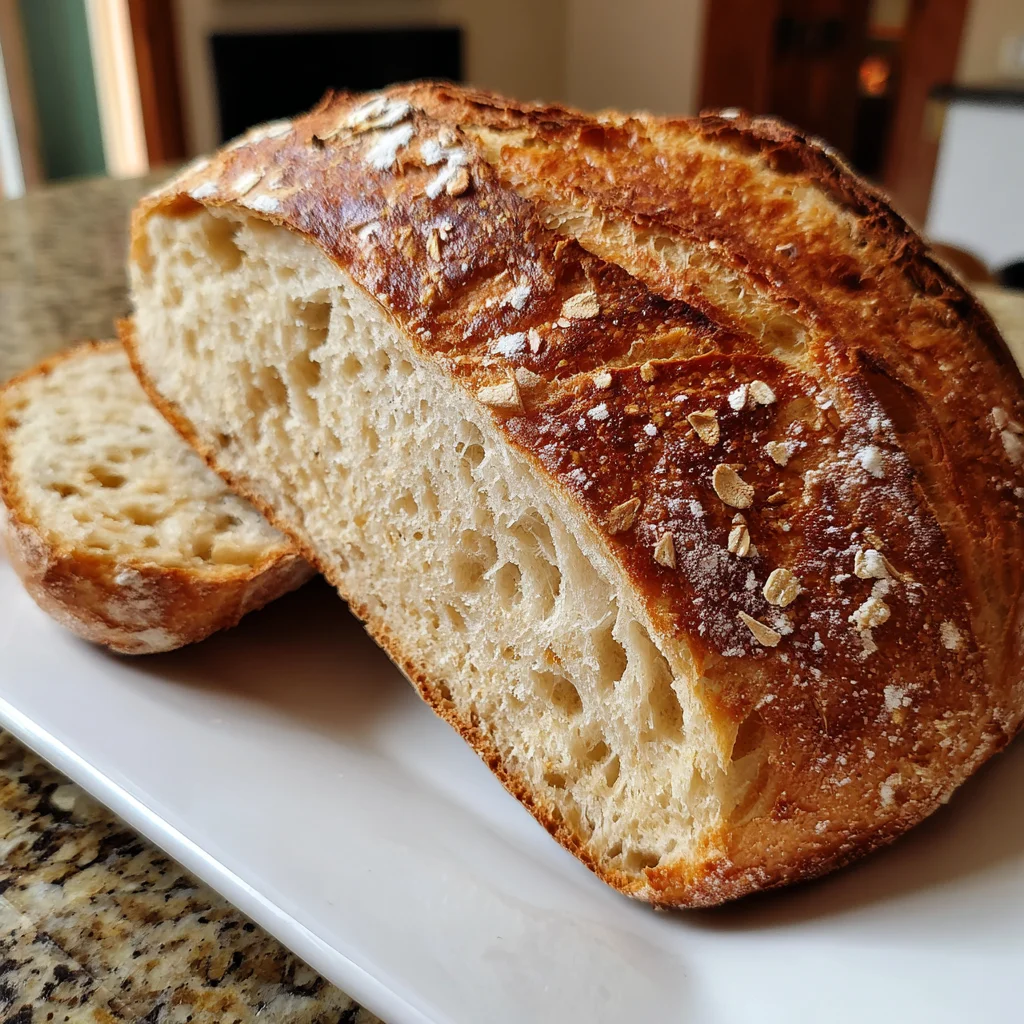
Introduction to Honey Oat Sourdough Bread
As a busy mom and passionate home cook, I know how important it is to have a bread recipe that feels special yet is manageable. That’s where this Honey Oat Sourdough Bread comes in. Imagine waking up to the aroma of freshly baked bread wafting through your kitchen, with a comforting mix of sweetness from honey and the heartiness of oats. It’s perfect for sandwiches, toast, or simply enjoying with a pat of butter. Plus, it’s vegan, so it fits into many diets. Let’s dive into this delightful journey of baking!
Why You’ll Love This Honey Oat Sourdough Bread
This Honey Oat Sourdough Bread is not just a recipe; it’s a celebration of home baking that brings families together. It’s surprisingly easy to make, and the taste? Oh, it’s simply divine! The combination of sweet honey and hearty oats results in a flavor that dances on your taste buds. Whether you’re a seasoned baker or a novice, this recipe simplifies the art of baking, making it a joy instead of a chore.
Ingredients for Honey Oat Sourdough Bread
Gathering the right ingredients is key to creating a delicious Honey Oat Sourdough Bread. Here’s what you’ll need:
- Bread Flour: This is the foundation of your loaf, giving it strength and structure.
- Sourdough Starter: Your secret weapon! It adds that signature tang and helps the bread rise beautifully.
- Salt: Enhances flavor and strengthens the dough’s gluten.
- Water: Vital for hydration and activating the flour. Use filtered water for the best results.
- Honey: Sweetens the bread, balancing the sour notes from the starter. Maple syrup can be a great substitute for a different flavor.
- Rolled Oats: Adds texture and nutty flavor. For a twist, consider adding seeds or nuts.
- Extras for Topping: Additional oats create an appealing crust. You can also use seeds like sesame or flax for an extra crunch.
If you’re feeling adventurous, consider adjusting the proportions to suit your taste. Remember, exact measurements can be found at the bottom of the article for easy printing!

How to Make Honey Oat Sourdough Bread
Baking your own Honey Oat Sourdough Bread may appear daunting, but I promise it’s easier than it looks! Let’s break it down into manageable steps, each filled with helpful tips to guide you. With a little patience, you will create a loaf that will impress everyone, including yourself!
Step 1: Combine Ingredients
Start by combining your sourdough starter, water, and bread flour in a large mixing bowl. Using a wooden spoon, mix everything until it becomes too sticky to handle with the spoon. It’s totally fine if the dough looks shaggy—that’s how it’s supposed to be!
Step 2: Autolyse Method
Now, let the mixture sit for about an hour. This process is called autolyse. It allows the flour to absorb the water fully, developing the gluten and making it easier to work with later. Your kitchen will smell a bit like fresh-baked bread already!
Step 3: Mix in Salt, Honey, and Oats
After letting it rest, sprinkle in the salt, honey, and oats. Mix again until well incorporated. This blend adds flavor and texture, creating the unique character of your Honey Oat Sourdough Bread that you’ll love!
Step 4: Stretch and Fold Technique
Next, it’s time to work that dough! Perform the first stretch and fold of the dough by gently lifting and folding it over itself. Do this process every 30 minutes for a total of 3 to 4 times. It strengthens the dough—think of it as giving it a mini workout!
Step 5: First Rise
Once your dough has doubled in size, it’s time to shape it! Keep it covered and find a warm spot in your kitchen for it to rise. This rising phase is crucial; it develops that delightful airy texture in your bread.
Step 6: Shape the Dough
Once your dough has grown, shape it into a ball. To do this, gently turn it onto a floured surface and create surface tension by pulling the top down and tucking the edges underneath. This step is key for a nice round loaf!
Step 7: Refrigerate Overnight
Transfer your shaped dough into a floured bowl or bread banneton. Cover it with plastic wrap and refrigerate for at least 12 hours. This overnight chill not only enhances flavors but also makes it easier to score the dough later.
Step 8: Preheat the Oven
When you’re ready to bake, preheat your oven to 425°F (220°C). The right temperature is essential for that perfect crust. While the oven heats, you’ll also have time to get your next steps ready.
Step 9: Prepare for Baking
Carefully flip the dough onto a piece of parchment paper. Gently spray it with water, and sprinkle some oats on top. This is where the magic happens! You can even add slits or designs on the dough. It helps the bread expand beautifully as it bakes.
Step 10: Bake the Bread
Now comes the exciting part! Place your dough (on the parchment) into a hot Dutch oven, cover it with the lid, and bake for 35 minutes. Around the 30-minute mark, check on it. If it’s not golden, leave it to bake uncovered for an additional 15 to 20 minutes.
Step 11: Cooling Process
Once your bread is golden brown, remove it from the oven and let it cool completely on a wire rack. This cooling phase is essential! Yes, the smell will tempt you, but patience pays off when slicing into a well-set loaf!
Tips for Success
- Use filtered water for best results; it can enhance the flavor of your Honey Oat Sourdough Bread.
- Keep dough covered during rising to prevent it from drying out.
- Measure your ingredients accurately—baking is a science!
- For a crunchier crust, place ice cubes in the oven during the first 10 minutes of baking.
- Be patient! The longer chilling time helps develop the flavors.
Equipment Needed
- Mixing Bowl: A large one is ideal. You can also use a plastic container.
- Wooden Spoon: Perfect for mixing. A sturdy spatula works too.
- Bread Banneton: Helps shape your dough. A regular bowl dusted with flour will do.
- Dutch Oven: Essential for baking. A heavy oven-safe pot can be a substitute.
- Wire Rack: For cooling your bread. A cutting board can work in a pinch.
Variations
- Nutty Delight: Add chopped nuts like walnuts or pecans for an extra crunch and flavor boost.
- Seed Toppers: Mix in pumpkin seeds or sunflower seeds into the dough for added texture and nutrition.
- Dried Fruits: Incorporate raisins, cranberries, or chopped dried apricots for a touch of sweetness.
- Herb Infusion: Experiment with fresh herbs—like rosemary or thyme— to give your bread a savory twist.
- Whole Wheat Blend: Substitute half of the bread flour with whole wheat flour for a heartier loaf packed with fiber.
Serving Suggestions
- Classic Spread: Serve slices warm with butter or a drizzle of honey.
- Breakfast Delight: Pair with fresh fruit and a cup of herbal tea for a comforting breakfast.
- Sandwich Wonder: Use it to make hearty sandwiches filled with your favorite ingredients.
- Charcuterie Board: Slice and display on a charcuterie board with cheeses and olives for an elegant appetizer.
- Soup Companion: Enjoy alongside a bowl of your favorite soup for a complete meal.
FAQs about Honey Oat Sourdough Bread
As I’ve baked my share of this Honey Oat Sourdough Bread, I’ve come across a few questions that often pop up. Let’s tackle them together, shall we?
Can I use a different sweetener instead of honey?
Absolutely! Maple syrup or agave nectar works beautifully in this recipe, giving your bread its own unique flavor while still maintaining that wonderful sweetness.
What should I do if my bread is too dense?
If your loaf turns out dense, it might need more time to rise during the first stage. Additionally, ensure your sourdough starter is active and bubbly, as this key ingredient helps the loaf rise properly.
How can I store leftover Honey Oat Sourdough Bread?
To keep your bread fresh, store it in a paper bag or wrapped in a clean kitchen towel. Avoid plastic, as it can make the crust soggy. You can also slice and freeze it for up to three months for easy future toast!
Can I use whole wheat flour in this recipe?
Yes, you can! Substituting half of the bread flour with whole wheat flour gives your Honey Oat Sourdough Bread added fiber and a heartier texture, which many find delightful.
Why is my sourdough bread sticking to the banneton?
If your dough sticks to the banneton, try dusting it more generously with flour before placing your shaped dough inside. A well-floured banneton makes a world of difference in preventing sticky situations!
Final Thoughts
Baking this Honey Oat Sourdough Bread is more than just a task; it’s a delightful experience that fills your home with warmth and tantalizing aromas. Each slice tells a story of your culinary journey, creating memories around the table with loved ones. The sweet, nutty flavor pairs beautifully with anything, whether it’s breakfast or dinner. Plus, it’s a lovely way to embrace the art of baking without feeling overwhelmed. Trust me, the smiles and satisfaction from your family will be the best reward. So roll up your sleeves, and let the magic of homemade bread begin!
PrintHoney Oat Sourdough Bread: Discover the Perfect Recipe!
This Honey Oat Sourdough Bread is a delicious artisanal loaf with a blend of bread flour, oats, and honey, resulting in a crusty exterior and a soft, flavorful interior.
- Prep Time: 1 hour
- Cook Time: 35 minutes (plus 15-20 minutes if needed)
- Total Time: Approximately 13-14 hours (including resting times)
- Yield: 1 large loaf or 2 smaller loaves 1x
- Category: Bread
- Method: Baking
- Cuisine: Artisan
- Diet: Vegan
Ingredients
- 625 grams bread flour (about 4 cups)
- 100 grams active sourdough starter (about 1 cup)
- 10 grams salt (about 1 3/4 teaspoon)
- 450 grams water (about 1 1/2 cup)
- 30 grams honey
- 50 grams rolled oats (extra for topping)
Instructions
- Combine sourdough starter, water, and flour in a large mixing bowl. Mix with a wooden spoon until the mixture is too sticky to manage with a spoon.
- Let the mixture sit for one hour (autolyse stage).
- Add salt, honey, and oats to the mixture and let it sit for another 30 minutes.
- Perform the first stretch and fold or coil fold of the dough. Repeat this every 30 minutes for a total of 3-4 times.
- Once the dough has doubled in size, shape it into a ball and create surface tension.
- Transfer the shaped dough into a floured bowl or a bread banneton, cover with plastic wrap, and refrigerate for at least 12 hours.
- Preheat your oven to 425°F (220°C) and prepare a parchment paper.
- Gently flip the dough onto the parchment paper, spray it with water, and sprinkle oats on top.
- Make slits or designs on the dough to allow it to rise properly during baking.
- Place the dough with the parchment paper into a hot Dutch oven, cover with the lid, and bake for 35 minutes.
- Check the bread around 30 minutes. If needed, bake uncovered for an additional 15-20 minutes until golden brown.
- Remove from the oven and let it cool completely on a rack before slicing.
Notes
- Plan for the bread-making process to include at least 12 hours in the fridge and 3 hours on the countertop.
- Using a bread banneton helps maintain dough shape and texture.
- Keep dough covered while it rests to prevent drying.
- Use ice cubes to enhance the crust texture during baking if desired.
Nutrition
- Serving Size: 1 slice
- Calories: 180
- Sugar: 3g
- Sodium: 150mg
- Fat: 2g
- Saturated Fat: 0g
- Unsaturated Fat: 1g
- Trans Fat: 0g
- Carbohydrates: 33g
- Fiber: 2g
- Protein: 6g
- Cholesterol: 0mg