Introduction to Tasty Whoopie Pies
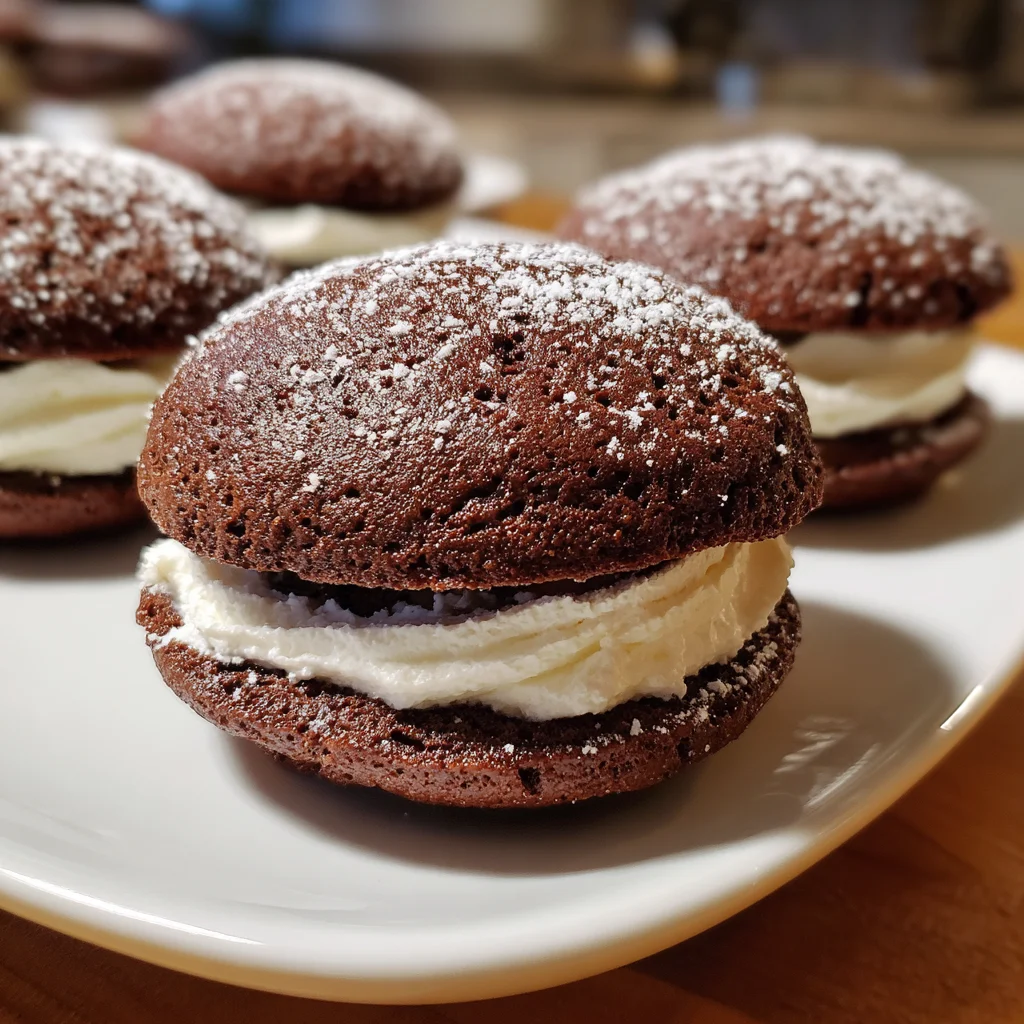
There are days when nothing short of a sweet escape will do, and that’s where these Tasty Whoopie Pies come in! Picture two irresistibly soft chocolate cakes, lovingly wrapped around a fluffy marshmallow filling. Whether you’re rushing to meet deadlines or simply trying to soothe those post-school snack cravings, this delightful treat is your perfect ally. With minimal fuss and maximum taste, whoopie pies are a fantastic way to impress your loved ones or treat yourself after a long day. Trust me, once you make these, they’ll quickly become your go-to dessert!
Why You’ll Love This Tasty Whoopie Pies
Tasty Whoopie Pies are not just a treat; they’re a celebration of simplicity and flavor. In just a little over an hour, you can whip up a batch that’ll leave everyone asking for seconds. These pillowy delights are easy to customize, making them perfect for any occasion. Plus, they resonate with nostalgic flavors that will remind you of childhood. With every bite, you’re not just tasting dessert; you’re tasting happiness!
Ingredients for Tasty Whoopie Pies
Are you ready to gather some tasty essentials? Let’s look at what you’ll need to make these delightful whoopie pies! Here’s a breakdown of the ingredients:
- All-purpose flour: This forms the base of our chocolate cakes, giving them structure and softness.
- Dutch-process cocoa powder: It deepens the chocolate flavor while adding a rich, dark color to our whoopie pies.
- Baking soda: This leavening agent causes the cakes to rise and become fluffy and airy.
- Fine sea salt: A little salt enhances sweetness and balances flavors beautifully.
- Unsalted butter: The star for our batter; it adds moisture and a rich buttery flavor.
- Dark brown sugar: Not just for sweetness, it lends a lovely caramel depth to the cakes.
- Egg: This acts as a binder, helping to hold our ingredients together while providing richness.
- Vanilla extract: A must-have for adding aromatic sweetness to both the cakes and the filling.
- Buttermilk: It adds tang and moisture, contributing to a tender crumb in the cakes.
- Marshmallow crème: The pièce de résistance! This fluffy filling makes each bite a soft, sweet wonder.
- Powdered sugar: It sweetens our filling perfectly and gives it that desirable smooth texture.
- Optional flavors: Feel free to spice things up with a pinch of cinnamon or a splash of almond extract for added warmth and complexity!
Now, I’ve made sure to share the exact quantities for each ingredient at the bottom of the article, so you can easily print them out. Ready to bring these tasty whoopie pies to life? Let’s move on to the fun part!

How to Make Tasty Whoopie Pies
Creating Tasty Whoopie Pies is like embarking on a mini baking adventure! Follow these simple steps, and you’ll soon be enjoying delightful bites of chocolatey goodness. Let’s dive in!
Step 1: Preheat the Oven
First things first, crank that oven up to 375°F (190°C). This ensures our cakes have the right heat to rise beautifully. While it’s warming up, you can get everything else ready. Multitasking is key, right?
Step 2: Prepare the Dry Ingredients
In a medium bowl, sift together the all-purpose flour, Dutch-process cocoa powder, baking soda, and fine sea salt. Sifting is essential; it avoids clumps and gives your cakes a lighter texture. Set this dry mixture aside for later.
Step 3: Mix the Wet Ingredients
In your electric mixer bowl, beat the unsalted butter and dark brown sugar on low speed until they blend, about 1 minute. Amp up the speed to medium-high and continue mixing for about 3 minutes until it’s light and fluffy. Now, add in the egg and vanilla extract, mixing for another 3 minutes. The smell will whisk you away to dessert heaven!
Step 4: Combine Dry and Wet Ingredients
Now it’s time to combine! Add half of the dry mixture and half of the buttermilk to the butter mixture. Mix on low speed until just combined. Repeat with the remaining dry and wet ingredients. The batter should be fluffy and ready to shine!
Step 5: Scoop and Bake
Using a medium (1 ½-tablespoon) scoop, drop mounds of batter onto your prepared baking sheets. Leave about 2 inches between each mound to allow for spreading. Bake for 11 minutes. A little tip: check them a minute early to avoid overbaking. You want them to spring back when gently pressed!
Step 6: Cool the Cakes
Once baked, let the cakes cool on the pans for 5 minutes. Then, carefully transfer them to a wire rack to cool completely. Resist the urge to sneak a bite; patience is key here!
Step 7: Make the Marshmallow Filling
While the cakes are cooling, take a clean mixer bowl to whip up the filling. Beat the marshmallow crème and unsalted butter on low speed until smooth. Next, add the powdered sugar, vanilla extract, and sea salt. Mix until everything is incorporated and luscious. You might find yourself wanting to eat this filling straight from the bowl!
Step 8: Assemble the Whoopie Pies
Now for the fun! Dollop marshmallow filling onto the flat side of half of your cooled cakes. Top with another cake, pressing gently to form a delightful sandwich. Each one is a tiny hug for your taste buds!
Step 9: Chill (Optional)
If you’re planning to transport your whoopie pies or just want a fudgier texture, chill them in the fridge for at least an hour. This step is optional, but oh-so-rewarding!
Tips for Success
- Check your cookies a minute early to prevent them from becoming dry.
- When measuring flour, spoon it into the measuring cup and level off for accuracy.
- Use room temperature ingredients for a smoother batter.
- Don’t overmix the batter; mix just until combined for tender cakes.
- Try different fillings—peanut butter or cream cheese frosting work wonders!
Equipment Needed
- Electric mixer: A stand mixer works wonders, but a handheld mixer is a great alternative.
- Mixing bowls: Use medium and large bowls for mixing ingredients; any size will do.
- Baking sheets: Sheet pans are perfect; just ensure they’re lined with parchment paper.
- Scoop: A medium ice cream scoop helps portion the batter evenly; a spoon can work in a pinch.
- Wire rack: Essential for cooling; you can also use a plate if you don’t have one.
Variations for Tasty Whoopie Pies
- Peanut Butter Whoopie Pies: Replace the marshmallow filling with creamy peanut butter frosting for a nutty twist.
- Red Velvet Whoopie Pies: Substitute the cocoa powder with red velvet cake mix for a festive touch. Use cream cheese frosting inside for a classic pairing!
- Gluten-Free Version: Use a gluten-free all-purpose flour blend to make these tasty treats suitable for gluten-sensitive folks.
- Mini Whoopie Pies: Scale down the batter to make bite-sized versions—perfect for parties or snacks!
- Flavorful Additions: Stir in a teaspoon of espresso powder or a sprinkle of cinnamon for a warm, aromatic flavor boost.
- Dairy-Free Option: Use coconut or almond milk instead of buttermilk and a dairy-free butter substitute for a vegan-friendly treat!
Serving Suggestions for Tasty Whoopie Pies
- With a Glass of Milk: The classic pairing of whoopie pies with cold milk makes for a delightful treat.
- Serve with Coffee: A cup of coffee enhances the chocolate flavor, creating a delightful afternoon snack.
- Presentation: Arrange them on a decorative platter, dusted with powdered sugar for a touch of elegance.
- Ice Cream Sandwich: For an indulgent twist, sandwich your favorite ice cream between two whoopie pies!
- Fruit Side: Serve with fresh berries to balance the sweetness and add a refreshing touch.
FAQs about Tasty Whoopie Pies
Got questions about these delightful Tasty Whoopie Pies? I’ve got answers! Here are some common inquiries you might have while baking these scrumptious treats.
Can I make Tasty Whoopie Pies ahead of time?
Absolutely! These tasty treats can be baked ahead of time and stored in an airtight container. You can assemble them just before serving for the freshest taste.
How do I store leftover Whoopie Pies?
Store any leftovers in an airtight container at room temperature for up to 3 days. If you want to keep them longer, consider refrigerating to maintain freshness.
Can I freeze Whoopie Pies?
Yes, you can freeze baked whoopie pies without the filling for up to 3 months. When ready to enjoy, simply thaw at room temperature and fill them with the marshmallow crème!
What can I use instead of marshmallow crème?
If marshmallow crème isn’t your thing, you can use buttercream frosting or whipped cream as a delicious alternative. Just be sure to adjust sweetness to taste!
Can I add flavors to the filling?
Absolutely! Feel free to mix in flavors like almond extract, cocoa powder, or even crushed candy for a unique twist on the marshmallow filling.
Final Thoughts
Baking these Tasty Whoopie Pies isn’t just about creating a delicious dessert; it’s about bringing joy to your kitchen and smiles to your loved ones. There’s something magical about the process—the merging of chocolatey batter and fluffy marshmallow filling—that takes me back to simpler times. Each bite feels like a warm hug, perfect for sharing during family gatherings or a cozy night in. I genuinely hope you find as much happiness in making these as I do. So roll up your sleeves and dive into this delightful adventure; you won’t regret it!
PrintTasty Whoopie Pies: Irresistibly Soft and Sweet Treats!

Tasty Whoopie Pies are irresistibly soft and sweet treats that consist of two chocolate cakes filled with fluffy marshmallow filling.
- Prep Time: 20 minutes
- Cook Time: 11 minutes
- Total Time: 1 hour 20 minutes
- Yield: 12 to 15 whoopie pies 1x
- Category: Dessert
- Method: Baking
- Cuisine: American
- Diet: Vegetarian
Ingredients
- 1 2/3 cups all-purpose flour
- 2/3 cup Dutch-process cocoa powder
- 1 1/2 tsp baking soda
- 1/2 tsp fine sea salt
- 1 stick unsalted butter (4 oz), cool room temperature
- 1 cup dark brown sugar, lightly packed
- 1 large egg, room temperature
- 1 tsp vanilla extract
- 1 1/4 cups buttermilk, room temperature
- 297 grams marshmallow creme (just under 13 oz)
- 15 tbsp unsalted butter (about 7.5 oz), cool room temperature
- 1 cup plus 2 tbsp powdered sugar, sifted
- 1 1/2 tbsp vanilla extract
- 1/2 tsp fine sea salt
Instructions
- Preheat your oven to 375°F (190°C). Line large baking sheets with parchment paper to prevent the whoopie pies from sticking.
- Sift the all-purpose flour, cocoa powder, baking soda, and salt into a medium bowl. Set aside.
- In an electric mixer bowl, beat the unsalted butter and dark brown sugar on low speed until combined, then increase to medium-high and beat for about 3 minutes until light and fluffy. Scrape down the sides and add the egg and vanilla extract, mixing for another 3 minutes.
- Add half of the dry ingredient mixture and half of the buttermilk to the butter mixture, mixing on low speed until just combined. Repeat with the remaining ingredients until the batter is fluffy.
- Use a medium (1 ½-tablespoon) scoop to drop mounds of batter onto the prepared baking sheets, leaving about 2 inches between each mound. Bake for 11 minutes or until they spring back when pressed gently.
- Let the cakes cool on the pans for 5 minutes before transferring to a wire rack to cool completely.
- In a clean mixer bowl, beat the marshmallow creme and unsalted butter on low speed until smooth. Scrape down the sides, add powdered sugar, vanilla extract, and sea salt, then mix until incorporated and smooth.
- Dollop marshmallow filling onto the flat side of half of the cooled cakes. Top with another cake to form a sandwich, pressing gently.
- If transporting or for a fudgier texture, chill the assembled whoopie pies in the fridge for at least an hour before serving.
Notes
- Check cookies a minute early to prevent overbaking.
- For a fuller flavor, consider adding a pinch of extra salt to the filling.
- Chilling the whoopie pies enhances their texture.
Nutrition
- Serving Size: 1 whoopie pie
- Calories: 220
- Sugar: 15g
- Sodium: 120mg
- Fat: 9g
- Saturated Fat: 5g
- Unsaturated Fat: 3g
- Trans Fat: 0g
- Carbohydrates: 30g
- Fiber: 1g
- Protein: 2g
- Cholesterol: 20mg