Introduction to Candy Corn Pudding Cups
With fall in the air and schedules getting busier with the approach of Halloween, it is definitely time for something fun to be prepared – Candy Corn Pudding Cups: a festive flavored dessert to bring the spirit of the holiday onto every spoon. This three-colored pudding is not just attractive, but a lifeline on a busy day. I mean, who doesn’t crack when they’re sweaty-palmed and knee-deep in costume wrappings and face paint at 5 pm deadline? This is an easy holiday treat that you are going to love!
Why You’ll Love This Candy Corn Pudding Cups
Let’s face it, life can be busy for sure! That’s why I love having this Candy Corn Pudding Cups recipe. Super simple to make without any baking involved and takes no time at all, just 20 minutes to be exact. The kiddos love the fun look of the colorful layers combined with smooth vanilla pudding – and so do the grown-ups. As if you needed another reason to make your day fun by indulging in a little candy corn!
Ingredients for Candy Corn Pudding Cups
Creating these Candy Corn Pudding Cups is a breeze with just a handful of ingredients. Here’s what you need to bring this festive dessert to life:
- Vanilla instant pudding: Two packages provide the creamy base for your cups. Instant pudding is a lifesaver, allowing for quick preparation with no cooking required.
- Cold milk: Six cups required for mixing with the pudding. While whole milk offers richness, feel free to use low-fat or almond milk for lighter options.
- Orange food coloring: Just a few drops are needed to achieve that cheerful orange layer. This is optional, but it definitely gives a festive touch!
- Cool Whip: An 8-ounce tub adds an airy, sweet topping that complements the pudding perfectly. You could substitute homemade whipped cream if you prefer.
- Candy corn: The star of the show! Use these deliciously sweet corn candies as a fun garnish. You can also replace them with any candy of your choice for a twist.
- Orange and yellow sanding sugar: This sugary sprinkle adds a touch of sparkle. It’s optional, but let’s be honest—who doesn’t love the extra bling?
- Clear plastic cups: These 9-ounce cups allow for beautiful layering and easy serving. Glass cups are also a lovely choice if you want to show off those vibrant layers.
For exact quantities of each ingredient, be sure to check the bottom of this article where you can find a printable version of the recipe!

How to Make Candy Corn Pudding Cups
Now that we have all our ingredients ready, let’s jump into the fun part! Making these Candy Corn Pudding Cups is a delightful experience that’s perfect for getting the kids involved. Here’s how to create these festive treats step by step.
Preparing the Pudding Mixture
First things first, let’s mix our pudding! Grab a large mixing bowl and pour in the two packages of vanilla instant pudding. Next, add the six cups of cold milk. Whisk everything together according to the package instructions. The result should be a smooth, creamy pudding.
Once your pudding is ready, divide it into two bowls. Pour 2 cups into one bowl and the remaining 4 cups into another. This division is key for creating those gorgeous colorful layers!
Color the Pudding
Now it’s time to make that eye-catching orange layer. In the bowl with 4 cups of pudding, add about 5 drops of orange food coloring. Mix thoroughly after each drop to see how the color develops. You’ll want that perfect pumpkin hue that screams Halloween!
Feel free to adjust the number of drops based on your preference. A deeper shade gives a more vibrant look, while less creates a lighter, pastel tone. Just remember to have fun with it!
Layering the Cups
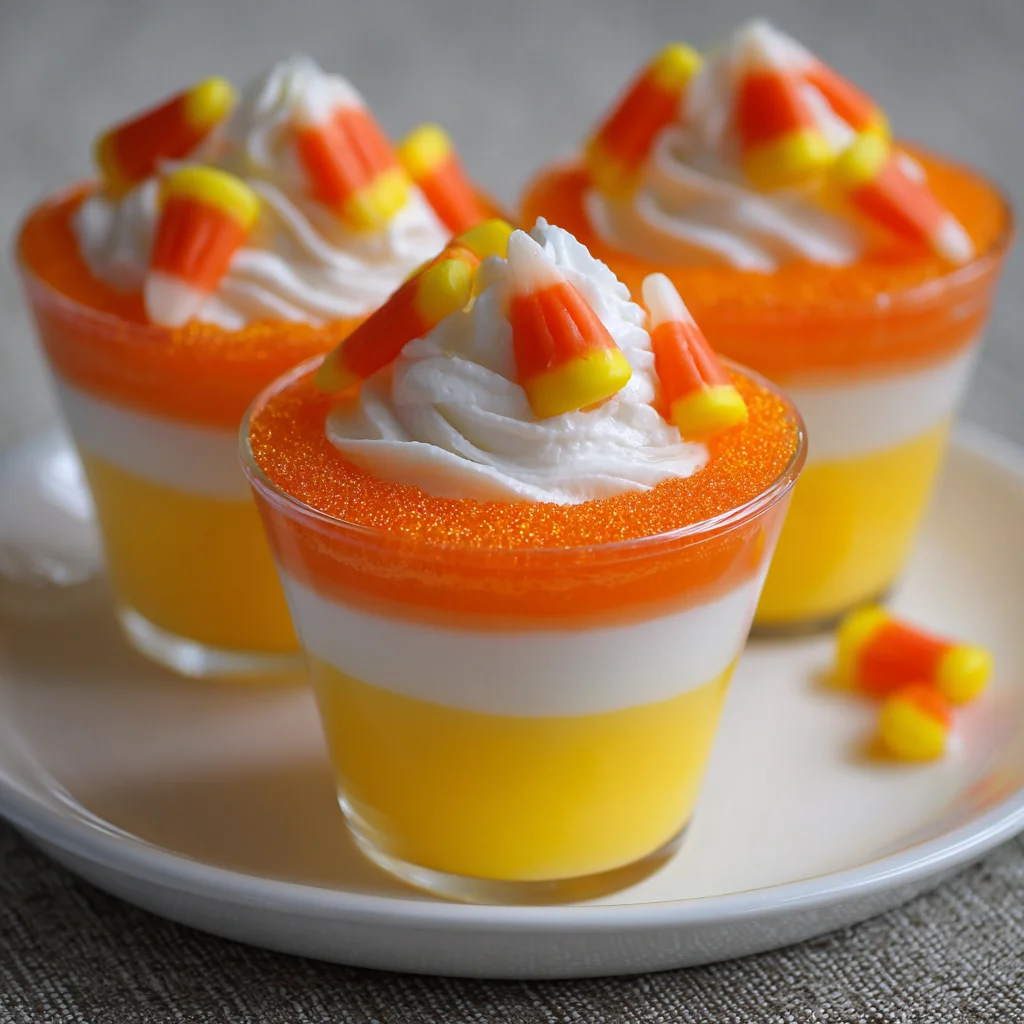
Let’s start layering! Grab your clear plastic cups (or glass ones if you’re feeling fancy). Begin by adding 4 spoonfuls of the yellow vanilla pudding at the bottom of each cup. This will be your base.
Next, on top of the yellow layer, carefully add 8 spoonfuls of the orange pudding. This ratio of approximately ⅓ yellow and ⅔ orange keeps it visually stunning. Take your time during this step to ensure straight lines for that layered effect!
Topping with Cool Whip
Now for the heavenly topping! Once you’ve added your pudding layers, grab your thawed Cool Whip. Spoon it generously on top of the orange pudding until it’s nice and fluffy. This creamy topping is the icing on the cake, enhancing the overall texture.
It creates a light cloud on top of all that vibrant color, making each cup look like a festive masterpiece!
Adding Festive Touches
Your final step is to sprinkle those delightful finishing touches! Scatter candy corn on top of the Cool Whip for that perfect crunch and sweetness. Don’t hold back here—it’s all about that Halloween appeal!
If you like, add a sprinkle of orange and yellow sanding sugar for some sparkle. This optional step gives your cups a festive glimmer, making them truly stand out. And just like that, your Candy Corn Pudding Cups are ready to impress!
Tips for Success
- Always whisk the pudding for a full two minutes to avoid lumps.
- Use a spatula to get the pudding into your cups neatly; it makes layering easier.
- Chill the cups for at least an hour before serving; it enhances flavor.
- Use different types of candy for variety if your family isn’t crazy about candy corn.
- Layering tools like silicone spatulas work great for smoothing out the pudding!
Equipment Needed
- Mixing bowls: Use two large bowls for easy mixing. A glass bowl works beautifully too.
- Whisk: A standard whisk will do; a hand mixer saves effort as well.
- Spoons: Grab a sturdy spoon for layering and scooping the pudding.
- Clear plastic cups: Ideal for showcasing layers. Feel free to use mason jars for a rustic twist.
- Spatula: Handy for spreading Cool Whip evenly on top!
Variations
- Chocolate Delight: Swap out vanilla pudding for chocolate instant pudding for a rich twist that’s sure to please any chocolate lover.
- Fruit Fiesta: Replace candy corn with seasonal fruits like mini marshmallows, gummy worms, or chopped strawberries for a lighter touch.
- Gluten-Free Option: Use gluten-free instant pudding mix and check the Cool Whip label for gluten-free certification to make this dessert friendly for all diets.
- Low-Sugar Version: Use sugar-free pudding mix and a reduced-calorie whipped topping to create a lightened-up treat everyone can enjoy.
- Layered Parfaits: Add layers of crushed graham crackers or crushed Oreos between pudding layers for added texture and flavor!
Serving Suggestions
- Pair your Candy Corn Pudding Cups with apple slices and caramel dip for a fun snack combo.
- For a festive drink, serve alongside chilled apple cider or a pumpkin spice latte.
- Display on a colorful Halloween-themed tray, topped with mini pumpkins for added flair.
- Consider using themed straws or spooky napkins to create a complete Halloween experience!
FAQs about Candy Corn Pudding Cups
Can I make Candy Corn Pudding Cups ahead of time?
Absolutely! These treats can be prepared a day in advance. Just keep them sealed in the fridge. It makes for a stress-free party prep!
How long do Candy Corn Pudding Cups last?
Stored in an airtight container, they’ll last about 5-7 days in the fridge, but I doubt they’ll stick around that long!
Can I use a different flavor of pudding?
Of course! Chocolate or banana pudding are great options for a tasty twist. Just keep in mind that the colors may differ.
What can I substitute for candy corn?
If candy corn isn’t your thing, consider mini marshmallows or chocolate chips. You could even use gummy candies for a fun texture change!
Is this recipe suitable for dietary restrictions?
Yes! You can easily adapt this recipe for gluten-free or low-sugar diets with appropriate substitutions. Just check the labels to ensure they meet your needs.
Final Thoughts
Creating Candy Corn Pudding Cups has been one of my beloved kitchen adventures, and I’m sure it’ll become a cherished memory for you too. These colorful, whimsical cups not only bring joy to our taste buds but also ignite the spirit of Halloween within our homes. They’re the perfect blend of nostalgia, fun, and festivity—showcasing how a simple dessert can bring families together. With each delightful spoonful, you’ll hear laughter and see smiles, making this an unforgettable treat that adds a special sparkle to the holiday season. Happy indulging, my fellow sweets enthusiasts!
PrintCandy Corn Pudding Cups: A Fun, Festive Treat!
Candy Corn Pudding Cups are a fun and festive treat perfect for any celebration, especially Halloween. These layered pudding cups feature vibrant colors and are topped with candy corn for a delightful presentation.
- Prep Time: 15 minutes
- Cook Time: 0 minutes
- Total Time: 15 minutes
- Yield: 7 cups 1x
- Category: Dessert
- Method: No-bake
- Cuisine: American
- Diet: Vegetarian
Ingredients
- 2 packages vanilla instant pudding 5.1-ounce each
- 6 cups cold milk
- Orange food coloring
- 8 ounces Cool Whip thawed
- Candy corn
- Orange and yellow sanding sugar
- 7 9-ounce clear plastic cups
Instructions
- In a large bowl, pour both packages of instant vanilla pudding mix and add the milk. Then mix according to package instructions. This will make 6 cups of pudding.
- Divide the pudding so there are 2 cups of pudding in one bowl and 4 cups of pudding in another.
- In the bowl with the 4 cups of pudding, add 5 drops of orange food coloring, mixing between each drop until desired orange color is achieved. No need to color the pudding in the other bowl.
- Then in a plastic cup, add 4 spoonfuls of the yellow vanilla pudding for the bottom layer. Then 8 spoonfuls of the orange-colored vanilla pudding for the second layer.
- The pudding ratio should be about ⅓ yellow and ⅔ orange, with a little extra room for the cool whip on top.
- Next, cover the top with the thawed cool whip.
- Finally, add candy corn and sanding sugar on top of the cool whip.
- Serve chilled or at room temperature.
- Store any leftover pudding in an airtight container for 5-7 days.
Notes
- This recipe can be easily doubled for larger gatherings.
- Ensure the pudding is well mixed to avoid lumps.
- Adjust the amount of food coloring based on your preference.
Nutrition
- Serving Size: 1 cup
- Calories: 220
- Sugar: 25g
- Sodium: 150mg
- Fat: 8g
- Saturated Fat: 4g
- Unsaturated Fat: 2g
- Trans Fat: 0g
- Carbohydrates: 34g
- Fiber: 0g
- Protein: 3g
- Cholesterol: 20mg