Introduction to Big Blue Bakery Cookies
Welcome to the vibrant world of Big Blue Bakery Cookies! As a busy mom, I know how challenging it can be to whip up an impressive treat without spending hours in the kitchen. That’s why I absolutely adore these cookies! They’re not only visually stunning with their beautiful hue, but they also combine delightful flavors that will impress everyone. Whether you’re hosting a gathering or just want a sweet pick-me-up after a long day, these cookies are the perfect go-to solution. Trust me, each bite of these colorful delights is a little moment of joy!
Why You’ll Love This Big Blue Bakery Cookies
These Big Blue Bakery Cookies are an absolute crowd-pleaser! First, they come together quickly, making them perfect for busy days. Plus, the combination of creamy white chocolate and crunchy cookie bits creates a burst of flavor that will have your taste buds dancing. And let’s not forget their stunning blue hue, which adds a fun twist to your cookie jar. They truly are a delightful treat that everyone will want!
Ingredients for Big Blue Bakery Cookies
Getting the ingredients ready for Big Blue Bakery Cookies is part of the fun! Here’s what you’ll need to turn your kitchen into a cookie haven:
- All-purpose flour: The foundation of your cookies, providing structure and chewiness.
- Baking soda: This is your leavening agent. It helps the cookies rise beautifully.
- Salt: Just a pinch enhances the sweetness and balances flavors.
- Unsalted butter: Adds richness and flavor; make sure it’s softened for easy mixing!
- Granulated sugar: To sweeten the dough and give those lovely edges a slight crispness.
- Light brown sugar: It brings moisture and a delicious caramel flavor. The combo with granulated sugar is key!
- Eggs: They bind the cookies together and add richness for a soft texture.
- Vanilla extract: This adds a warm, inviting flavor. Don’t skip it!
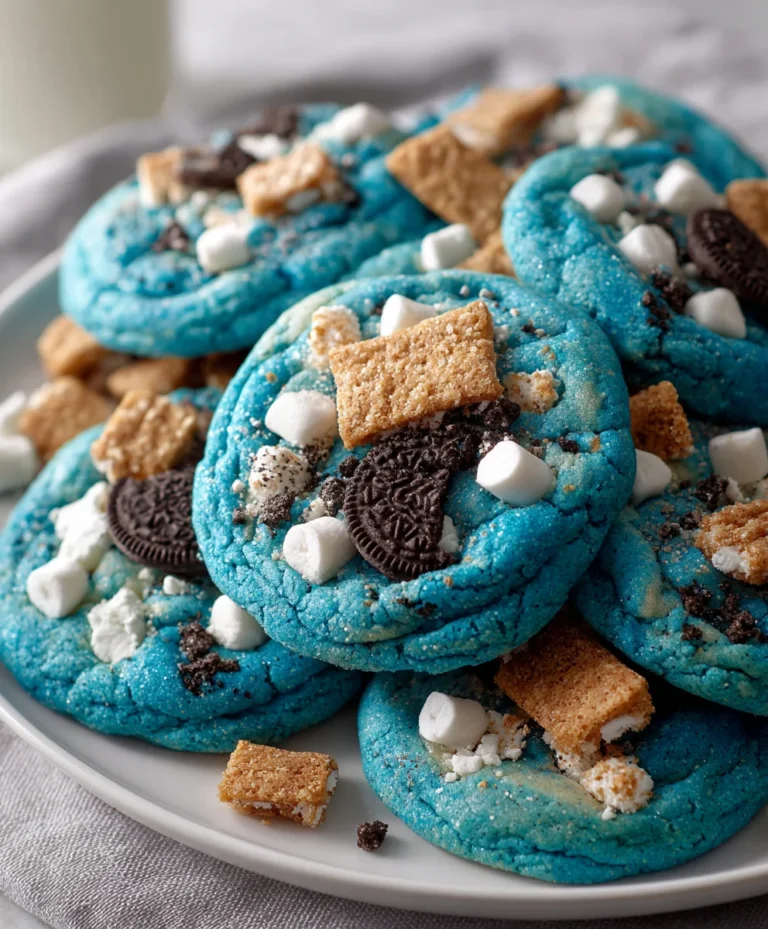
- Blue gel food coloring: A few drops create that signature blue color. Feel free to adjust according to your preference.
- White chocolate chips: They melt beautifully and provide a creamy sweetness.
- Crushed chocolate sandwich cookies: Think Oreos! They add a delightful crunch and extra chocolatey flavor.
- Crushed square breakfast cereal: This adds a fun texture and a nod to that childhood crunch.
If you’re looking for alternatives, you can swap the white chocolate for dark chocolate or use coconut oil instead of butter for a dairy-free treat. For exact quantities of each ingredient, check the bottom of the article; they’re available for easy printing!
How to Make Big Blue Bakery Cookies
Now that we have our ingredients ready, let’s dive into the fun part—making those scrumptious Big Blue Bakery Cookies! Follow these simple steps, and you’ll have a delightful treat in no time.
Step 1: Preheat and Prepare
First things first, let’s set the stage for cookie magic! Preheat your oven to 375°F (190°C). While it’s warming up, line your baking sheets with parchment paper. This prevents sticking and makes cleanup easy. Trust me, parchment paper is a mom’s best friend when baking!
Step 2: Mix Dry Ingredients
In a medium bowl, whisk together the all-purpose flour, baking soda, and salt. This step is vital—it ensures your leavening agent is evenly distributed, helping your cookies rise just right. Make sure there are no lumps! This is where the cookie journey truly begins.
Step 3: Cream Butter and Sugars
In a large bowl, grab your softened unsalted butter. Beat it together with granulated sugar and light brown sugar until the mixture is light and fluffy. This creaming method is key for texture, lending a tender quality to your cookies. You’ll know it’s ready when it looks pale and airy. Just think of it as giving your butter a little spa treatment!
Step 4: Add Eggs and Flavorings
Now it’s time to incorporate the eggs, adding them one at a time. Make sure to mix well after each addition for a smooth batter. Stir in your vanilla extract and the blue gel food coloring. This is where the magic happens! Keep mixing until your dough is a lovely uniform blue. It’s like bringing a little joy to your kitchen!
Step 5: Combine Mixtures
Gently add the dry ingredient mix to the wet ingredients. Here’s a tip: mix on low speed to avoid a flour cloud in your kitchen. You want to combine everything just until incorporated; over-mixing can lead to tough cookies. We’re aiming for soft and chewy here!
Step 6: Fold in Extras
Now for the fun part—folding in the white chocolate chips, crushed chocolate sandwich cookies, and crushed square breakfast cereal. Make sure they’re distributed evenly throughout the dough. Each bite should explode with flavor! Just imagine that delightful crunch up against creamy chocolate.
Step 7: Chill the Dough
Cover that beautiful dough tightly with plastic wrap and stick it in the refrigerator for at least 30 minutes. I know, it’s tough waiting, but this step is crucial! Chilling solidifies the butter, helping the cookies maintain their shape while baking. You want thick, chewy goodness, right?
Step 8: Bake the Cookies
Scoop out the chilled dough using a 2-tablespoon cookie scoop, or roll them into 1.5-inch balls. Place them about 2 inches apart on the prepared baking sheets. Bake in your preheated oven for 10-12 minutes. The edges should look lightly golden while the centers remain soft. Keep an eye on them—nobody wants burnt cookies!
Step 9: Cooling Time
Once you pull those beauties from the oven, let them cool on the baking sheets for about 5 minutes. This is critical as they continue to bake a little on the sheet. After they’ve set, transfer the cookies to a wire rack to cool completely. Ah, the scent of fresh cookies cooling down is pure bliss!
Tips for Success
- Always use softened butter for easy blending and a light texture.
- Measure flour correctly—spoon it into the cup, then level it off to avoid dense cookies.
- Don’t skip chilling the dough; it’s the secret to thick and chewy cookies.
- Rotate the baking sheets halfway through baking for even cooking.
- Experiment with colorful sprinkles for an extra festive touch!
Equipment Needed
- Baking sheets: You can use regular or insulated sheets for this recipe.
- Parchment paper: If you don’t have this, a silicone baking mat works great.
- Mixing bowls: A medium and a large bowl will do the trick.
- Electric mixer: A hand mixer is a perfect option if you don’t have a stand mixer.
- Cookie scoop: A tablespoon can work as a handy alternative.
Variations of Big Blue Bakery Cookies
- Chocolate Lovers: Swap half of the white chocolate chips for dark chocolate chips for a richer flavor.
- Nutty Addition: Fold in 1 cup of chopped nuts such as pecans or walnuts for a delightful crunch.
- Gluten-Free Option: Use a gluten-free flour blend instead of all-purpose flour for a gluten-free treat.
- Vegan Version: Replace the butter with coconut oil and use flax eggs in place of regular eggs for a vegan option.
- Funfetti Style: Add colorful sprinkles to the dough before baking for a festive touch perfect for celebrations.
Serving Suggestions for Big Blue Bakery Cookies
- Pair these cookies with a tall glass of milk for a classic treat.
- Serve alongside a scoop of vanilla ice cream for an indulgent dessert.
- Present on a colorful platter to make them pop at gatherings.
- Offer with brewed coffee or tea for a delightful afternoon snack.
- For special occasions, wrap them in clear bags tied with a ribbon for a sweet gift!
FAQs about Big Blue Bakery Cookies
Let’s tackle some of the burning questions you might have about these scrumptious Big Blue Bakery Cookies! After all, a little extra information can go a long way in making your baking adventure even more enjoyable.
Can I use different colors of food coloring?
Absolutely! Feel free to experiment with different colors to match the occasion. Just remember to use gel food coloring for vibrant results. It’s like giving your cookies a personality!
How should I store the cookies?
I recommend storing the cookies in an airtight container at room temperature. They’ll stay delicious for about a week, but let’s be honest—they probably won’t last that long!
Can I freeze the dough for later use?
Yes, you can! Just wrap the dough tightly in plastic wrap and store it in the freezer. It will keep for up to three months. When you’re ready to bake, thaw it in the fridge overnight.
Why did my cookies spread too much?
Over-mixing the dough or not chilling it long enough can result in cookies that spread too much. Remember, chilling is key to keeping those thick and chewy cookies intact!
Are these cookies suitable for kids?
Absolutely! Kids love the fun color and flavors. Just be cautious with younger ones and the food coloring; a little goes a long way!
Final Thoughts
Making Big Blue Bakery Cookies is truly an adventure filled with joy and creativity. From the moment you mix the ingredients to the delightful aroma wafting through your kitchen, each step is a reminder of the happiness baking brings. These cookies aren’t just visually striking; they are a treat that sparks smiles and satisfies cravings. Whether enjoyed as a mid-afternoon pick-me-up or at a lively gathering, each bite invites you to savor the moment. I hope you find as much joy in baking and sharing them as I do. Happy baking!
PrintBig Blue Bakery Cookies

Big Blue Bakery Cookies are a delicious treat featuring a striking blue color and a delightful mix of flavors including white chocolate and crushed cookies.
- Prep Time: 15 minutes
- Cook Time: 12 minutes
- Total Time: 57 minutes
- Yield: 24 cookies 1x
- Category: Dessert
- Method: Baking
- Cuisine: American
- Diet: Vegetarian
Ingredients
- 2 1/4 cups all-purpose flour
- 1 teaspoon baking soda
- 1/2 teaspoon salt
- 1 cup (2 sticks) unsalted butter, softened
- 3/4 cup granulated sugar
- 3/4 cup packed light brown sugar
- 2 large eggs
- 1 teaspoon vanilla extract
- Blue gel food coloring, a few drops (or until desired color is reached)
- 1 cup white chocolate chips
- 1 cup crushed chocolate sandwich cookies (like Oreos)
- 1 cup crushed square breakfast cereal (like Golden Grahams or similar)
Instructions
- Preheat oven to 375F (190C). Line baking sheets with parchment paper.
- In a medium bowl, whisk together the flour, baking soda, and salt. Set aside.
- In a large bowl, cream together the softened butter, granulated sugar, and brown sugar until light and fluffy.
- Beat in the eggs one at a time, fully incorporating each before adding the next. Stir in the vanilla extract and blue gel food coloring until dough is uniformly blue.
- Gradually add the dry ingredients to the wet ingredients, mixing on low speed until just combined.
- Fold in the white chocolate chips, crushed chocolate sandwich cookies, and crushed square breakfast cereal until evenly distributed.
- Cover the dough tightly with plastic wrap and refrigerate for at least 30 minutes to solidify the butter and prevent spreading.
- Scoop the chilled dough using a 2-tablespoon cookie scoop or roll into 1.5-inch balls, placing them 2 inches apart on the prepared baking sheets.
- Bake for 10-12 minutes, until edges are lightly golden and centers look set but soft.
- Remove from oven, let cool on baking sheets for 5 minutes, then transfer to a wire rack to cool completely.
Notes
- Chilling the dough for at least 30 minutes is crucial for preventing spread and ensuring thick, chewy cookies.
Nutrition
- Serving Size: 1 cookie
- Calories: 180
- Sugar: 10g
- Sodium: 100mg
- Fat: 8g
- Saturated Fat: 5g
- Unsaturated Fat: 2g
- Trans Fat: 0g
- Carbohydrates: 25g
- Fiber: 1g
- Protein: 2g
- Cholesterol: 20mg