Introduction to Bruleed Vanilla-Bean Cheesecake
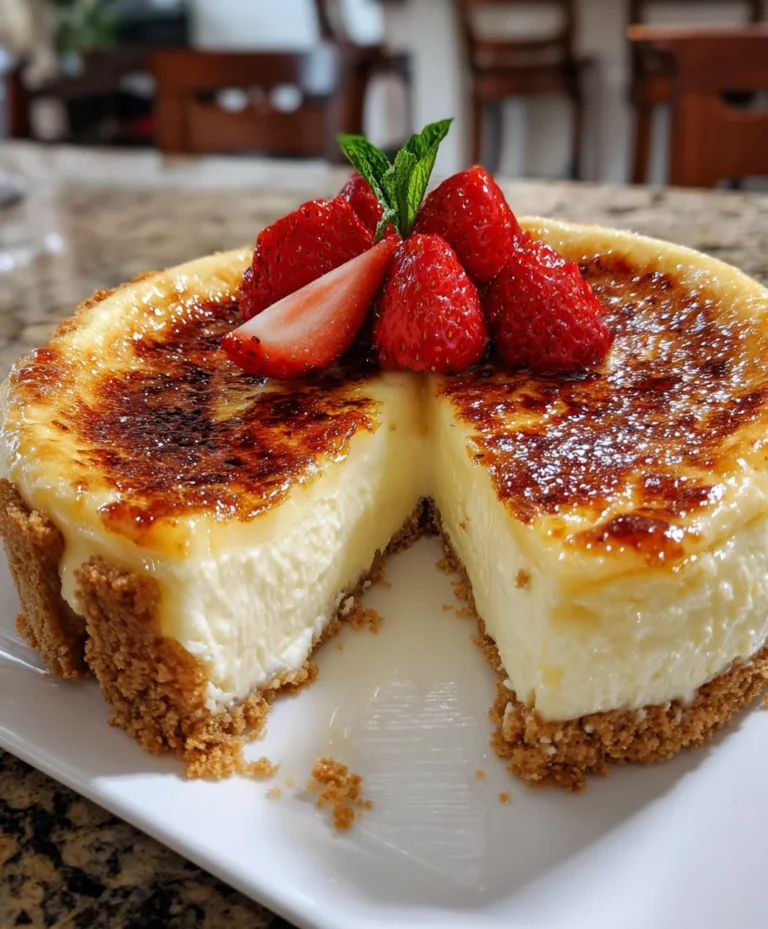
There’s something truly magical about the Bruleed Vanilla-Bean Cheesecake. It’s that one dessert that, without fail, turns a regular meal into a celebration. I know how hectic life can get, especially for busy moms and professionals. This rich cheesecake, with its creamy filling and a dazzling caramelized topping, is not just another dessert—it’s a conversation starter and a mood booster. Whether you’re impressing guests or treating yourself after a long day, this cheesecake is the perfect solution. It’s simple enough to whip up, yet indulgent enough to feel like a luxurious treat!
Why You’ll Love This Bruleed Vanilla-Bean Cheesecake
This Bruleed Vanilla-Bean Cheesecake is not just a dessert; it’s a lifesaver for anyone short on time. With just a handful of ingredients and a few easy steps, you can create a show-stopping treat that’s bursting with flavor. The creamy filling paired with the delightful crunchy top is a match made in heaven. Plus, it’s perfect for any occasion, making it a versatile delight that everyone will rave about!
Ingredients for Bruleed Vanilla-Bean Cheesecake
Creating this Bruleed Vanilla-Bean Cheesecake starts with gathering a few essentials from your kitchen. Each ingredient plays a vital role in achieving that delightful flavor and texture.
- Graham crackers: These will be the base of your cheesecake, providing a crunchy contrast to the creamy filling. Feel free to substitute with crushed cookies like Oreos for a twist!
- Granulated sugar: This sweetener balances the richness of the cheesecake. You’ll use it both in the crust and the filling.
- Kosher salt: Enhances flavors and brings out the sweetness. Just a pinch goes a long way!
- Unsalted butter: Essential for binding the crust ingredients together into a delicious base. Use salted butter if that’s what you have on hand.
- Cream cheese: The star of your dessert! Make sure it’s at room temperature for easy blending and that luscious texture.
- Sour cream: This adds a subtle tanginess that complements the sweetness beautifully. You can substitute with Greek yogurt if preferred.
- Egg: Acts as a binder, giving the cheesecake a rich, creamy consistency. Always use room temperature eggs for best results.
- Vanilla bean or pure vanilla extract: Vanilla provides that amazing flavor depth. Using a fresh vanilla bean is ideal, but extract works perfectly too!
- Superfine sugar: This is what you’ll use for that captivating caramelized top. It’s smoother than regular sugar, making it easier to melt.
- Spun sugar: While optional, it adds a beautiful finishing touch that is sure to impress. You can find it at specialty baking stores or craft it at home if you’re feeling adventurous!
For specific amounts of each ingredient, be sure to check the bottom of this article, where you’ll find everything you need neatly laid out for printing!
How to Make Bruleed Vanilla-Bean Cheesecake
Bringing this Bruleed Vanilla-Bean Cheesecake to life is both exciting and straightforward. Each step reveals a bit of magic, leading up to that luscious, flavorful finale. Let’s dive into the process!
Preparing the Graham Cracker Crust
First things first, we need to make that scrumptious crust. Grab your graham crackers and break them into pieces. I love using a food processor for this—it’s efficient and keeps things tidy. Pulse them with granulated sugar and a pinch of kosher salt until they become fine crumbs.
Next, drizzle in the melted butter and give it another quick pulse. The mixture should resemble wet sand, ready for shaping! Firmly press it into the base and up the sides of a 23-centimetre tart pan. Don’t be shy, really pack it down for a solid crust.
Baking the Crust
Once your crust is formed, it’s time for the oven! Preheat it to 175°C and place your tart pan on a baking sheet. Bake the crust for about 10 to 12 minutes until it’s dry and set. Your kitchen will start to smell heavenly. After baking, transfer it to a wire rack to cool completely. This step is essential for a crunchier texture!
Making the Creamy Filling
Now, let’s make the creamy filling that truly defines this Bruleed Vanilla-Bean Cheesecake! In a clean food processor, toss in your room-temperature cream cheese, sour cream, and granulated sugar. Blend until smooth and creamy—really creamy. Remember, it’s essential not to overmix here. Just a few good whirs will do!
Incorporate the egg, vanilla seeds or extract, and that pinch of kosher salt. Blend briefly until everything is smooth and combined. We want to keep it silky, not overly whipped!
Baking the Cheesecake
Pour this luscious batter into your cooled crust, smoothing the top evenly. Now for the important part—bake the cheesecake at 175°C for about 30 to 35 minutes. Keep an eye on it; the edges should be set while the center remains slightly jiggly. This is where the magic lies—if it’s too firm, it’ll lose that signature creaminess!
Chilling the Cheesecake
Patience is key! After baking, transfer the pan to a wire rack and let it cool for about an hour. Then, refrigerate it for at least 2 hours, or overnight if you have the luxury of time. Chilling allows those flavors to meld and gives you that smooth, perfect texture. Serve it nice and cold!
Bruleeing the Top
Now comes the showstopper—bruleeing the top! Before serving, sprinkle a tablespoon of superfine sugar evenly over the chilled surface of the cheesecake. Grab your kitchen blowtorch and caramelize the sugar. Use a sweeping motion back and forth, focusing on the middle to avoid burning the crust.
For an extra layer of indulgence, repeat with the remaining sugar. This creates a divine, crunchy topping that contrasts beautifully with the creamy filling beneath. Cut with a sharp knife (wipe the blade between slices for clean cuts), serve, and enjoy every bite!
Tips for Success
- Always use room temperature ingredients for a smooth mixture.
- Don’t rush the chilling process—this helps enhance the flavors.
- For a thicker crust, add an extra graham cracker or two.
- Keep your blowtorch moving to avoid burning the sugar.
- Wipe the knife clean after each cut for neat slices.
Equipment Needed for Bruleed Vanilla-Bean Cheesecake
- Food processor: Essential for blending your cheesecake filling; a hand mixer works too.
- 23-centimetre tart pan: A removable bottom pan is perfect; a springform pan can be a substitute.
- Baking sheet: Helps catch any drips during baking.
- Blowtorch: Ideal for caramelizing sugar; you can use the broiler as an alternative.
Variations of Bruleed Vanilla-Bean Cheesecake
- Chocolate ganache drizzle: Add a rich chocolate layer on top before bruleeing for a decadent twist.
- Fruit toppings: Fresh berries or sliced peaches make a lovely topping. They add a fresh burst of flavor!
- Gluten-free option: Use gluten-free graham crackers or almond flour for the crust. It’s an easy swap!
- Nut crust: Substitute some graham crackers with crushed nuts, such as almonds or walnuts, for added crunch and flavor.
- Spiced cheesecake: Incorporate spices like cinnamon or nutmeg for a warm, aromatic twist on the classic flavor.
Serving Suggestions for Bruleed Vanilla-Bean Cheesecake
- Pair it with a dollop of freshly whipped cream for an indulgent touch.
- Serve alongside a berry compote to add a fresh, tangy contrast.
- A fragrant cup of espresso or a rich hot chocolate complements the cheesecake beautifully.
- Garnish with mint leaves for a pop of color and freshness.
FAQs about Bruleed Vanilla-Bean Cheesecake
As with any delightful dish, questions are sure to pop up! Here are some of the most common inquiries about the Bruleed Vanilla-Bean Cheesecake, addressed with love and care.
Can I make this cheesecake ahead of time?
Absolutely! This Bruleed Vanilla-Bean Cheesecake is perfect for making ahead. Just remember to brulee the top right before serving for that fresh and crunchy finish!
What’s the best way to store leftovers?
Store any leftover cheesecake in an airtight container in the refrigerator. It should last for about 3–4 days, but I bet it won’t stick around that long!
Can I use a different type of crust?
Definitely! While I adore the classic graham cracker crust, feel free to experiment with crushed cookies or even a nut-based crust for a unique spin on this Bruleed Vanilla-Bean Cheesecake.
How can I adjust the sweetness?
Try reducing the amount of sugar in the filling if you prefer a less sweet cheesecake. You can also balance it out with tangy toppings like a fruit compote, which complements the flavor beautifully.
Is the brûlée on top necessary?
While the caramelized sugar topping enhances the dessert’s beauty and adds texture, you can absolutely skip this step if you’re short on time. The cheesecake is still delicious without it!
Final Thoughts on Bruleed Vanilla-Bean Cheesecake
Every bite of this Bruleed Vanilla-Bean Cheesecake is like a warm hug after a long day. It transforms ordinary moments into special celebrations, bringing friends and family together with its creamy goodness and delightful crunch. Whether it’s a holiday gathering or a weeknight treat, this cheesecake is bound to leave a lasting impression. I cherish the smiles it brings and the shared memories around the table. Trust me, once you make this decadent dessert, it will become a cherished favorite in your home—one that you’ll want to whip up again and again!
PrintBruleed Vanilla-Bean Cheesecake
Bruleed Vanilla-Bean Cheesecake is a decadent dessert featuring a creamy filling with rich vanilla flavor, topped with a perfectly caramelized sugar crust.
- Prep Time: 30 minutes
- Cook Time: 45 minutes
- Total Time: 3 hours 15 minutes
- Yield: 8 servings 1x
- Category: Dessert
- Method: Baking
- Cuisine: American
- Diet: Vegetarian
Ingredients
- 12 graham crackers, broken into pieces
- 3 tablespoons granulated sugar
- Pinch of kosher salt
- 5 tablespoons unsalted butter, melted
- 450 grams cream cheese, at room temperature
- 120 millilitres sour cream
- 100 grams granulated sugar
- 1 large egg, at room temperature
- 1 vanilla bean, seeds scraped, or 1 teaspoon pure vanilla extract
- Pinch of kosher salt
- 50 grams superfine sugar, divided
- Spun sugar, for topping
Instructions
- Preheat oven to 175°C. In a food processor, pulse graham crackers with granulated sugar and kosher salt until finely ground.
- Add melted butter and pulse again until evenly combined. Press mixture firmly into the base and up the sides of a 23-centimetre round tart pan with removable bottom.
- Place pan on a baking sheet and bake until dry and set, 10 to 12 minutes. Transfer to a wire rack and let cool completely.
- In a clean food processor, blend cream cheese, sour cream, granulated sugar, egg, vanilla seeds or extract, and a pinch of kosher salt just until smooth. Do not overmix.
- Pour cheesecake batter into the cooled crust, smoothing top evenly.
- Bake cheesecake at 175°C until filling is just set, 30 to 35 minutes. Transfer pan to a wire rack and cool for 1 hour.
- Refrigerate until thoroughly chilled, at least 2 hours or up to overnight.
- Before serving, sift 1 tablespoon superfine sugar evenly over the surface of the chilled cheesecake, avoiding the crust.
- Caramelize sugar with a small kitchen blowtorch by sweeping flame back and forth over the surface, concentrating towards the centre to avoid burning the crust.
- Repeat with the remaining tablespoon superfine sugar to create a second evenly brûléed layer.
- Top the cheesecake with spun sugar. To serve, slice with a sharp knife, wiping the blade clean between cuts for neat slices.
Notes
- Ensure all ingredients, especially cream cheese and egg, are at room temperature for best results.
- For a more intense vanilla flavor, use both the seeds and the extract.
- Use caution when caramelizing sugar with a blowtorch to avoid burns.
Nutrition
- Serving Size: 1 slice
- Calories: 450
- Sugar: 28g
- Sodium: 300mg
- Fat: 30g
- Saturated Fat: 18g
- Unsaturated Fat: 10g
- Trans Fat: 0g
- Carbohydrates: 38g
- Fiber: 1g
- Protein: 6g
- Cholesterol: 120mg