Introduction to Cherry Snowball Cookies
Hey there! If you’re anything like me, your days can get pretty hectic. That’s why I absolutely love tasty treats that are not only delightful but also easy to whip up. Enter the Cherry Snowball Cookies! These little gems are perfect for any occasion, whether you’re hosting a celebration or just want a sweet treat to brighten your day. Their vibrant cherry flavor and buttery texture make them irresistible, and trust me, they’ll impress everyone at your table. Grab your mixing bowl, and let’s create something delicious together!
Why You’ll Love This Cherry Snowball Cookies
Let’s face it, life can be busy, and finding quick yet delightful desserts is a must! Cherry Snowball Cookies hit the sweet spot—they’re simple to make and require minimal fuss. Plus, the burst of juicy cherries combined with buttery goodness creates a melt-in-your-mouth experience. Whether it’s a spontaneous gathering or just a cozy family night, these cookies turn any moment into a special occasion. You’ll love how they vanish off the plate!
Ingredients for Cherry Snowball Cookies
Gathering the right ingredients is half the battle when you’re in the kitchen! For these Cherry Snowball Cookies, you’ll need a handful of simple staples that bring tons of flavor. Here’s what to grab:
- Unsalted butter: This creamy hero adds richness to the cookies. Make sure it’s softened for easy mixing.
- Powdered sugar: Also known as confectioners’ sugar, it makes the cookies sweet and gives them a lovely, delicate finish.
- Vanilla extract: A must-have in any cookie recipe, it adds warm, familiar flavors that enhance the overall taste.
- Almond extract: Just a hint of this fragrant extract gives the cookies an added depth, pairing beautifully with the cherries.
- All-purpose flour: The backbone of any cookie, it provides essential structure and holds everything together.
- Salt: A pinch of salt enhances flavors and balances the sweetness, making each bite more exciting.
- Pecans or walnuts: These nuts add delightful crunch and nuttiness. You can choose based on your personal preference!
- Maraschino cherries: Make sure these are well-drained and chopped. Their bright color and sweet flavor bring joy to each cookie.
For exact measurements, check out the detailed list at the bottom of the article—it’s printable for your convenience!
How to Make Cherry Snowball Cookies
Ready to dive into making these delightful Cherry Snowball Cookies? Let’s break it down into simple steps so you can whip up a batch with ease. Trust me, you’ll be savoring that sweet cherry goodness in no time!
Preparing the Dough
Start by gathering your ingredients and your best mixing bowl (or stand mixer). Beat the softened butter with the powdered sugar until it becomes light and fluffy—about 3 to 5 minutes should do the trick.
Next, stir in the vanilla and almond extracts until just blended. The aroma alone will have your mouth watering!
In another bowl, whisk together the all-purpose flour and salt. Gradually add this mixture to the wet ingredients. Mix on low speed, being careful not to overdo it. We want a soft, cohesive dough that’s not overmixed.
Now comes the fun part: gently fold in the chopped pecans (or walnuts) and the vibrant maraschino cherries. Their bright color is like a cheerleader for your cookies!
Chilling the Dough
Once the dough is all mixed up, it’s time to give it a little rest. Cover the bowl and pop it in the fridge for at least 30 minutes. Chilling the dough helps the flavors meld and makes it easier to handle.
If you’re tight on time, you can chill it longer—up to 2 hours works well, but trust me, the wait is worth it. Use this time to clean up your workspace or even prepare a cup of tea!
Baking the Cookies
When you’re ready, preheat your oven to 350°F (175°C). Line those baking sheets with parchment paper to ensure easy cookie removal later.
After chilling, roll the dough into 1-inch balls. Place them on the prepared baking sheets, leaving about 1-2 inches between each cookie. Bake for about 12-15 minutes, or until the edges turn a lovely golden brown.
Be mindful—every oven is different, so keep an eye on them towards the end. Once done, let the cookies cool on the baking sheets for a few minutes. This helps them set up beautifully.
Finishing Touches
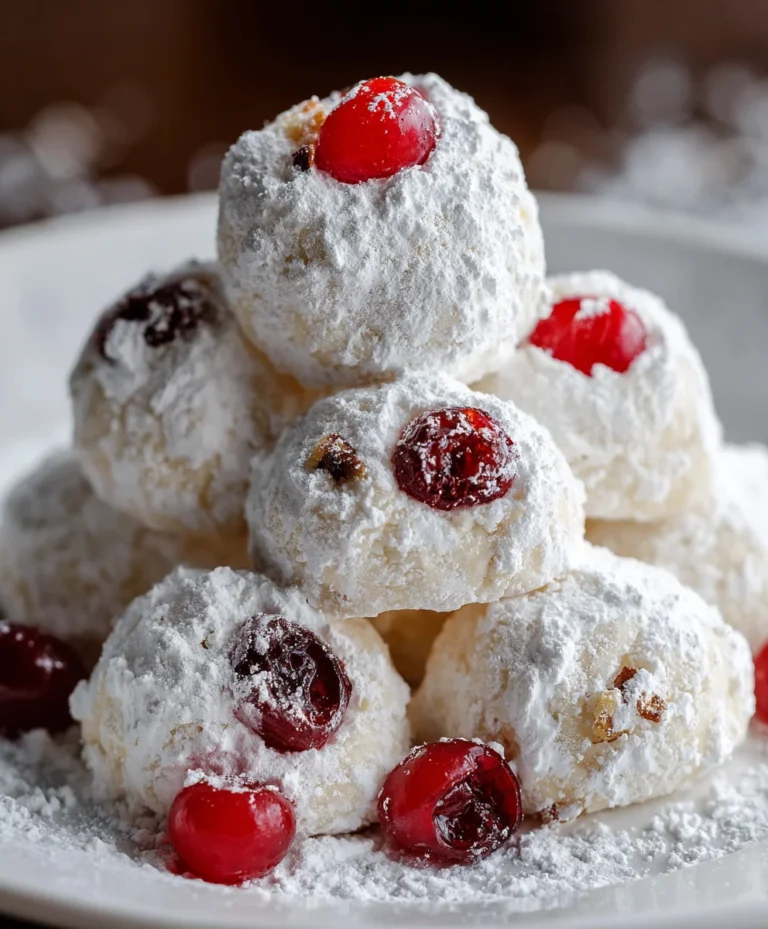
Here’s where the magic happens! While the cookies are still slightly warm, roll them in powdered sugar. This gives them that signature snowy finish. Who can resist that?
Once cooled completely, roll them in powdered sugar one more time for good measure. It’s a bit like wrapping them in a cozy blanket of sweetness!
And voilà! Your Cherry Snowball Cookies are now ready to be enjoyed. Store any leftovers in an airtight container; they’ll keep for about five days at room temperature. Or, pop some in the freezer for a sweet treat later!
Tips for Success
- Ensure your butter is softened for easy mixing—leave it out at room temperature for about 30 minutes.
- Don’t rush the chilling process; it’s essential for texture and flavor.
- Experiment with varying nut types for unique flavors—feel free to use your favorites!
- Watch the cookies closely while baking to avoid over-browning.
- For extra flair, try rolling the cookies in colored sugar for festive occasions!
Equipment Needed
- Mixing bowl: A standard mixing bowl works, but a stand mixer makes it easier.
- Whisk: Handy for combining dry ingredients; a fork can also do the job.
- Baking sheets: Use rimmed sheets for easier cookie placement and removal.
- Parchment paper: Essential for non-stick baking; aluminum foil is a good alternative.
- Wire rack: Great for cooling cookies; a plate can work if you’re in a pinch.
Variations on Cherry Snowball Cookies
- White Chocolate Cherry Snowballs: Add chopped white chocolate chips for a creamy twist that complements the cherries beautifully.
- Chocolate Cherry Snowballs: Mix in cocoa powder for a richer chocolate flavor—perfect for chocolate lovers!
- Gluten-Free Option: Substitute all-purpose flour with a gluten-free flour blend for a similar texture and taste.
- Coconut Cherry Snowballs: Incorporate sweetened shredded coconut for added texture and a tropical vibe.
- Nut-Free Version: Omit the nuts entirely for a delightful cookie that’s safe for those with nut allergies.
Serving Suggestions
- Pair these cookies with a hot cup of coffee or tea for a cozy afternoon treat.
- Serve alongside some fresh fruit for a refreshing contrast to the sweetness.
- Plate the cookies on a festive dish, dusting with extra powdered sugar for a charming presentation.
- Great for cookie platters at holiday gatherings or casual get-togethers!
FAQs about Cherry Snowball Cookies
Got questions about these delightful Cherry Snowball Cookies? Don’t worry—I’ve got you covered! Here are some FAQs that might pop up as you dive into baking:
Can I use fresh cherries instead of maraschino cherries?
While fresh cherries would add a bright flavor, they have more moisture. So, ensure you pit and chop them finely if you decide to use fresh ones. You may also want to reduce some of the butter to prevent sogginess.
How should I store Cherry Snowball Cookies?
These cookies stay delicious in an airtight container at room temperature for about five days. For longer storage, pop them in the freezer—just make sure they’re well-wrapped!
Can I make the dough ahead of time?
Absolutely! You can prepare the dough a day in advance. Just keep it covered in the fridge. This saves time and makes cookie baking a breeze when you’re ready!
What if I don’t have powdered sugar?
You can make a quick substitute by blending granulated sugar in a blender or food processor until it becomes fine. Voilà! You’re ready to roll those cookies in sweetness.
How do I know when the cookies are done baking?
Keep an eye on the edges of the cookies. They should turn lightly golden brown while the center remains soft. If you let them cool on the baking sheet, they’ll firm up just right!
Final Thoughts on Cherry Snowball Cookies
Making Cherry Snowball Cookies isn’t just about baking; it’s an experience filled with delightful aromas and joyful moments. The little bursts of cherry mixed with buttery goodness create a treat that resonates with both the heart and the taste buds. Whether you’re sharing them at a gathering or enjoying them solo with a warm beverage, they add a sprinkle of sweetness to any day. So gather your ingredients, embrace the joy of baking, and let these cookies bring smiles to your family and friends. Trust me, they’ll become a cherished tradition in no time!
PrintCherry Snowball Cookies

Cherry Snowball Cookies are a delightful and irresistible treat, perfect for special occasions or everyday enjoyment.
- Prep Time: 30 minutes
- Cook Time: 12-15 minutes
- Total Time: 1 hour 30 minutes (including chilling time)
- Yield: Approximately 24 cookies 1x
- Category: Dessert
- Method: Baking
- Cuisine: American
- Diet: Vegetarian
Ingredients
- 1 cup (2 sticks) unsalted butter, softened
- 1/2 cup powdered sugar, plus more for coating
- 1 teaspoon vanilla extract
- 1/4 teaspoon almond extract
- 2 1/4 cups all-purpose flour
- 1/4 teaspoon salt
- 1 cup finely chopped pecans or walnuts
- 1 cup maraschino cherries, drained well and chopped
Instructions
- In a large bowl or stand mixer, beat softened butter and 1/2 cup powdered sugar until light and fluffy (3-5 minutes).
- Stir in vanilla and almond extracts until just combined.
- In a separate bowl, whisk together flour and salt. Gradually add to the wet ingredients, mixing on low speed until just combined. Do not overmix.
- Gently fold in chopped pecans (or walnuts) and chopped, well-drained maraschino cherries.
- Cover and refrigerate the dough for at least 30 minutes, or up to 2 hours.
- Preheat oven to 350°F (175°C). Line baking sheets with parchment paper.
- Roll chilled dough into 1-inch balls.
- Place cookies on prepared baking sheets, leaving 1-2 inches between each. Bake for 12-15 minutes, or until edges are lightly golden brown.
- Let cookies cool on baking sheets for a few minutes before transferring to a wire rack.
- While still slightly warm, roll cookies in powdered sugar.
- Let cookies cool completely, then roll in powdered sugar again.
- Store in an airtight container at room temperature for up to 5 days. Can be frozen for longer storage.
Notes
- Make sure the cherries are well-drained to prevent excess moisture in the cookies.
- These cookies can be frozen for longer storage; just thaw before serving.
- Feel free to substitute walnuts for pecans based on preference.
Nutrition
- Serving Size: 1 cookie
- Calories: 150
- Sugar: 10g
- Sodium: 30mg
- Fat: 10g
- Saturated Fat: 5g
- Unsaturated Fat: 3g
- Trans Fat: 0g
- Carbohydrates: 16g
- Fiber: 1g
- Protein: 2g
- Cholesterol: 25mg