
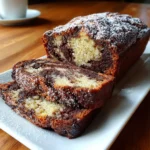
Introduction to Chocolate Marble Bread
There are few things in life as comforting as the aroma of freshly baked bread wafting through your home. Chocolate Marble Bread is that delightful treat that brings together rich flavors with an incredibly soft texture. It’s perfect for busy mornings when quick breakfast solutions are essential or as a sweet indulgence after dinner.
I remember weekends when my kids would beg for something special, and this bread always did the trick. With just a few simple steps, you can whip up this delightful recipe, impressing your loved ones and treating yourself to a slice of heaven!
Why You’ll Love This Chocolate Marble Bread
This Chocolate Marble Bread is a true crowd-pleaser. It’s not only easy to make, but it also boasts a rich, buttery flavor that will leave your taste buds dancing with joy. With minimal ingredients and straightforward steps, whipping up this delightful treat is a breeze. Whether you’re a seasoned baker or a novice, this recipe offers a fast and rewarding way to bring warmth to your kitchen.
Ingredients for Chocolate Marble Bread
Gathering the right ingredients is the first step toward creating a masterpiece in your kitchen. Here’s what you’ll need to make this heavenly Chocolate Marble Bread:
- All-purpose flour: This is the foundation of our bread, providing structure and texture.
- Baking powder: A leavening agent, it helps the bread rise and gives it that light, fluffy quality.
- Salt: Just a pinch enhances the flavors and balances the sweetness of the bread.
- Unsalted butter: Butter adds not only moisture but also richness, making each slice melt in your mouth.
- Granulated sugar: Sweetness comes from this staple ingredient; it also contributes to the bread’s lovely golden crust.
- Eggs: These bind everything together, adding structure and a bit of protein to your slice.
- Vanilla extract: A splash of this magical ingredient brings warmth and depth to the overall flavor.
- Milk: It adds moisture, making the bread tender and soft.
- Cocoa powder: This is the secret to the rich chocolate flavor we crave in our marbled bread.
- Hot water: Mixing cocoa with hot water helps dissolve it smoothly, ensuring a lump-free chocolate batter.
For those who want to elevate the chocolatey goodness, consider adding a bit of instant espresso powder to deepen the flavor.
You can find all the exact measurements at the bottom of the article, ready for printing—making your baking journey even easier!

How to Make Chocolate Marble Bread
This Chocolate Marble Bread is exceptionally rewarding to make. Follow these simple steps, and you’ll have the kitchen filled with an irresistible aroma. Let’s get baking!
Step 1: Preheat and Prepare
First things first, preheat your oven to 350°F (175°C). That way, it’s nice and warm by the time your batter is ready.
While that’s happening, grease and flour a 9×5-inch loaf pan. This will ensure your gorgeous Chocolate Marble Bread slides right out once it’s baked. Trust me; it’s a crucial step!
Step 2: Mix Dry Ingredients
In a medium bowl, whisk together the all-purpose flour, baking powder, and salt. Properly mixing these ingredients is vital.
This step ensures the baking powder can do its magic, helping the bread rise beautifully. Plus, the salt balances the sweetness, giving your loaf a well-rounded flavor!
Step 3: Cream Butter and Sugar
Now, grab a large mixing bowl. Beat the softened unsalted butter and granulated sugar together until the mixture is light and fluffy.
This shouldn’t take more than a couple of minutes. The fluffiness is key for a nice rise in your bread, so don’t rush this step!
Step 4: Add Eggs and Vanilla
Add the eggs, one at a time, mixing well after each addition. This helps ensure each egg is well integrated. Then, stir in the vanilla extract.
The batter should start to look smooth and creamy, and oh, that vanilla aroma will be irresistible!
Step 5: Combine Wet and Dry Ingredients
Next, it’s time to alternate adding the dry ingredients and milk into the butter mixture. Start with a third of the flour mix, then add half the milk.
Continue this cycle until you’ve added everything, starting and ending with the flour. This method keeps the batter perfectly mixed without overdoing it!
Step 6: Prepare the Chocolate Batter
In a small bowl, mix the unsweetened cocoa powder with hot water until it’s smooth.
Then, take about 1 cup of the plain batter and mix it with the cocoa mixture. This creates your rich chocolate batter, perfect for marbling!
Step 7: Layer the Batters
Pour half of the plain batter into your greased loaf pan. Then, dollop the chocolate batter on top in spoonfuls.
Finally, pour in the rest of the plain batter. This layering is essential for that beautiful marbled effect we’re aiming for!
Step 8: Swirl and Bake
Now comes the fun part—swirling! Take a knife and gently swirl the two batters together in a figure-eight motion, making sure not to overmix.
Then, bake your creation for 50 to 60 minutes or until a toothpick inserted in the center comes out clean. Just imagine how delightful your kitchen will smell while this bakes!
Tips for Success
- Measure ingredients carefully; precise measurements lead to the best results.
- Let your butter soften at room temperature for easy creaming.
- Don’t skip the swirling step—it’s what makes the bread visually stunning!
- For even baking, place the loaf pan in the center of the oven.
- Check for doneness a few minutes early; ovens can vary in heat.
Equipment Needed
- Loaf pan: A 9×5-inch pan is ideal; if you don’t have one, an 8×4-inch pan works too.
- Mixing bowls: Use one large and one medium bowl. Glass or stainless steel works best!
- Whisk: A simple hand whisk or an electric mixer will do the job.
- Knife: Essential for swirling the batters together and checking for doneness.
- Measuring cups and spoons: Accurate measurements are key for successful baking!
Variations on Chocolate Marble Bread
- Nutty Delight: Fold in some chopped walnuts or pecans into the batter for a crunchy texture that pairs beautifully with chocolate.
- Fruit Fusion: Add a cup of fresh blueberries or raspberries to the plain batter for a fruity twist and extra deliciousness.
- Gluten-Free Option: Substitute all-purpose flour with a gluten-free blend for a tasty gluten-free Chocolate Marble Bread.
- Healthier Swap: Replace some of the granulated sugar with honey or maple syrup for a natural sweetness and a unique flavor.
- Vegan Version: Use plant-based butter and flaxseed meal as an egg substitute (1 tablespoon ground flaxseed mixed with 2.5 tablespoons of water for each egg).
Serving Suggestions for Chocolate Marble Bread
- Enjoy a warm slice with a pat of butter on top for an irresistible treat.
- Pair with a side of fresh fruit, like berries or sliced bananas, for a delightful contrast.
- Serve with a hot cup of coffee or tea for the perfect afternoon pick-me-up.
- Dust with powdered sugar or drizzle with chocolate ganache for a show-stopping presentation.
FAQs about Chocolate Marble Bread
Let’s tackle some commonly asked questions about this delicious Chocolate Marble Bread. Whether you’re a seasoned baker or just starting out, getting the answers you need can make all the difference!
Can I substitute other flours for all-purpose flour?
Absolutely! You can use whole wheat flour for a nuttier flavor or opt for gluten-free flour blends if you have dietary restrictions. Just keep in mind that the texture may vary slightly.
How can I store the Chocolate Marble Bread to keep it fresh?
Wrap the bread tightly in plastic wrap or aluminum foil. It stays fresh at room temperature for up to 3 days. You can also freeze it for longer storage—just slice it first for easy thawing!
Can I add chocolate chips to the batter?
Of course! Adding chocolate chips will enhance the chocolatey goodness. Just fold them in when you combine the wet and dry ingredients. They will melt slightly and create decadent pockets of chocolate!
Is it possible to make this bread ahead of time?
Yes! You can bake the Chocolate Marble Bread a day ahead. Just make sure to let it cool completely before wrapping it up. This allows the flavors to meld beautifully.
What’s the best way to serve this bread?
Serving warm with a dollop of butter or alongside a hot drink is simply heavenly. You can even toast slices for a delightful crunch!
Final Thoughts
Chocolate Marble Bread isn’t just a recipe; it’s an experience. The joy of pulling a loaf from the oven, its aroma wrapping around you like a warm hug, is unmatched. Whether enjoyed on a busy morning or as a sweet end to your day, each bite is a reminder of simple pleasures.
Baking this bread will not only fill your home with a delightful scent, but it will also create cherished memories with loved ones. So, grab those ingredients and get started—your kitchen is about to become the heart of a delicious adventure!
PrintChocolate Marble Bread: Indulge in This Easy Recipe!
This Chocolate Marble Bread is a delightful and easy-to-make treat that combines rich chocolate flavor with a soft, buttery loaf. Perfect for breakfast or dessert!
- Prep Time: 15 minutes
- Cook Time: 60 minutes
- Total Time: 1 hour 15 minutes
- Yield: 1 loaf 1x
- Category: Dessert
- Method: Baking
- Cuisine: American
- Diet: Vegetarian
Ingredients
- 1 ¾ cups (220 g) all-purpose flour
- 2 tsp baking powder
- ½ tsp salt
- ½ cup (115 g) unsalted butter, softened
- 1 cup (200 g) granulated sugar
- 2 large eggs
- 1 tsp vanilla extract
- ½ cup (120 ml) milk
- 2 tbsp unsweetened cocoa powder
- 2 tbsp hot water
Instructions
- Preheat your oven to 350°F (175°C). Grease and flour a 9×5-inch loaf pan.
- In a medium bowl, whisk together flour, baking powder, and salt.
- In a large mixing bowl, beat butter and sugar until light and fluffy.
- Add eggs one at a time, mixing well after each addition. Stir in vanilla.
- Gradually add the flour mixture to the wet ingredients, alternating with the milk, beginning and ending with the flour.
- In a small bowl, mix cocoa powder with hot water until smooth. Take about 1 cup of the batter and stir in the cocoa mixture to make the chocolate batter.
- Pour half of the plain batter into the loaf pan, then add the chocolate batter in spoonfuls. Top with the remaining plain batter.
- Use a knife to gently swirl the batters together to create a marbled effect.
- Bake for 50–60 minutes, or until a toothpick inserted into the center comes out clean.
- Cool in the pan for 10 minutes before transferring to a wire rack to cool completely.
Notes
- For extra flavor, you can add ½ tsp instant espresso powder to the chocolate batter.
- This bread keeps well for up to 3 days at room temperature when wrapped tightly.
Nutrition
- Serving Size: 1 slice
- Calories: 230
- Sugar: 15g
- Sodium: 150mg
- Fat: 10g
- Saturated Fat: 6g
- Unsaturated Fat: 4g
- Trans Fat: 0g
- Carbohydrates: 32g
- Fiber: 1g
- Protein: 3g
- Cholesterol: 40mg