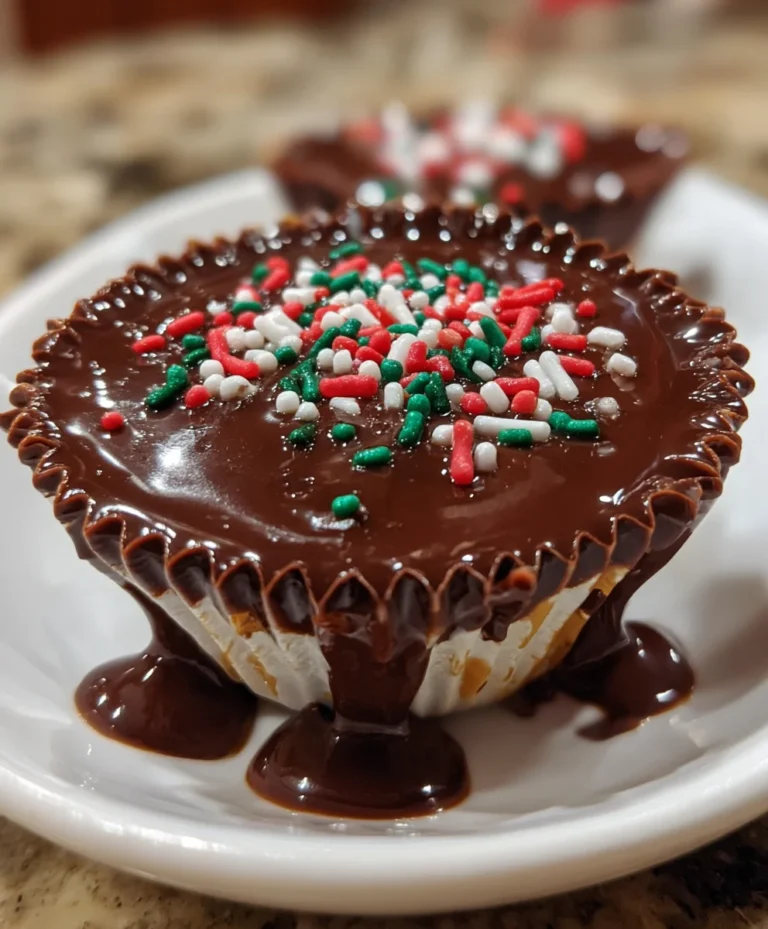
Introduction to Christmas Chocolate Caramel Cups
The holiday season is upon us, and with it comes the delightful hustle and bustle of family gatherings and festive celebrations. If you’re like me, you want to spread joy without spending hours in the kitchen. That’s where these Christmas Chocolate Caramel Cups come in! They bring together rich chocolate and gooey caramel in a delightful treat that your loved ones will adore. Whether you’re hosting a holiday party or simply treating the kids after a long day, these little cups are the perfect solution—simple, sweet, and oh-so-satisfying!
Why You’ll Love This Christmas Chocolate Caramel Cups
These Christmas Chocolate Caramel Cups are a game changer for busy days. You can whip them up in just over an hour, bringing bliss to your kitchen without a fuss. The combination of creamy chocolate and smooth caramel creates a taste sensation that feels luxurious, yet they’re simple enough for anyone to master. Plus, they make a fantastic gift and are bound to be a hit at any holiday gathering!
Ingredients for Christmas Chocolate Caramel Cups
Gathering the right ingredients is the first step to crafting these delicious Christmas Chocolate Caramel Cups. Here’s what you’ll need:
- Sugar: This is the foundation for your caramel, offering the sweetness that balances perfectly with chocolate.
- Heavy Cream: Essential for creating that smooth, rich caramel. It adds creaminess and depth to each bite.
- Chocolate Almond Bark: This easy-to-use ingredient provides a silky chocolate layer. You can also substitute with any high-quality chocolate if you prefer.
- Holiday Sprinkles: These are the finishing touch! They bring color and cheer to your treats. Feel free to choose any festive sprinkles that catch your eye!
For those looking to experiment or tweak the recipe, consider using dark chocolate for a more intense flavor, or flavored extracts like vanilla or peppermint to give a twist to your caramel. If you’re vegan, you might look for dairy-free chocolate and coconut cream as a substitute for heavy cream. Remember, the exact measurements are listed at the bottom of the article, so you can print or save them for your kitchen adventures!
How to Make Christmas Chocolate Caramel Cups
Making these Christmas Chocolate Caramel Cups is a fun and rewarding journey. Follow each step closely, and soon you’ll have delicious treats to share with everyone. Let’s dive in and bring some holiday cheer to your kitchen!
Step 1: Prepare the Cupcake Liners
Start by placing 36 mini cupcake liners in a mini cupcake tin. This is the cozy little home for your chocolate caramel cups! It’s like setting the stage for a festive performance.
Step 2: Make the Bottom Chocolate Layer
In a large bowl, melt half of the chocolate almond bark.
Do this gently in the microwave, heating it in 30-second increments. Stir it until smooth and silky.
Now, spoon some of this luscious chocolate into each cupcake liner.
Using a small spoon or a kitchen brush, spread the chocolate up the sides. This layer should be thick enough that no liner peeks through.
Step 3: Allow the Chocolate to Harden
Once the chocolate is spread, let your cups sit and harden. You can set them aside at room temperature or pop them into the fridge for a quicker set.
Patience is key here, as you want a solid foundation for your caramel.
Step 4: Prepare the Caramel
While the chocolate cups are firming up, it’s time to make the caramel.
Add the sugar to a heavy-bottomed pot. Heat it gently over medium heat.
Stir as little as possible until it melts. You’ll want it to turn a beautiful amber color, so keep a close eye!
Remember, don’t rush this step—burnt sugar is a no-go.
Once it’s ready, slowly pour in the heavy cream while whisking. This will create that smooth, creamy caramel.
Transfer the caramel into a bowl and let it cool in the fridge for about 30 minutes until it thickens.
Step 5: Fill the Chocolate Cups with Caramel
Now that your caramel is thickened and rich, it’s time for the fun part!
Spoon that gooey goodness into your chocolate cups, filling them almost to the top.
Just be careful not to overflow—no one wants a chocolate caramel mess!
Step 6: Add the Top Chocolate Layer
Melt the remaining chocolate almond bark in the microwave in the same way as before.
Once melted, place a spoonful of chocolate over each caramel-filled cup.
Gently spread it to the edges, sealing in all that caramel magic.
Step 7: Refrigerate to Set
Finally, sprinkle your holiday sprinkles on top for some festive flair.
Pop the entire tray back into the fridge for about an hour. This will allow everything to set perfectly.
And just like that, your Christmas Chocolate Caramel Cups are ready to shine!
Tips for Success
- Use a heavy-bottomed pot for even melting and to prevent burning the sugar.
- Stir the caramel as little as possible to achieve a smooth texture.
- Let the chocolate harden completely before adding the caramel layer for best results.
- Customize sprinkles to match your holiday theme or personal taste.
- For an extra touch, drizzle melted chocolate on top before serving!
Equipment Needed
- Mini Cupcake Tin: This is essential for shaping your chocolate caramel cups. If you don’t have one, use a regular muffin tin with larger liners.
- Microwave-Safe Bowl: Great for melting chocolate. A double boiler also works well if you prefer.
- Whisk: Perfect for blending the caramel smoothly. A fork can work in a pinch!
- Spoon: For filling your cups and spreading chocolate easily. A small spatula is handy too!
Variations
- Dark Chocolate: Swap out the chocolate almond bark for dark chocolate for a richer, more intense flavor.
- Nutty Additions: Stir in chopped nuts like pecans or almonds into the caramel for crunch and depth.
- Minty Twist: Add a few drops of peppermint extract to the caramel for a festive mint flavor that pairs well with chocolate.
- Vegan Option: Use dairy-free chocolate and a plant-based cream alternative, like coconut cream, to make these treats vegan-friendly.
- Different Sprinkles: Experiment with colored sprinkles, crushed candy canes, or edible glitter for a unique holiday presentation!
Serving Suggestions
- Pair your Christmas Chocolate Caramel Cups with a warm cup of cocoa or spiced cider for a cozy treat.
- Present these cups on a festive platter adorned with fresh cranberries and evergreen sprigs for a beautiful display.
- For a fun touch, serve them alongside homemade cookies or mini brownies for a sweet holiday spread!
FAQs about Christmas Chocolate Caramel Cups
Can I make Christmas Chocolate Caramel Cups ahead of time?
Absolutely! These treats can be made a few days in advance. Just store them in an airtight container in the fridge to keep them fresh and delectable.
How do I store leftover chocolate caramel cups?
Store any leftovers in an airtight container at room temperature for up to a week. If your home is warm, keep them in the fridge to prevent melting.
Can I use a different type of chocolate?
Yes! Feel free to experiment with milk chocolate, dark chocolate, or even white chocolate to suit your tastes. Each type will give a unique flavor profile.
What can I do if my caramel turns out too hard?
If your caramel becomes too hard, try gently reheating it in the microwave with a splash of cream to soften it up. Just be cautious not to overheat.
How can I make these cups even more festive?
Add a sprinkle of edible glitter or crushed peppermint on top for a dazzling holiday touch. You can also use themed cupcake liners to elevate the presentation!
Final Thoughts
These Christmas Chocolate Caramel Cups are more than just treats; they’re little moments of joy wrapped in chocolate! They bring smiles to family gatherings, warm conversations, and sweet memories. Each cup is a reminder that the holidays are about sharing love and laughter, and what better way to do that than through delicious homemade goodies? Whether you’re treating yourself after a long day or presenting them as gifts, these cups are bound to become a cherished part of your holiday traditions. So gather your loved ones and enjoy this festive delight together!
PrintChristmas Chocolate Caramel Cups
Delightful Christmas treats featuring a rich layer of chocolate and a gooey caramel filling, perfect for the holiday season.
- Prep Time: 30 minutes
- Cook Time: 15 minutes
- Total Time: 1 hour 45 minutes
- Yield: 36 mini chocolate caramel cups 1x
- Category: Dessert
- Method: Baking
- Cuisine: American
- Diet: Vegetarian
Ingredients
- 1 cup sugar
- ⅔ cup heavy cream
- 1 pound chocolate almond bark
- holiday sprinkles
Instructions
- Place 36 mini cupcake liners in a mini cupcake tin. Set aside.
- MAKE THE BOTTOM CHOCOLATE LAYER: In a large bowl, melt half of the chocolate almond bark in 30-second increments in the microwave until melted and smooth.
- Spoon a little bit of the chocolate into each cupcake liner.
- Using a small spoon or even a paintbrush, spread the chocolate up the sides of the liners. If the chocolate layer seems too thin, you can add a bit more chocolate to the cup and spread up the sides some more. You want to make sure you cannot see the bottom of the liner.
- Set the chocolate cups aside to harden.
- MAKE THE CARAMEL: While the chocolate cups are setting up, add the sugar to a heavy-bottomed pot over medium heat on the stove.
- Let the sugar slowly melt, stirring as little as possible and very gently. The sugar will melt until there are no lumps and it is an amber color. This can burn and become bitter if you let it get too dark.
- As soon as the sugar has reached the correct color, remove it from the heat and very slowly whisk in a thin stream of the heavy cream until it is all combined.
- Pour the caramel carefully into a bowl and set in the fridge for 30 minutes to thicken up.
- ADD THE CARAMEL TO THE CHOCOLATE CUPS: Once the caramel is thicker, you can spoon it into the chocolate lined muffin liners.
- You want to fill the shells up almost to the top of where the chocolate ends but not over it.
- ADD THE TOP CHOCOLATE LAYER: Melt the remaining chocolate almond bark.
- Spoon chocolate over the top of the caramel cups and gently spread it to the edges of the liners.
- Sprinkle with the holiday sprinkles.
- Place the cups into the fridge for another hour to completely set.
Notes
- Ensure not to overheat the sugar while melting to avoid a bitter taste.
- Use a heavy-bottomed pot for even heat distribution while making caramel.
- Feel free to customize the holiday sprinkles for added cheer!
Nutrition
- Serving Size: 1 cup
- Calories: 150
- Sugar: 20g
- Sodium: 50mg
- Fat: 7g
- Saturated Fat: 4g
- Unsaturated Fat: 1g
- Trans Fat: 0g
- Carbohydrates: 20g
- Fiber: 1g
- Protein: 2g
- Cholesterol: 10mg