Introduction to Christmas Sandwich Cookies
It’s that magical time of year again when the air is filled with holiday cheer, and what better way to celebrate than with delightful Christmas Sandwich Cookies? These tasty treats are not only beautiful but also a wonderful way to bring the family together in the kitchen. As a busy mom myself, I know how hectic the holiday season can get. That’s why this recipe is so perfect—it’s quick, fun, and a surefire way to impress your loved ones while making sweet memories. Trust me, your friends and family will be reaching for these cookies long after they’ve cooled!
Why You’ll Love This Christmas Sandwich Cookies
These Christmas Sandwich Cookies are a total game changer for your holiday baking! They’re not just easy to make but also incredibly fun—perfect for involving the kiddos. The cookies have a delightful crunch paired with creamy frosting that will bring smiles to everyone’s faces. Plus, they’re versatile, so you can mix up flavors and colors to fit your holiday spirit. Who wouldn’t love a treat that’s as festive as it is delicious?
Ingredients for Christmas Sandwich Cookies
Let’s gather everything we need for these delightful Christmas Sandwich Cookies. The beauty of this recipe lies in its simplicity and adaptability. Here’s what you’ll be using:
- All-purpose flour: The base of our cookies, providing structure and a lovely texture.
- Cornstarch: This little ingredient helps create that soft, melt-in-your-mouth texture.
- Baking soda: The rising agent that gives our cookies a bit of lift and tenderness.
- Fine sea salt: Enhances flavor; a pinch goes a long way in baking!
- Unsalted butter: It’s crucial to have this soft and creamy for mixing. You can use vegan butter as a substitute if needed.
- Granulated sugar: Provides sweetness along with a bit of crispiness to the cookies.
- Light brown sugar: Adds moisture and a delightful caramel flavor that I just adore.
- Large eggs: They bind everything together, adding richness and moisture.
- Vanilla extract: A staple in sweet treats, it brings warmth and depth to the flavors.
- Holiday M&Ms: These vibrant candies not only look festive but also add a surprising crunch and a burst of color.
- Mini chocolate chips: For chocolate lovers, these little gems make each bite irresistible.
- Holiday sprinkles: Because every cookie needs a touch of magic! Feel free to choose your favorites.
For the frosting, you’ll need:
- Unsalted butter: Again, this should be softened to create a luscious filling.
- Sifted powdered sugar: This will ensure a smooth and creamy frosting that pipes easily.
- Pinch of fine sea salt: Just to balance the sweetness!
- Vanilla extract: We’ll use this again to tie all the flavors together.
- Whole milk: For achieving the perfect consistency in the frosting.
- Gel food coloring: Red and green colors bring your holiday spirit to life. This is optional but oh-so-fun!
Don’t worry; I’ve included the exact measurements at the bottom of the article for easy reference and printing. Happy baking!
How to Make Christmas Sandwich Cookies
Preheat and Prepare
First things first, let’s set the stage. Preheat your oven to 350°F. This is the magic number for these Christmas Sandwich Cookies. While the oven warms up, line your baking sheets with parchment paper. It’ll ensure the cookies don’t stick and makes cleanup a breeze. Trust me, you’ll thank yourself later for this simple step!
Mix the Dry Ingredients
In a medium-sized bowl, whisk together the all-purpose flour, cornstarch, baking soda, and fine sea salt. This blend will give your cookies that coveted soft texture. Make sure everything is well combined; it’s the foundation for our festive masterpiece!
Cream the Butters and Sugars
Now, it’s time for the fun part! In the bowl of your stand mixer, beat the softened unsalted butter with granulated and brown sugars. Use the paddle attachment for the best results. Mix them together for about 3 minutes until light and fluffy. Next, add the eggs one at a time, mixing until fully combined. The final touch is the tablespoon of vanilla extract—this adds that warm, inviting aroma we all adore. Just wait until this filling bakes—it’ll smell heavenly!
Combine Flour and Add-ins
Slowly add the dry flour mixture into the butter and sugar blend. Stir it gently until just combined. Be careful not to overmix! Once you have a lovely dough, fold in the vibrant holiday M&Ms, mini chocolate chips, and sweet sprinkles. This is the moment when the cookie dough comes to life, bursting with color and flavor!
Shape and Bake
Take about 2 tablespoons of the dough and roll it into a slightly taller-than-wide ball. This shape helps the cookies keep their form while baking. Place them on your prepared baking sheet, leaving space between each. Bake for 11-12 minutes. They should be lightly golden at the edges and look dry on top. Resist the urge to overbake; we want chewy cookies, not crunchy ones! On taking them out, you can press in some extra M&Ms or sprinkles for a festive touch.
Cool and Prepare the Filling
Let the cookies cool on the baking sheet for about 10 minutes before transferring them to a wire rack. This cooling time is important; it helps them set properly. While they cool, let’s whip up our delicious filling! In your stand mixer, cream the softened unsalted butter until smooth. Gradually add the sifted powdered sugar, mixing until fully incorporated. Add a pinch of salt, vanilla extract, and milk, then beat on high for 3 minutes until fluffy!
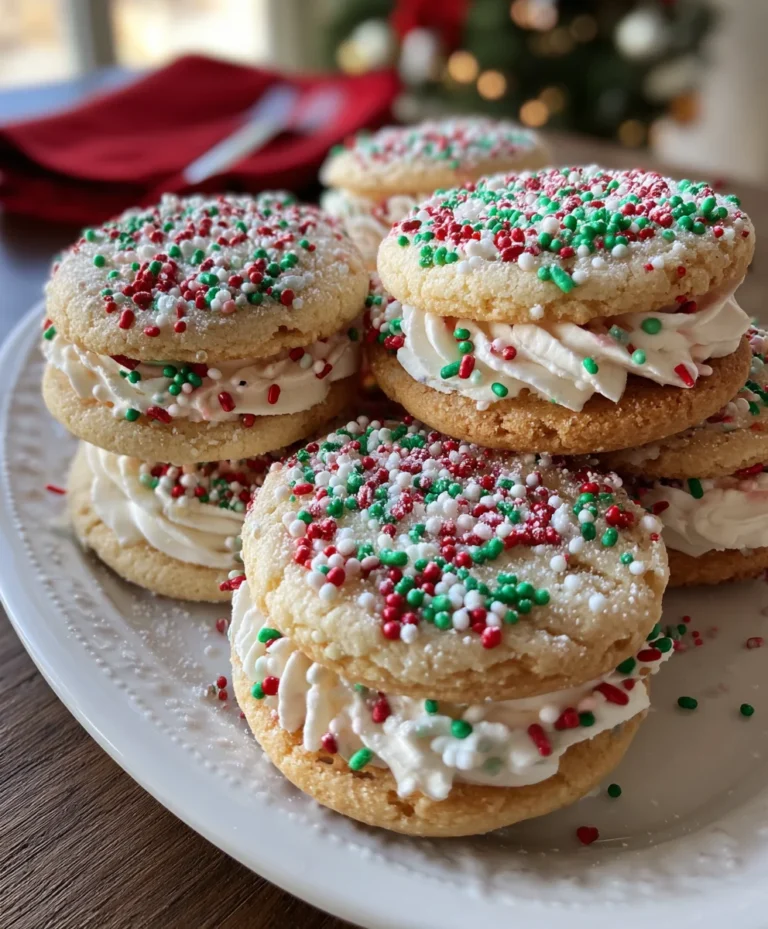
Assemble the Sandwich Cookies
Once your cookies have cooled and your frosting is ready, it’s time to assemble those gorgeous sandwiches! Use piping bags or plastic bags with snipped ends to pipe a dollop of frosting on the bottom of half the cookies. Top them with another cookie and gently press down. Nosh on your festive creations right away, or share the joy with family and friends!
Tips for Success
- Always use softened butter for easy mixing and a smooth frosting.
- Don’t rush the cooling process; allow cookies to set before assembling.
- Feel free to customize the frosting colors to match your holiday decor!
- Make extra dough and freeze it for last-minute cookie cravings.
- Try adding different mix-ins like nuts or dried fruit for a fun twist.
Equipment Needed for Christmas Sandwich Cookies
- Stand mixer: Essential for creaming butter and sugar; a hand mixer works as well.
- Baking sheets: Use any flat baking tray; just ensure they are lined with parchment paper.
- Piping bags: Handy for frosting; plastic bags with snipped ends work too.
- Mixing bowls: A couple of different sizes for mixing and combining ingredients.
- Whisk and spatula: Helpful for stirring and folding; even a wooden spoon will do!
Variations of Christmas Sandwich Cookies
- Peanut Butter Delight: Swap some butter for creamy peanut butter to create a rich and nutty flavor.
- Gluten-Free Option: Use a 1-to-1 gluten-free flour blend instead of all-purpose flour for a gluten-free treat.
- Minty Fresh: Add a dash of peppermint extract to the frosting for a festive minty kick.
- Dried Fruit and Nuts: Incorporate chopped dried cranberries or walnuts for a chewy texture and added flavor.
- Chocolate Lovers: Use chocolate cookie dough instead of traditional for an indulgently rich treat.
Serving Suggestions for Christmas Sandwich Cookies
- Hot Cocoa: Pair these delightful cookies with a warm mug of hot cocoa for a cozy experience.
- Milk: Nothing beats a classic glass of milk alongside these festive treats.
- Holiday Platter: Arrange the cookies on a decorative platter for an eye-catching centerpiece at your holiday gathering.
- Gift Bags: Package them in festive bags for thoughtful homemade gifts.
- Ice Cream Sandwich: Try using two cookies to make a delicious ice cream sandwich for a fun dessert twist!
FAQs about Christmas Sandwich Cookies
As we dive into these enchanting Christmas Sandwich Cookies, I often get questions buzzing around like holiday bees. Here are some of the most common queries I hear and hope to clarify for you:
Can I make the cookie dough ahead of time?
Absolutely! You can prepare the dough a day in advance. Just wrap it tightly in plastic wrap and refrigerate it. When you’re ready to bake, let it sit at room temperature for a while before shaping the cookies.
How do I store the leftover sandwich cookies?
To keep the cookies fresh, store them in an airtight container at room temperature. They’ll stay delightful for about a week. Trust me; they won’t last long with the sweet aroma wafting around!
Can I use different types of frosting?
Of course! Feel free to experiment with different frostings. Cream cheese or royal icing would create new flavor profiles. Just think about what works best for your festive theme!
What can I substitute for eggs in this recipe?
If you need an egg substitute, you can use unsweetened applesauce or a flax egg. Just remember, this may slightly alter the texture but will still keep your cookies on the delightful side!
Can I freeze these cookies?
Yes indeed! After baking, once completely cooled, these cookies can be frozen. Just layer them between parchment paper in an airtight container. They’ll be a merry treat when you’re ready to enjoy them!
Final Thoughts
You know, there’s something truly magical about baking Christmas Sandwich Cookies. It’s not just about the delightful taste, but the laughter and love shared in the kitchen. Creating these vibrant cookies with family and friends makes for precious memories. Each bite is a reminder of the joy of giving and togetherness during the holidays. So, whether you’re at a bustling family gathering or enjoying a quiet evening, these cookies are sure to bring a smile. Spread cheer, create connections, and indulge in the sweetness—because that’s what the season is all about!
PrintChristmas Sandwich Cookies

Delightful Christmas Sandwich Cookies filled with festive colors and flavors, perfect for holiday celebrations.
- Prep Time: 30 minutes
- Cook Time: 12 minutes
- Total Time: 42 minutes
- Yield: 24 cookies 1x
- Category: Dessert
- Method: Baking
- Cuisine: American
- Diet: Vegetarian
Ingredients
- 2 ½ cups all-purpose flour
- 2 tablespoons cornstarch
- 1 teaspoon baking soda
- ¾ teaspoon fine sea salt
- 1 cup unsalted butter softened
- ¾ cup granulated sugar
- ¾ cup light brown sugar packed
- 2 large eggs
- 1 tablespoon vanilla extract
- 1 ½ cups holiday M&Ms
- ½ cup mini chocolate chips
- ½ cup holiday sprinkles
- 1 cup unsalted butter softened
- 5 cups sifted powdered sugar
- Pinch of fine sea salt
- 1 tablespoon vanilla extract
- 2 tablespoons whole milk
- Green gel food coloring
- Red gel food coloring
Instructions
- Preheat the oven to 350°F. Line sheet trays with parchment paper, set aside.
- In a medium-sized bowl, stir together the flour, cornstarch, baking soda, and salt, set aside.
- In the body of a stand mixer with the paddle attachment, cream the butter with the granulated and brown sugar for 3 minutes until light and fluffy.
- Add the eggs one at a time until fully mixed, stir in the vanilla.
- Add the flour mixture to the bowl and slowly stir it in until combined. Scrape down the sides as needed.
- Add the M&Ms and chocolate chips, and stir to combine.
- Add the sprinkles and stir to combine.
- Take 2 tablespoons of the dough and roll it into a ball; make them a little bit taller than wide, in a spherical shape to avoid too much spread. Continue with all the dough.
- Bake for 11-12 minutes until lightly golden brown along the edge and the tops appear dry. Do not overbake.
- When they come out of the oven, press more M&M’s, chocolate chips, and sprinkles into the dough for a pretty presentation if desired. Let cool for 10 minutes on the sheet tray, then transfer to a wire rack to cool completely.
- While the cookies are baking, make the filling. Cream the butter in the body of a stand mixer with the paddle attachment until smooth.
- Add the powdered sugar a little at a time until fully mixed in. Add the salt, vanilla, and milk. Stir to combine, then place on medium-high speed for 3 minutes until fluffy.
- Divide the frosting evenly between 3 bowls. Add red food coloring to one bowl and green food coloring to another bowl, and stir to combine until you reach your desired color. Leave the last bowl as is.
- Place the frosting in three piping bags or into three plastic bags and snip off the end. Pipe a dollop of each color onto the bottom of half of the cookies. Place another cookie on top and gently press down to form a sandwich. Serve immediately.
Notes
- Ensure the butter is softened for better mixing.
- Do not overbake the cookies for a chewy texture.
- Feel free to customize colors and sprinkles according to your preference.
Nutrition
- Serving Size: 2 cookies
- Calories: 180
- Sugar: 10g
- Sodium: 100mg
- Fat: 8g
- Saturated Fat: 5g
- Unsaturated Fat: 3g
- Trans Fat: 0g
- Carbohydrates: 25g
- Fiber: 1g
- Protein: 2g
- Cholesterol: 25mg