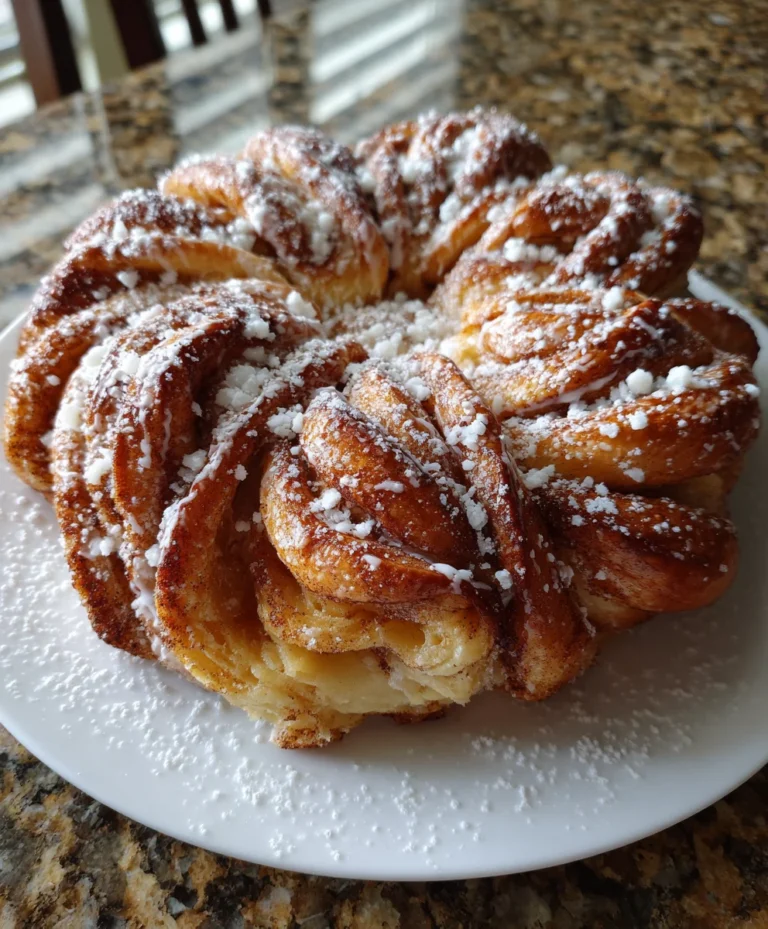
Introduction to Cinnamon Roll Pull-Apart Snowflake
As we dive into the hustle and bustle of our daily lives, it’s always a joy to find a delightful treat that can steal the spotlight. That’s where my Cinnamon Roll Pull-Apart Snowflake comes into play! This dessert is not just a feast for the eyes but also an easy way to bring smiles to your loved ones. Whether you’re hosting a cozy family gathering or need a quick solution for a busy day, this stunning recipe will surely impress. Trust me, this cinnamon roll creation is the perfect blend of simplicity and charm!
Why You’ll Love This Cinnamon Roll Pull-Apart Snowflake
This Cinnamon Roll Pull-Apart Snowflake is like a warm hug on a plate! You’ll adore how easily it comes together, making kitchen chaos feel like a breeze. With its gooey cinnamon filling and delightful presentation, it transforms the ordinary into extraordinary. Plus, your family will love tearing into this delicious dessert. It’s perfect for those busy weeks, giving you more time to enjoy laughter and memories around the table!
Ingredients for Cinnamon Roll Pull-Apart Snowflake
Let’s gather the magic ingredients that will help you create this stunning Cinnamon Roll Pull-Apart Snowflake. Each one plays a crucial role in making this dessert not only beautiful but also delicious!
- All-purpose flour: The backbone of your dough, providing structure. You can substitute with whole wheat flour for a healthier option, though the texture will differ.
- Granulated sugar: This sweet ingredient adds flavor and helps with browning. You can use coconut sugar for a more natural alternative.
- Active dry yeast: This little hero makes your dough rise and gives it that fluffy texture. Ensure it’s fresh for the best results!
- Salt: Enhances flavor. Don’t skip it, as it balances the sweetness and enhances other flavors.
- Warm milk: It activates the yeast and brings moisture to the dough. Aim for a comfortable temperature, just warm enough to touch.
- Unsalted butter (melted & softened): Adds richness and flavor to your dough and filling. If you prefer, substitute it with coconut oil for a dairy-free version.
- Large egg: It binds the dough together and contributes to its lovely texture. For a vegan option, use a flax egg instead.
- Light brown sugar: This adds caramel-like sweetness and moisture to the filling. If you’re out, white sugar will work, but the flavor will change slightly.
- Ground cinnamon: Brings that warm, inviting scent and flavor that we all adore in cinnamon rolls. Feel free to sprinkle on extra for a bolder kick!
- Powdered sugar: A must for the icing that brings everything together. It melts into a lovely drizzle when mixed with milk and vanilla.
- Milk (for icing): Just enough to thin the icing, making it perfect for drizzling. Use dairy or a non-dairy alternative based on preference.
- Pure vanilla extract: For that delightful aroma and taste that elevates the icing. You can use vanilla bean paste for an extra touch of sophistication!
For exact measurements, be sure to check the bottom of the article where you can find everything laid out neatly for easy printing!
How to Make Cinnamon Roll Pull-Apart Snowflake
Now comes the fun part—making your own Cinnamon Roll Pull-Apart Snowflake! Follow these simple steps, and you’ll create a showstopper that fills your home with the sweetest aroma. Each step will guide you through the process, ensuring delicious results!
Step 1: Activate Yeast
Start by grabbing a large bowl. Combine warm milk, granulated sugar, and active dry yeast. Give it a little stir, then let it stand for 5 to 10 minutes. Look for it to get frothy, which means your yeast is happy and ready to work its magic!
Step 2: Prepare Dough
Once your yeast is frothy and bubbly, add melted butter, the room-temperature egg, and salt into the mixture. Mix well! Gradually add all-purpose flour, stirring until a soft dough begins to form. Your goal is a lovely, slightly sticky dough that’s easy to handle.
Step 3: Knead Dough
On a lightly floured surface, knead your dough for about 5 to 7 minutes. Use the palms of your hands to push the dough away, then fold it back. Feel the dough; it should become smooth and elastic. If it’s too sticky, sprinkle a bit more flour on your work surface, but don’t overdo it!
Step 4: Preheat Oven
While your dough rises, preheat your oven to 350°F. Line a baking sheet with parchment paper to keep your snowflake from sticking. This will make cleanup a breeze!
Step 5: Shape Dough Circles
Once your dough has risen and doubled in size, punch it down gently. Divide the dough into three equal pieces. Roll each piece into a 12-inch diameter circle, taking care to keep them as even as possible. This ensures uniform baking.
Step 6: Layer Filling
Take the first dough circle and place it on the prepared baking sheet. Spread half of the softened butter evenly over the surface. Then, sprinkle half of the cinnamon sugar mixture generously across it. This will create that delicious gooey center we all adore!
Step 7: Assemble Layers
On top of the first dough circle, add the second one! Spread the remaining butter and cinnamon sugar mixture just like you did before. Finally, layer on the third dough circle without any filling. This helps create the lift you want for your snowflake.
Step 8: Cut Dough
Now comes the fun part! Place a small glass in the center of your stacked dough. Using a sharp knife, cut the dough into 16 equal strips, radiating outwards from the glass. Just be sure not to cut all the way through the center! This is key for that gorgeous snowflake shape.
Step 9: Form Snowflake
Remove the glass gently. It’s time to twist! Take two adjacent strips and twist them away from each other twice. Pinch the ends together to form a pointed tip. Repeat this with all pairs until you have a beautiful snowflake shape.
Step 10: Second Rise
Cover your shaped dough with a clean towel and let it rise for another 15 minutes. This step is crucial for achieving a fluffy texture. Patience is key here, as those little yeast soldiers continue to work!
Step 11: Bake
Once it’s risen, pop it in the oven for 22 to 25 minutes. You want it golden brown and smelling heavenly! Keep an eye on it as it bakes; timing can vary based on your oven.
Step 12: Add Icing
After baking, let your snowflake cool for about 10 minutes. In the meantime, whisk together powdered sugar, milk, and vanilla extract until smooth. Drizzle this delightful icing over your warm pull-apart snowflake. It’s the cherry on top!
Tips for Success
- Ensure your milk is warm, not hot, to activate the yeast effectively.
- Don’t skip the kneading—this develops the gluten for a fluffy texture.
- Keep a light hand with the flour when rolling out to maintain softness.
- If the dough seems too sticky, add flour gradually.
- Check your oven’s temperature for accuracy; ovens can vary.
Equipment Needed for Cinnamon Roll Pull-Apart Snowflake
- Mixing bowl: A large bowl for combining your ingredients. A sturdy pasta bowl can work if you’re in a pinch!
- Rolling pin: To roll out your dough evenly. A clean wine bottle can substitute in a hurry!
- Baking sheet: A flat sheet for baking; ensure it’s rimmed for catching any buttery goodness.
- Parchment paper: Makes for easy cleanup and prevents sticking. Foil can be used as an alternative.
- Sharp knife: For cutting your dough with precision. A pizza cutter can also do the trick.
Variations of Cinnamon Roll Pull-Apart Snowflake
- Pecan Caramel Snowflake: Add chopped pecans to the cinnamon sugar filling for a delightful crunch. Drizzle with caramel sauce before serving for an indulgent twist!
- Chocolate Hazelnut Twist: Replace the cinnamon sugar filling with hazelnut spread. Top with mini chocolate chips for a rich and decadent flavor.
- Fruit-Infused Delight: Incorporate fresh blueberries or chopped apples into the filling, giving your snowflake a fruity flair. Toss the fruit in a bit of sugar to enhance sweetness.
- Gluten-Free Version: Substitute all-purpose flour with a gluten-free flour blend to make this recipe lighter and suitable for gluten-sensitive friends and family.
- Dairy-Free Option: Use almond milk or oat milk and coconut oil to create a delicious dairy-free version without sacrificing flavor.
Serving Suggestions for Cinnamon Roll Pull-Apart Snowflake
- Hot Cocoa: Pair your snowflake with a warm cup of hot cocoa for a cozy treat.
- Fresh Fruit: Serve with slices of fresh oranges or berries to balance the richness.
- Festive Plate: Present on a decorative platter with powdered sugar dusted on top for a charming touch.
- Ice Cream: A scoop of vanilla ice cream served alongside brings joy to every bite!
FAQs about Cinnamon Roll Pull-Apart Snowflake
So, you’ve got questions about my Cinnamon Roll Pull-Apart Snowflake? Don’t worry; I’ve got answers! Here are some common queries to help you out:
Can I make the dough ahead of time?
Absolutely! You can prepare the dough the night before, let it rise, then refrigerate it. Just allow it to come to room temperature before shaping!
What’s the best way to store leftovers?
Leftovers can be stored in an airtight container at room temperature for up to two days or refrigerated for up to a week. Just rewarm it briefly in the oven!
Can I freeze the Cinnamon Roll Pull-Apart Snowflake?
Yes! To freeze, wrap it well in plastic wrap and foil before freezing. Thaw it overnight in the fridge when you’re ready to enjoy it again.
How can I make my snowflake look even more festive?
Add festive sprinkles or edible glitter on top of the icing for a sparkling holiday touch! It’s all about presentation!
What if I don’t like cinnamon?
No worries! You can swap out cinnamon for other spices like nutmeg or cardamom, or even use chocolate spread for a delicious alternative. Get creative!
Final Thoughts on Cinnamon Roll Pull-Apart Snowflake
Creating this Cinnamon Roll Pull-Apart Snowflake has been more than just a baking experience; it’s a warm memory in the making. The aroma wafting through your home, the joy on your loved ones’ faces, and the ease of preparation all come together beautifully. This delightful dessert is perfect for any occasion, adding a touch of warmth to your gatherings. So, roll up your sleeves, embrace the joy of home baking, and let this snowflake sprinkle sweetness into your life. Trust me, each pull-apart piece will be met with smiles and laughter, just like it should be!
PrintCinnamon Roll Pull-Apart Snowflake
A stunning and delicious dessert that resembles a snowflake, made with cinnamon rolls that pull apart easily.
- Prep Time: 30 minutes
- Cook Time: 25 minutes
- Total Time: 1 hour 15 minutes
- Yield: Serves 8–10 1x
- Category: Dessert
- Method: Baking
- Cuisine: American
- Diet: Vegetarian
Ingredients
- 3 1/4 cups all-purpose flour
- 1/4 cup granulated sugar
- 2 1/4 tsp active dry yeast
- 1/2 tsp salt
- 3/4 cup warm milk (about 110°F)
- 1/4 cup unsalted butter, melted
- 1 large egg, room temperature
- 1/2 cup packed light brown sugar
- 2 tsp ground cinnamon
- 1/4 cup unsalted butter, softened
- 1 cup powdered sugar
- 2–3 tbsp milk
- 1/2 tsp pure vanilla extract
Instructions
- Activate Yeast: Combine warm milk, granulated sugar, and active dry yeast in a large bowl. Let stand for 5–10 minutes until frothy.
- Prepare Dough: Add melted butter, egg, and salt to the yeast mixture. Gradually incorporate flour until a soft dough forms.
- Knead Dough: Knead dough on a lightly floured surface for 5–7 minutes until smooth and elastic. Place in a greased bowl, cover, and allow to rise in a warm place for 1 hour or until doubled in size.
- Preheat Oven: Preheat oven to 350°F and line a baking sheet with parchment paper.
- Shape Dough Circles: Punch down dough and divide into three equal pieces. Roll each piece into a 12-inch diameter circle.
- Layer Filling: Place one dough circle on the prepared baking sheet. Spread half of the softened butter over the surface, then sprinkle half of the cinnamon sugar mixture evenly.
- Assemble Layers: Add the second dough circle on top. Spread the remaining butter and cinnamon sugar. Place the third dough circle on top without filling.
- Cut Dough: Place a small glass in the center of the stacked dough. Using a sharp knife, cut the dough into 16 equal strips radiating outward from the glass, taking care not to cut through the center.
- Form Snowflake: Twist two adjacent strips away from each other twice, then pinch the ends together to form a point. Repeat with all pairs to create the snowflake shape.
- Second Rise: Remove the glass. Cover the shaped dough with a towel and let rise for 15 minutes.
- Bake: Bake for 22–25 minutes until the snowflake is golden brown.
- Add Icing: Cool for 10 minutes. Whisk powdered sugar, milk, and vanilla extract together until smooth, then drizzle over the warm pull-apart.
Notes
- For best results, ensure the milk is at the right temperature when activating the yeast.
- Make sure to knead the dough well to develop gluten for better structure.
- This recipe is perfect for holiday gatherings or special occasions.
Nutrition
- Serving Size: 1 piece
- Calories: 220
- Sugar: 7g
- Sodium: 150mg
- Fat: 7g
- Saturated Fat: 4g
- Unsaturated Fat: 2g
- Trans Fat: 0g
- Carbohydrates: 34g
- Fiber: 1g
- Protein: 3g
- Cholesterol: 25mg