
Introduction to Dulce de Leche Cheesecake Bars
When life gets hectic, I crave simple solutions that bring joy to my kitchen. These dulce de leche cheesecake bars are a slice of happiness that can brighten any busy day. With their creamy filling and crunchy graham cracker crust, they’re not just a dessert; they’re a delightful experience. Whether you’re impressing friends at a gathering or treating your family after dinner, these bars will do the trick. Plus, they’re easy to make! Trust me, you’ll want this recipe in your back pocket for when you need it most.
Why You’ll Love This Dulce de Leche Cheesecake Bars
These dulce de leche cheesecake bars are a dream for anyone with a busy lifestyle! They come together quickly, needing just a handful of ingredients and minimal effort. The balance of rich cheesecake, sweet dulce de leche, and a crunchy crust is simply unbeatable. Plus, they can be made ahead, meaning you’ll have a delicious dessert ready to go whenever the mood strikes. What’s not to love?
Ingredients for Dulce de Leche Cheesecake Bars
Gathering the right ingredients is essential for making these heavenly dulce de leche cheesecake bars. Here’s what you’ll need:
- Graham cracker crumbs: The base of our crust, providing that familiar crunch and sweetness.
- Sugar: Just a bit to enhance the flavors—because who doesn’t love a touch of sweetness?
- Cinnamon: An optional spice that adds warmth and a hint of exotic flavor to the crust.
- Melted butter: This binds the crust together, giving it a rich and buttery taste.
- Cream cheese: The star of the cheesecake layer, making it rich, creamy, and utterly delightful.
- Granulated sugar: This sweetens our cheesecake filling to perfection, balancing its richness.
- Eggs: They provide structure and creaminess; be sure they’re at room temperature for best results.
- Dulce de leche: A must-have for this recipe, adding a creamy, caramel-like sweetness to the cheesecake.
- Vanilla extract: A splash of vanilla elevates the flavor profile and enhances sweetness.
- Dulce de leche for topping: The crowning glory, drizzled on top for extra indulgence. Trust me, you won’t want to skip this!
- Heavy cream: This is used to adjust the consistency of the dulce de leche topping, making it pourable.
- Fleur de sel or flaky sea salt: A sprinkle adds a gorgeous contrast to the sweetness, rounding out the flavors beautifully.
For the exact quantities of each ingredient, check out the end of the article where you can easily print the recipe for your next baking adventure!

How to Make Dulce de Leche Cheesecake Bars
Creating these dulce de leche cheesecake bars is a delightful journey. Follow along with these steps, and you’ll have creamy, luscious bars ready to impress!
Step 1 – Craft the Crust
First, let’s make the foundation of our bars—the crust. In a medium bowl, combine graham cracker crumbs, sugar, and cinnamon. The sweet scent of cinnamon wafts through the air, evoking memories of cozy kitchens.
Next, pour in the melted butter. Using a fork, mix until everything looks like wet sand. Don’t worry if it clumps—just make sure it’s combined well. Now, take this mixture and press it firmly into a greased 13×9-inch pan. A little elbow grease here creates that crunchy, satisfying base.
Pop the crust into a preheated oven at 350°F for about 10 minutes. This quick baking gives it a lovely golden hue. Once done, let it cool while we whip up the cheesecake layer.
Step 2 – Make the Cheesecake Layer
Now comes the star of the show—the cheesecake layer! Begin by placing softened cream cheese and sugar into a mixing bowl. Using a hand mixer or stand mixer, beat until it’s silky smooth. This step is crucial because we want no lumps!
Now, add the dulce de leche and vanilla extract. Watch as the mixture turns a beautiful caramel color. Mix it in well, and then add the eggs, one by one. Beat gently after each addition, ensuring they are well incorporated. Remember, room temperature eggs blend in better, giving us that luscious creamy texture.
Once all is mixed, pour the cheesecake batter onto the cooled crust, spreading it evenly. Bake at 325°F for about 35–38 minutes. We’re creating a velvety layer that will melt in your mouth.
Step 3 – Make It Golden
Once you pull the bars from the oven, let them cool completely. I know patience isn’t easy, but it’s worth it! While waiting, warm the remaining dulce de leche with heavy cream on the stove or in the microwave until it’s pourable.
Gently spread this luscious dulce de leche topping over the cooled cheesecake layer. Picture the silky sweetness coating every inch. It’s like a warm hug for your taste buds!
Step 4 – Chill and Slice
Now comes the final stretch! Refrigerate the bars for at least an hour. I often love to leave them overnight for the best texture. As they chill, they become firmer and easier to slice.
For slicing, grab a sharp knife and dip it in warm water. This little trick ensures each cut is clean and neat. When you’re ready to serve, sprinkle a touch of fleur de sel on top. It makes the bars even more irresistible! Enjoy every bite of these delightful dulce de leche cheesecake bars.
Tips for Success
- Use room temperature cream cheese for a smooth filling without lumps.
- Don’t skip the chilling time; it helps set the bars for easier slicing.
- Experiment with flavors by adding a splash of almond extract or citrus zest.
- Press the crust firmly for a sturdy base that won’t crumble.
- Slice with a warm knife for clean edges—no one likes a messy bar!
Equipment Needed
- 13×9-inch baking pan: A standard size for even cooking; you can also use an 8×8-inch pan for thicker bars.
- Mixing bowls: For combining ingredients; both glass and stainless steel work well.
- Hand mixer or stand mixer: To whip the cheesecake filling; a whisk can work in a pinch.
- Sharp knife: Essential for slicing the bars; a pizza cutter can be a fun alternative!
- Measuring cups and spoons: Accurate measuring ensures a perfect result every time.
Variations
- Chocolate Delight: Add cocoa powder to the crust and mix melted chocolate into the cheesecake batter for a chocolaty twist.
- Fruit Infusion: Swirl in your favorite fruit puree, like raspberry or strawberry, to the cheesecake layer before baking.
- Nutty Crunch: Fold chopped nuts, such as pecans or walnuts, into the cheesecake for added texture and flavor.
- Gluten-Free Option: Substitute graham cracker crumbs with gluten-free cookies or almond flour for those with gluten sensitivities.
- Lower Sugar: Use a sugar substitute like stevia or erythritol for a healthier version without sacrificing flavor.
Serving Suggestions for Dulce de Leche Cheesecake Bars
- Fresh Fruit: Serve with sliced strawberries or blueberries for a refreshing contrast.
- Whipped Cream: A dollop of freshly whipped cream elevates the dessert to new heights.
- Coffee or Tea: Pair these bars with a warm cup for a cozy treat.
- Chocolate Drizzle: Add a drizzle of melted chocolate for an extra indulgent touch.
- Elegant Plating: Dust with cocoa powder or powdered sugar for a beautifully finished look.
FAQs about Dulce de Leche Cheesecake Bars
As you embark on your dulce de leche cheesecake adventure, you may have a few lingering questions. Here are some common ones I’ve encountered:
Can I make dulce de leche cheesecake bars ahead of time?
Absolutely! These bars can be made a day in advance, which is perfect for busy schedules. Just store them in the refrigerator until you’re ready to serve.
What should I do if my cheesecake layer cracks?
Cracking can happen, especially if the cheesecake bakes too quickly. To prevent this, bake at a lower temperature and avoid opening the oven door during baking. If it does crack, don’t worry—it’ll be covered with dulce de leche topping!
Can I freeze these cheesecake bars?
Yes! Cut the bars into squares and wrap them tightly in plastic wrap, then place them in an airtight container. Freeze for up to three months. Thaw in the refrigerator before serving.
Are there any gluten-free options for the crust?
Definitely! You can use gluten-free graham crackers or almond flour to make a winning crust without gluten. It’s just as delicious!
What can I use instead of dulce de leche?
If you can’t find dulce de leche, caramel sauce can be a great substitute. It won’t have the same depth of flavor, but it will still taste wonderful!
Final Thoughts on Dulce de Leche Cheesecake Bars
There’s something magical about these dulce de leche cheesecake bars. Each bite combines the richness of creamy cheesecake with the warm embrace of caramel. They bring back memories of shared laughter and joyful gatherings. Whether you’re a busy mom or a working professional, these bars fit seamlessly into your life. They’re not just a dessert; they’re a moment of sweetness amidst the chaos. So, whip up a batch, share them with loved ones, and let the flavors create new memories around your table. You’ll find joy in every delicious bite!
PrintDulce de Leche Cheesecake Bars that Everyone Will Love!
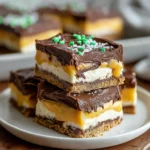
Decadent dulce de leche cheesecake bars with a crunchy graham cracker crust, creamy cheesecake filling, and a luscious dulce de leche topping, sprinkled with a touch of sea salt.
- Prep Time: 20 minutes
- Cook Time: 50 minutes
- Total Time: 1 hour 10 minutes
- Yield: 16 bars 1x
- Category: Dessert
- Method: Baking
- Cuisine: Mexican-American
- Diet: Vegetarian
Ingredients
- 2 1/4 cups graham cracker crumbs (about 17 crackers)
- 2 tablespoons sugar
- 1/4 to 1/2 teaspoon cinnamon
- 10 tablespoons melted butter
- 3 (8 oz) packages cream cheese, softened
- 1 cup granulated sugar
- 3 large eggs, room temperature
- 1/2 cup dulce de leche
- 2 teaspoons vanilla extract
- 2/3 cup dulce de leche for topping
- 3–5 tablespoons heavy cream (as needed)
- Fleur de sel or flaky sea salt, for sprinkling
Instructions
- Craft the Crust: Mix the graham cracker crumbs, sugar, and cinnamon in a bowl. Pour in the melted butter and stir until the mixture resembles wet sand. Press this evenly into a greased 13×9-inch pan and bake at 350°F for 10 minutes. Let it cool while you make the filling.
- Make the Cheesecake Layer: Blend the cream cheese and sugar until silky smooth. Add the dulce de leche and vanilla, then the eggs one at a time, mixing until incorporated. Pour the cheesecake batter onto your cooled crust and bake at 325°F for about 35–38 minutes.
- Make It Golden: Let the bars cool completely. Warm your dulce de leche topping with heavy cream until pourable. Pour and spread over the cooled cheesecake layer.
- Chill and Slice: Refrigerate the bars for at least an hour. When ready to serve, sprinkle with fleur de sel and slice into squares.
Notes
- Ensure cream cheese is at room temperature for a smooth batter.
- Use a sharp knife dipped in warm water for clean slices.
- For easier cutting, refrigerate the bars longer, if possible.
Nutrition
- Serving Size: 1 bar
- Calories: 300
- Sugar: 20g
- Sodium: 150mg
- Fat: 20g
- Saturated Fat: 10g
- Unsaturated Fat: 8g
- Trans Fat: 0g
- Carbohydrates: 30g
- Fiber: 1g
- Protein: 4g
- Cholesterol: 80mg