Introduction to Easy Eclair Cake Dessert
Welcome, friends! If you’re like me, juggling a family, work, and life, you know how precious time can be in the kitchen. That’s where my favorite creation, the Easy Eclair Cake Dessert, comes into play. It’s a no-bake delight that promises to impress without requiring hours of slaving over the stove. This dessert is perfect for busy days when you want to whip up something special that everyone will love. Imagine that delightful combination of creamy filling and chocolatey goodness gracing your dining table. Trust me; you’ll want this in your recipe repertoire!
Why You’ll Love This Easy Eclair Cake Dessert
This Easy Eclair Cake Dessert is a lifesaver in the kitchen! It’s not just simple; it’s also incredibly quick. With minimal prep and no baking fuss, you can have a stunning dessert ready in just over an hour. Plus, the taste? Oh, it’s a rich blend of creamy and chocolatey flavors that will leave your family and friends asking for seconds. It’s truly a crowd-pleaser!
Ingredients for Easy Eclair Cake Dessert
Gathering your ingredients is half the fun of making this Easy Eclair Cake Dessert. Here’s what you’ll need:
- Water: This forms the base for our crust, helping to create that perfect pastry texture.
- Unsalted Butter: Melting this ensures a rich flavor, avoiding any unwanted saltiness in our dessert.
- Plain Flour: Essential for our crust, it provides structure and helps absorb moisture to keep it light.
- Eggs: They give our crust that important lift and richness, creating a lovely puffy texture.
- Cream Cheese: This is the heart of the filling—smooth, tangy, and utterly delicious!
- Vanilla Instant Pudding Mix: The key to our creamy filling, adding sweetness and a delightful flavor.
- Heavy Whipping Cream: This creates a luscious, fluffy consistency for our filling, making it feel indulgent.
- Italian Sweet Cream Coffee Creamer: A sweet twist that enhances the overall flavor of the filling.
- Whipped Topping: Light and airy, it’s perfect for layering on top, offering that classic eclair finish.
- Chocolate Syrup: Drizzle this on top to add that trademark chocolatey goodness everyone loves!
All these ingredients come together to create a delicious symphony of textures and tastes. If you’re hunting for alternatives, feel free to use dairy-free options or even gluten-free flour based on your needs. The exact quantities are detailed at the bottom of the article and are ready for printing, so you’ll never miss a beat while preparing this delightful treat!
How to Make Easy Eclair Cake Dessert
Now for the best part: making this Easy Eclair Cake Dessert! It sounds fancy, but I promise it’s straightforward. Grab your apron, and let’s get down to business.
Preheat and Prepare
First things first, preheat your oven to 200°C (that’s about 400°F for my American friends!). While the oven heats, lightly grease a 23 x 33 cm (9 x 13-inch) baking dish. This step is crucial; it prevents our crust from sticking, giving it a chance to shine. The crust is the foundation, and it should be crispy yet soft. Trust me, no one wants a dessert that ends up stuck to the pan!
Making the Crust
Next, let’s create the crust that holds it all together! In a medium saucepan, combine the water and melted butter, bringing the mixture to a boil. Once it’s bubbling with excitement, remove it from the heat and whisk in the flour with fervor. You’ll see it come together almost instantly. Now, add the eggs, one at a time, mixing thoroughly after each addition. This blend is what makes our crust rise beautifully in the oven. Spread this delightful dough evenly in your prepared baking dish, pressing it up the sides gently, but don’t fret! It will puff up beautifully as it bakes. We’re aiming for a golden brown crust, so keep an eye on it as it bakes for 25–30 minutes. Once it’s done, let it cool completely—no shortcuts here!
Mixing the Filling
While waiting for the crust to cool, we can start on the luscious filling. Begin by placing your softened cream cheese in the bowl of a stand mixer. In a separate bowl, whisk the vanilla pudding mix with the heavy whipping cream and the Italian sweet cream coffee creamer. Whisk away for about 2 to 3 minutes, until it thickens up. Chill this pudding mixture in the fridge while the crust cools. Once your crust is ready, mix the chilled pudding into the cream cheese. You want it smooth and creamy, so take your time and mix well. Refrigerate this dreamy filling until it’s nice and cool.
Assembly
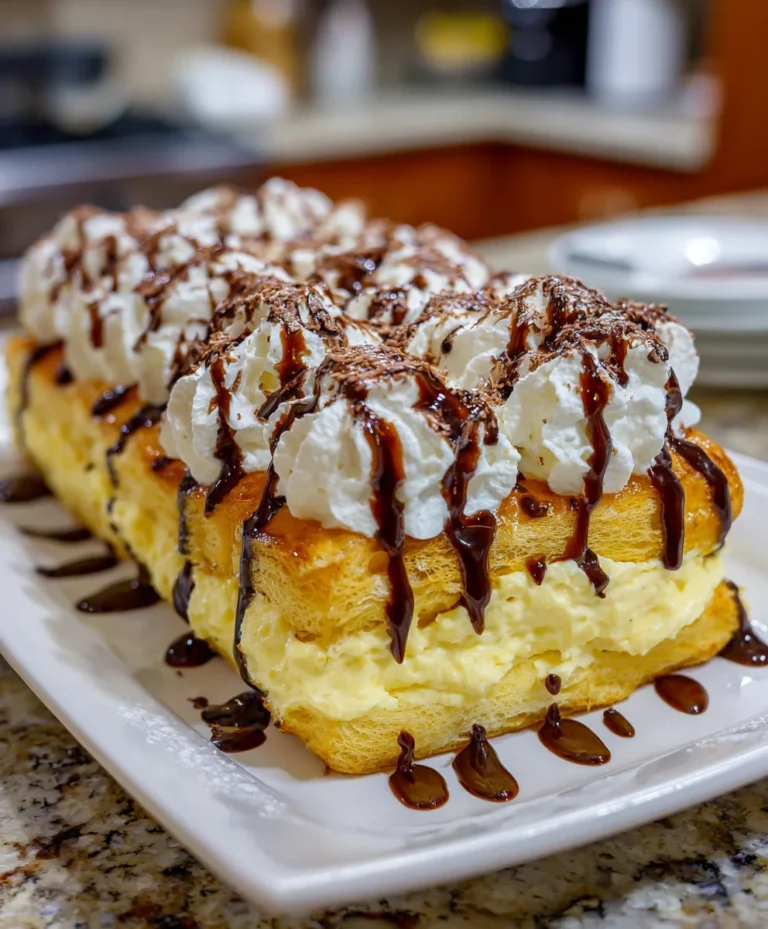
Now we’re ready to assemble! First, take that cooled crust and spread the filling evenly over the top. Don’t be shy! Make it look pretty. Then, spread the thawed whipped topping over the filling, smoothing it out like a fluffy cloud. Remember to be gentle with it—no one wants to disturb that beautiful filling! Once that’s done, transfer it back to the fridge. This dessert needs to chill for a bit to firm up, so give it at least an hour to set fully.
Final Touches
Finally, it’s time for the magic touch—drizzling the chocolate syrup. To do this, take the dessert out of the fridge once it’s set and drizzle chocolate syrup over the whipped topping in beautiful swirls. The more, the better! It gives it that classic eclair look and adds extra deliciousness. Now place it back in the fridge until you’re ready to serve. This Easy Eclair Cake Dessert is now picture-perfect and waiting to be devoured!
Tips for Success
- Make sure the crust cools completely before adding the filling to keep it from melting.
- For an extra creamy filling, let the pudding mixture chill longer—patience pays off!
- Customize your toppings with fresh fruits like strawberries or bananas for a fun twist.
- Use a spatula to smooth the whipped topping for a professional finish.
- Consider storing leftovers covered in the fridge; they last for 2–3 days!
Equipment Needed
- Baking Dish: A 23 x 33 cm (9 x 13-inch) pan works best; an oven-safe glass dish is a great alternative.
- Medium Saucepan: Ideal for boiling water and butter; any sturdy pot will do.
- Stand Mixer: For easy mixing; a hand mixer or whisk can substitute.
- Mixing Bowls: Use any size; keep it simple with a few standard bowls.
- Spatula: Perfect for spreading the filling; consider a silicone spatula for best results.
Variations
- Add a layer of fresh berries in between the filling and whipped topping for a burst of flavor.
- Try using chocolate pudding mix instead of vanilla for a rich double chocolate experience.
- Substitute coconut cream for whipped topping to give a tropical twist and a hint of coconut flavor.
- For a gluten-free version, switch to gluten-free flour in the crust.
- Experiment with flavored creamers, like hazelnut or caramel, to change the filling profile.
Serving Suggestions for Easy Eclair Cake Dessert
- Pair it with a dollop of whipped cream for an extra layer of indulgence.
- Serve with fresh berries on the side—strawberries or raspberries are fantastic!
- Accompany with a cup of coffee or a glass of milk for a delightful contrast.
- Consider garnishing with chocolate shavings for an elegant touch.
- Presentation tip: Use decorative dessert plates for an inviting look at your table!
FAQs about Easy Eclair Cake Dessert
Can I make this Easy Eclair Cake Dessert in advance? Absolutely! This dessert actually tastes even better after chilling overnight, allowing the flavors to meld beautifully. Just cover it well to keep it fresh.
How long does this dessert last in the fridge? This Easy Eclair Cake Dessert can last for about 2–3 days in the refrigerator if stored properly. Just remember to keep it covered to prevent it from drying out.
What can I substitute for the cream cheese? If you’re looking for a lighter option, you can use Greek yogurt instead. It’ll create a similar creamy texture and add a slight tang!
Can I use different pudding flavors? Definitely! Vanilla is a classic, but chocolate or butterscotch pudding can add a delicious twist to your Easy Eclair Cake Dessert. Experiment and find your favorite!
Is there a gluten-free option for this dessert? Yes! Just swap the plain flour for gluten-free flour, and you’ll have a delightful gluten-free version of this Easy Eclair Cake Dessert. Everyone can enjoy it!
Final Thoughts
Making the Easy Eclair Cake Dessert is more than just a recipe; it’s an opportunity to create sweet memories with loved ones. Each layer brings joy, whether it’s indulging in its creamy texture or savoring the rich chocolate drizzle. This no-bake wonder frees up your time, giving you moments to connect with family around the table. Plus, the smiles it brings are priceless! So, the next time you need a quick dessert that impresses, remember this delightful treat. Trust me, it’s sure to become a cherished tradition in your home just like it is in mine!
PrintEasy Eclair Cake Dessert

A delicious no-bake dessert that combines a light pastry crust, creamy filling, and a rich chocolate topping.
- Prep Time: 40 minutes
- Cook Time: 30 minutes
- Total Time: 1 hour 10 minutes
- Yield: 12 servings 1x
- Category: Dessert
- Method: No-Bake
- Cuisine: American
- Diet: Vegetarian
Ingredients
- 240 millilitres water
- 113 grams unsalted butter, melted
- 125 grams plain flour
- 4 large eggs
- 226 grams cream cheese, softened
- 2 x 96 grams boxes vanilla instant pudding mix
- 480 millilitres heavy whipping cream
- 240 millilitres Italian sweet cream coffee creamer
- 226 grams whipped topping, thawed
- Chocolate syrup, for drizzling
Instructions
- Preheat oven to 200°C. Lightly grease a 23 x 33 cm baking dish. Set whipped topping out to thaw.
- In a medium saucepan, melt butter with water and bring to a boil. Remove from heat, stir in flour until fully combined. Add eggs one at a time, mixing thoroughly after each addition. Spread the dough evenly across the bottom and up the sides of the prepared dish.
- Bake for 25 to 30 minutes, or until golden brown. Do not overbake. Remove from oven and cool completely. Do not push down any puffed areas, as the crust will settle with cooling.
- Place cream cheese in the bowl of a stand mixer. In a separate bowl, whisk vanilla pudding mix with heavy cream and creamer for 2 to 3 minutes until thickened. Chill pudding mixture in the refrigerator. Once set, gradually add the pudding mixture to the cream cheese, mixing until smooth and creamy. Refrigerate to chill thoroughly.
- Spread the chilled filling evenly over the cooled crust. Top with thawed whipped topping, smoothing over the entire surface.
- Drizzle chocolate syrup over the whipped topping. Refrigerate until fully set before serving.
Notes
- Ensure that the crust cools completely before adding the filling to prevent it from melting.
- For a firmer filling, allow it to chill longer in the refrigerator.
- Feel free to customize the toppings with fresh fruits or nuts.
Nutrition
- Serving Size: 1 piece
- Calories: 350
- Sugar: 18g
- Sodium: 210mg
- Fat: 20g
- Saturated Fat: 10g
- Unsaturated Fat: 8g
- Trans Fat: 0g
- Carbohydrates: 40g
- Fiber: 1g
- Protein: 4g
- Cholesterol: 80mg