Introduction to Ice Cream Sandwich Cake
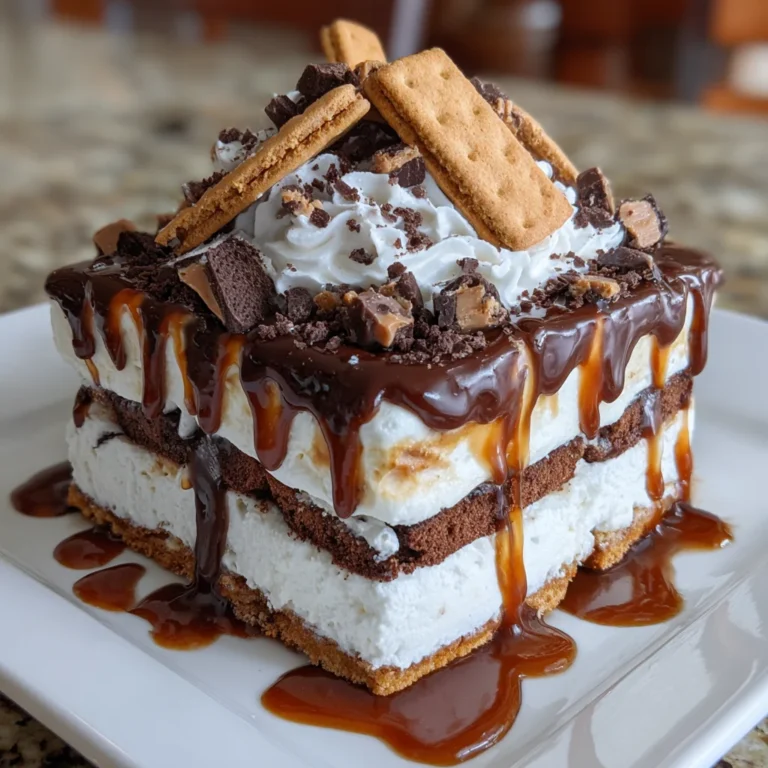
Ah, nothing says summer like a delightful Ice Cream Sandwich Cake! As a busy mom, I know how hard it can be to whip up something impressive yet simple. This dessert is just what you need for those warm gatherings or celebrations. Imagine layers of creamy goodness and crunchy surprises, all coming together in a glorious stack. It’s an effortless solution for satisfying sweet cravings without slaving in the kitchen. Plus, it’s a dish sure to impress your friends and family. You’ll love how quickly it comes together!
Why You’ll Love This Ice Cream Sandwich Cake
You’ll adore this Ice Cream Sandwich Cake for its unbeatable ease and delicious flavors. With no baking required, it’s a lifesaver for busy days. In just a few simple steps, you’ll create a dessert that looks as stunning as it tastes. The blend of creamy ice cream, rich sauces, and crunchy toppings will make your taste buds dance. Plus, it’s a guaranteed crowd-pleaser, perfect for any gathering!
Ingredients for Ice Cream Sandwich Cake
This Ice Cream Sandwich Cake is all about convenience and flavor! Below are the ingredients you’ll need to create this delightful treat. Don’t worry; the exact measurements are listed at the bottom of the article, available for printing.
Essential Ingredients
- Vanilla ice cream sandwiches: The foundation of this cake, creamy and sweet. They provide that glorious ice cream flavor without any fuss!
- Whipped topping: This light and fluffy layer adds an airy texture. It’s easy to spread and makes each bite feel a bit like heaven.
- Chocolate fudge sauce: A rich, chocolaty drizzle that brings depth to your dessert. It’s the ultimate detail for chocolate lovers!
- Caramel sauce: Sweet and sticky, caramel sauce complements chocolate beautifully, adding layers of flavor that keep everyone coming back for more.
- Mini chocolate chips: These little bites of chocolate bring crunch and sweetness. They’re the perfect finishing touch atop your Ice Cream Sandwich Cake!
- Crushed candy or chocolate bars: Think of Oreos, Snickers, or Reese’s Pieces for a delightful crunch! They add a fun texture and extra flavor layers.
Optional Ingredients and Substitutions
- Different ice cream sandwich flavors: Feel free to mix it up! Chocolate, mint, or cookie dough sandwiches can add unique flavors to your cake.
- Fresh fruit: Slices of banana or strawberries between layers can brighten the flavors and add a fruity twist!
- Nut butters: Want to make it richer? A layer of chocolate or peanut butter spread will take this dessert to the next level.
- Nuts: Crushed pecans or almonds can lend a delightful crunch, making each bite even more enjoyable.

How to Make Ice Cream Sandwich Cake
Now that we have all our ingredients ready, let’s dive into creating this Ice Cream Sandwich Cake. You’ll see how simple it is to assemble this dessert, and I promise, it will be worth it! Just follow these straightforward steps, and you’ll have a stunning treat to impress everyone.
Step 1: Prepare Your Workspace
First things first! Clear your kitchen counter and gather all your ingredients. Having everything within reach makes the process smoother. Since we’re making a no-bake cake, make sure your whipped topping is fully thawed. Trust me, this simple setup keeps the joy in baking!
Step 2: Create the First Layer
Grab your 9×13 inch baking dish and lay down the first layer of ice cream sandwiches. You’ll need 12 sandwiches to cover the bottom completely. This foundation is where all the magic begins! Make sure you arrange them snugly to avoid gaps. It’s like laying the first brick of a delicious castle!
Step 3: Add Whipped Topping and Sauces
Next, spread half of the whipped topping evenly over your first layer of ice cream sandwiches. Use a spatula for a smooth spread! Then, drizzle half of the chocolate fudge sauce and half of the caramel sauce over the whipped topping. The gooey goodness starts to take shape! This is where flavor layers begin to bloom.
Step 4: Layer the Toppings
Now, it’s time to sprinkle half of the mini chocolate chips and half of your crushed candy or chocolate bars on top. This crunchy layer adds excitement! You can use your fingers to sprinkle or just toss them on—whatever works best for you! It’s a delightful mix of textures and flavors.
Step 5: Build the Second Layer
Repeat the process by adding another layer of 12 ice cream sandwiches on top of your previous masterpiece. Ensure they’re well-aligned. This second layer brings balance and creates a lovely structure, just like building a sandwich! It’s shaping up beautifully, isn’t it?
Step 6: Finalize the Cake
Spread the remainder of the whipped topping over your second layer, smoothing it out as you go. Then, drizzle the rest of the chocolate fudge sauce and caramel on top. Finally, finish by sprinkling the remaining mini chocolate chips and crushed candy bars. This is where you make it shine! It’s like adding the final touches to a beautiful work of art.
Step 7: Freeze and Serve
Cover the dish tightly with plastic wrap. Now it’s time to take a break! Place your Ice Cream Sandwich Cake in the freezer for at least 2 hours or until firmly set. Once frozen, slice into pieces and serve immediately. Enjoy the smiles on your loved ones’ faces as they take a bite! You’ve created something truly special.
Tips for Success
- Make sure your whipped topping is fully thawed before spreading it.
- For a fun twist, try switching up the flavors of the ice cream sandwiches!
- Be generous with the sauces and toppings to create a beautiful finish.
- Allow plenty of time for freezing—this cake is best enjoyed when it’s firm.
- Use a warm knife to slice through the cake; it helps with a clean cut.
Equipment Needed
- 9×13 inch baking dish: Essential for layering your cake. A glass or metal dish works nicely!
- Spatula: Perfect for spreading the whipped topping evenly. A butter knife can work too!
- Plastic wrap: Necessary for covering the cake while it freezes.
- Knife: A serrated or warm knife helps in slicing through the frozen layers smoothly.
Variations
- Fruit Fusion: Incorporate fresh fruit like strawberries or bananas for a fruity twist! Layer them between ice cream sandwiches for extra flavor.
- Nutty Delight: Add crushed nuts like almonds or pecans for a crunchy texture that pairs beautifully with creamy ice cream.
- Different Flavor Profiles: Explore various ice cream sandwich flavors, like mint chocolate chip or peanut butter cookies, to create unique taste sensations.
- Vegan Version: Use vegan ice cream sandwiches and whipped topping to make this cake suitable for plant-based diets.
- Healthier Options: Swap out regular candy for healthier toppings like granola or dried fruit for a lighter feel.
Serving Suggestions
- Pair your Ice Cream Sandwich Cake with fresh fruit like strawberries or raspberries for a refreshing touch.
- Serve with a scoop of vanilla ice cream on the side for indulgence overload!
- For drinks, consider iced coffee or lemonade to balance the sweetness.
- Present slices on colorful plates for a festive look.
FAQs about Ice Cream Sandwich Cake
Got questions? I’ve got answers! Here are some frequently asked questions about this delightful Ice Cream Sandwich Cake. I hope these tips make your dessert-making journey even smoother.
Can I make Ice Cream Sandwich Cake ahead of time?
Absolutely! This cake can be made a day in advance. Just store it in the freezer and remove it shortly before serving. It will be ready to impress your guests!
What types of ice cream sandwiches work best?
I love using classic vanilla, but any flavor will do! Chocolate, cookies and cream, or even mint can make for a fun twist. Choose what your family enjoys!
Is it necessary to freeze the cake for two hours?
Yes, freezing allows the layers to set properly, giving your Ice Cream Sandwich Cake structure. If you slice it too soon, it may not hold together well. Patience is key!
Can I customize the toppings?
Definitely! Swap in your favorite treats like sprinkles, nuts, or fruit. The beauty of this cake is its versatility. Have fun with it!
How should I store leftovers?
If you happen to have leftovers, cover the cake with plastic wrap and keep it in the freezer. It can last for several days, but trust me, it won’t last long!
Final Thoughts
Creating this Ice Cream Sandwich Cake brings such joy and satisfaction. The blend of creamy and crunchy textures, along with rich toppings, makes each slice an experience that everyone relishes. As a passionate home cook, there’s something incredibly rewarding about seeing loved ones dive into a dessert I made with love. It’s the perfect treat for hot summer days and promises smiles with every bite. Plus, it’s quick and simple enough for any busy mom or professional to whip up. Making memories around this cake is what it’s all about—so enjoy every delicious moment!
PrintIce Cream Sandwich Cake: Indulge in a Cool Delight!
A delicious and easy-to-make Ice Cream Sandwich Cake, perfect for summer gatherings and celebrations.
- Prep Time: 20 minutes
- Cook Time: 0 minutes
- Total Time: 2 hours 20 minutes
- Yield: 12 servings 1x
- Category: Dessert
- Method: No-bake
- Cuisine: American
- Diet: Vegetarian
Ingredients
- 24 vanilla ice cream sandwiches
- 1 tub (16 oz) whipped topping, thawed
- 1 cup chocolate fudge sauce
- 1 cup caramel sauce
- 1 cup mini chocolate chips
- 1 cup crushed candy or chocolate bars (such as Oreo, Snickers, or Reese’s Pieces)
Instructions
- Begin by organizing your workspace and ensuring that all ingredients are ready and accessible.
- In a 9×13 inch baking dish, arrange a layer of 12 ice cream sandwiches. Make sure they cover the entire bottom of the dish.
- Spread half of the whipped topping evenly over the layer of ice cream sandwiches.
- Drizzle half of the chocolate fudge sauce and half of the caramel sauce over the whipped topping.
- Sprinkle half of the mini chocolate chips and half of the crushed candy or chocolate bars over the sauces.
- Add another layer of the remaining 12 ice cream sandwiches on top of the previous layers.
- Spread the rest of the whipped topping over this new layer of ice cream sandwiches.
- Once again, drizzle the remaining chocolate fudge sauce and caramel sauce over the whipped topping.
- Finish by sprinkling the remaining mini chocolate chips and crushed candy or chocolate bars over the top.
- Cover the dish with plastic wrap and freeze the cake for at least 2 hours, or until it is firm and set.
- Remove from the freezer, slice into pieces, and serve immediately.
Notes
- Feel free to customize the cake by using different flavors of ice cream sandwiches.
- For a fruitier version, add slices of banana or strawberries between the layers.
- To make it even more decadent, consider adding a layer of chocolate or peanut butter spread.
- This cake is perfect for summer gatherings and celebrations.
- If you like a little crunch, consider adding some nuts like pecans or almonds in the layers.
Nutrition
- Serving Size: 1 slice
- Calories: 350
- Sugar: 25g
- Sodium: 200mg
- Fat: 18g
- Saturated Fat: 10g
- Unsaturated Fat: 5g
- Trans Fat: 0g
- Carbohydrates: 40g
- Fiber: 2g
- Protein: 5g
- Cholesterol: 30mg