Introduction to Italian Easter Cookies
As a passionate home cook, there’s something truly magical about Italian Easter Cookies. These delightful treats remind me of family gatherings filled with laughter and celebration. I know how busy life can get, especially when juggling work, kids, and all the little moments in between. That’s why this recipe shines—it offers the perfect blend of deliciousness and simplicity. Whether you’re looking for a quick solution to surprise your loved ones or a sweet addition to your holiday traditions, these cookies are sure to impress while bringing joy to your home.
Why You’ll Love This Italian Easter Cookies
These Italian Easter Cookies are not just sweet treats; they’re an experience. They come together quickly, making them a breeze to whip up, even on the busiest of days. The soft, buttery texture paired with the nutty aroma of almond truly delights the senses. Plus, their vibrant glaze and fun sprinkles bring a festive flair that’s sure to make everyone smile. Who doesn’t love cookies that taste as good as they look?
Ingredients for Italian Easter Cookies
Gathering the right ingredients is like preparing a symphony; each element plays its unique part in creating the delightful harmony of flavors. Here’s what you’ll need to whip up these tempting Italian Easter Cookies:
- All-purpose flour: The backbone of your cookies, providing structure and a lovely crumb.
- Baking powder: This little agent ensures your cookies rise to a fluffy perfection.
- Salt: A pinch enhances the sweetness, providing a well-rounded flavor.
- Granulated sugar: Sweetens the dough, making each bite a little moment of bliss.
- Unsalted butter: For that rich texture, while allowing you to control the saltiness of the dough.
- Vanilla extract: Adds a warm, comforting aroma that pairs beautifully with the other flavors.
- Almond extract: This brings a delightful nuttiness, essential for the traditional taste of these Italian cookies.
- Eggs: They bind all the ingredients together, while also contributing to the cookies’ tenderness.
- Powdered sugar: Essential for the sweet, glossy glaze that tops off these treats.
- Milk or cream: Used in the glaze, making it creamy and luscious; you could swap for a plant-based option if you wish.
- Liquid food coloring: Feel free to get creative with colors to brighten up your cookies!
- Sprinkles: These are optional but highly recommended for an added burst of color and joy!
For exact measurements, check the bottom of the article where you’ll find them available for printing. Enjoy the process of mixing these ingredients; the smell of them coming together will be as delightful as the cookies themselves!
How to Make Italian Easter Cookies
Now that we’ve covered the essentials, it’s time to dive into the heart of the recipe: crafting your delicious Italian Easter Cookies! Each step is a bit like a dance, choreographed to create a delightful treat sure to please your taste buds. Here’s how to do it:
Step 1: Preheat the Oven
First things first—set the stage for baking by preheating your oven to 350°F. This warming up step is crucial; it ensures your cookies achieve that perfect golden-brown finish. While the oven gets cozy, you can prepare the rest of your ingredients. Multitasking at its finest!
Step 2: Mix Dry Ingredients
In a medium bowl, grab your whisk and combine the all-purpose flour, baking powder, and salt. Whisking these dry ingredients is essential—it helps to evenly distribute the baking powder, making sure your cookies rise perfectly. Think of it as creating a foundation for your cookie masterpiece!
Step 3: Cream Together Butter and Sugar
In a large bowl or stand mixer, it’s time for some magic! Cream together the softened butter and granulated sugar until the mixture becomes light and fluffy. This step not only adds sweetness but also incorporates air, essential for that delightful texture. It’s like a lighthearted conversation—make sure they’re well acquainted!
Step 4: Incorporate Eggs
Next up, bring in those room-temperature eggs. One at a time, mix them in on medium-low speed. Each egg needs time to blend seamlessly before you add the next, ensuring a smooth, cohesive batter. This part is important; it creates that tender quality we adore in cookies!
Step 5: Combine Wet and Dry Ingredients
Quite simply, it’s time to unite the wet and dry components. Slowly add the flour mixture to your buttery bliss, stirring just until combined. Watch out for overmixing; you want to retain that soft texture. Think of this as a gentle hug between the ingredients, a coming together that’s oh-so-important!
Step 6: Shape the Dough
Using a medium cookie scoop, measure about 1 ½ tablespoons of cookie dough and roll each one into a ball in your hands. Space these delicious little spheres about an inch apart on your lined baking sheets. This space allows them to spread while baking, creating that lovely cookie shape we all love!
Step 7: Bake the Cookies
Slide your baking sheets into the preheated oven and bake the cookies for 12 to 15 minutes. Keep an eye on them; they’re done when a toothpick inserted into the center comes out clean. Let them rest for about 5 minutes on the sheets before transferring them to a cooling rack. Patience, my friend, the best is yet to come!
Step 8: Prepare the Glaze
While the cookies cool, let’s make that sweet, glossy glaze! In a small bowl, whisk together the powdered sugar, milk, and almond extract. Aim for a smooth, lump-free consistency that will beautifully coat your cookies. Feel free to adjust the thickness—add more milk for a drippy glaze or more powdered sugar for a thicker layer!
Step 9: Decorate the Cookies
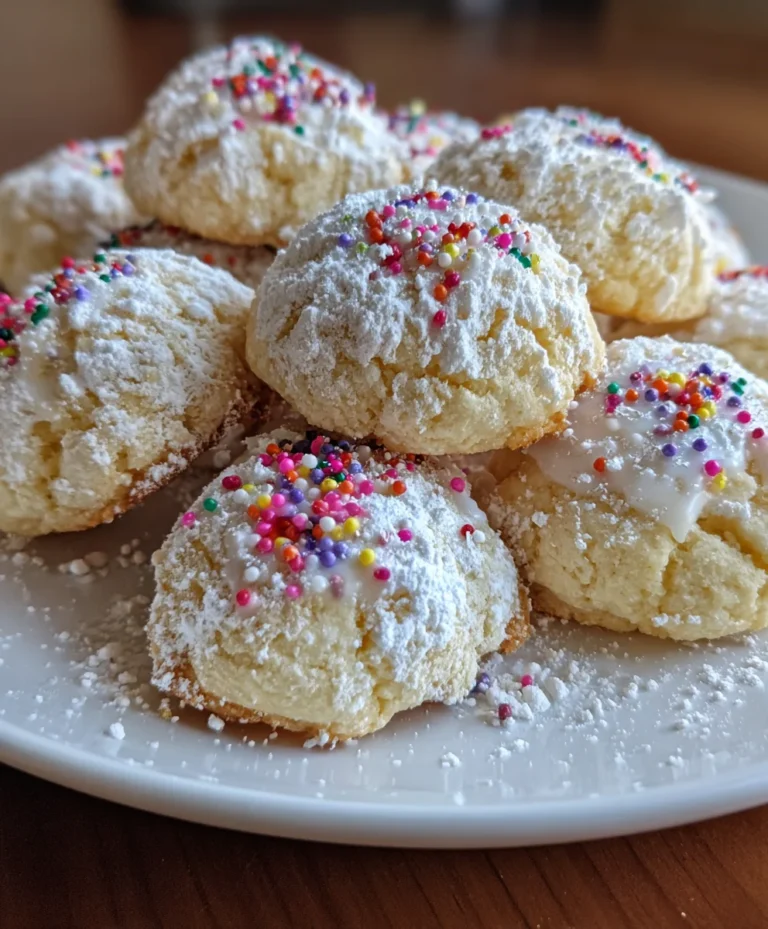
Once your cookies have cooled completely, it’s decorating time! Carefully dip the tops of each cookie in the glaze, allowing excess to drip off. Don’t hold back on the sprinkles—make each cookie as vibrant and joyful as you like! Set them on a plate to dry and let the festive fun begin!
Tips for Success
- Always use room-temperature eggs for better mixing and texture.
- Don’t overmix the dough; a light hand ensures softness.
- For more colorful cookies, try double-dipping in the glaze.
- Let cookies cool completely before glazing for smoother application.
- Keep an eye on baking times; ovens can vary.
Equipment Needed
- Baking sheets: Use standard sheets or try a cast-iron skillet for a unique twist.
- Parchment paper or silicone mats: Great alternatives include greasing the sheets.
- Medium cookie scoop: A spoon works in a pinch for shaping the dough.
- Whisk: Any mixing tool will do if a whisk isn’t handy.
Variations on Italian Easter Cookies
- For a citrus twist, add the zest of a lemon or orange to the dough for a fresh flavor burst.
- Swap out the almond extract for coconut or lemon extract to create a different taste profile.
- Try using whole wheat flour instead of all-purpose for a heartier, nuttier cookie.
- For a gluten-free option, substitute the flour with a 1:1 gluten-free baking blend.
- Add chocolate chips or dried fruits like cranberries for an extra layer of sweetness and texture.
Serving Suggestions for Italian Easter Cookies
- Present the cookies on a vibrant platter for a festive centerpiece at gatherings.
- Pair with a warm cup of coffee or tea to complement their sweetness.
- For special occasions, serve alongside fresh fruit or a light dessert, like gelato.
- Consider wrapping a few cookies in cellophane with a ribbon for delightful gifts.
FAQs about Italian Easter Cookies
In my journey of baking these delightful treats, I often get questions that pop up time and again. Here are some of the most common queries about Italian Easter Cookies:
Can I make the dough ahead of time?
Absolutely! You can prepare the dough in advance and refrigerate it for up to 24 hours. Just make sure to bring it to room temperature before baking, so the cookies spread beautifully!
What if I don’t have almond extract?
No worries! You can substitute it with vanilla extract or coconut extract for a different flavor twist. The cookies will still taste fantastic!
How should I store the cookies?
To keep your Italian Easter Cookies fresh, store them in an airtight container at room temperature. They should stay delicious for up to a week—if they last that long!
Can I freeze these cookies?
Yes, you can! Just freeze the cooled cookies in a single layer, then transfer them to a freezer bag. They’ll retain their charm for up to three months. Just thaw before glazing for a perfect treat!
What’s the best way to decorate the cookies?
Don’t be shy! Get creative with your sprinkles and colors. A little glitz can turn a simple cookie into an eye-catching masterpiece that brings smiles at any gathering!
Final Thoughts
Baking Italian Easter Cookies is more than just a recipe; it’s a joyful experience that wraps your kitchen in warmth and flavor. These cookies hold the essence of tradition, family, and celebration in every bite. As you roll, glaze, and decorate, you’ll feel a connection not just to your ingredients, but also to the loved ones who will savor your creations. Whether you’re sharing them during festive gatherings or enjoying them with a warm cup of tea, they’re sure to spread joy and sweet memories. So grab your apron, let’s create something beautiful together, and unleash a burst of happiness!
PrintItalian Easter Cookies

Delightful Italian Easter Cookies with a sweet glaze and colorful decorations.
- Prep Time: 30 minutes
- Cook Time: 15 minutes
- Total Time: 45 minutes
- Yield: 24 cookies 1x
- Category: Dessert
- Method: Baking
- Cuisine: Italian
- Diet: Vegetarian
Ingredients
- 3 cups all-purpose flour
- 2 teaspoons baking powder
- ¼ teaspoon salt
- ¾ cup granulated sugar
- 8 tablespoons unsalted butter, softened
- 1 teaspoon vanilla extract
- 2 teaspoons almond extract
- 3 eggs, room temperature
- 1 cup powdered sugar (for glaze)
- 3 tablespoons milk or cream (for glaze)
- 1 teaspoon almond extract (for glaze)
- Liquid food coloring (for decorating)
- Sprinkles (for decorating)
Instructions
- Preheat the oven to 350°F. Line two large baking sheets with parchment paper or silicone baking mats and set aside.
- In a medium bowl, whisk together the all-purpose flour, salt, and baking powder.
- In a large bowl or the bowl of a stand mixer, combine the softened butter, granulated sugar, and both the vanilla and almond extracts. Beat on medium-high speed until the mixture is light and fluffy.
- Add one egg at a time, mixing on medium-low speed until each egg is incorporated before adding the next.
- Slowly add the flour mixture to the wet ingredients, mixing just until combined. Be careful not to over mix.
- Use a medium cookie scoop (about 1 ½ tablespoons of cookie dough) and shape into balls with your hands. Place the balls about an inch apart on the prepared baking sheets.
- Bake for 12 to 15 minutes or until an inserted toothpick comes out clean. Let the cookies rest on the baking sheets for about 5 minutes before transferring to a cooling rack. Let cookies cool completely before glazing.
- For the glaze, whisk together the powdered sugar, milk, and almond extract in a small bowl until smooth and no lumps remain.
- Divide the glaze equally into 3 bowls and tint with food coloring.
- Carefully dip the cooled cookies in the glaze and decorate with sprinkles. Allow them to set up on a plate before serving.
Notes
- Consider double dipping the cookies for a deeper glaze color.
- Store cookies in an airtight container for freshness.
- Feel free to experiment with different flavors of extract in the glaze.
Nutrition
- Serving Size: 1 cookie
- Calories: 150
- Sugar: 10g
- Sodium: 50mg
- Fat: 5g
- Saturated Fat: 3g
- Unsaturated Fat: 2g
- Trans Fat: 0g
- Carbohydrates: 22g
- Fiber: 0g
- Protein: 2g
- Cholesterol: 30mg