
Introduction to Layered Candy Corn Pie
As the season of vibrant colors and warm sweaters sets in, my thoughts drift to treats as delightful as Layered Candy Corn Pie. Not only is this dessert a visual stunner, but it’s also a lovely little sweet escape for moms with never-ending ‘to-do’ lists. Cheerful layers mean lots of timesaving in preparation—it’s just the ticket for those busy days you need to delight your loved ones without spending all day in the kitchen. Serving that colorful pie at family get-togethers or Halloween parties will set the scene for smiling happy recollections of “Wow, I remember this from my childhood!”
Why You’ll Love This Layered Candy Corn Pie
This is the stuff of simplicity and sweetness. It’s an awesome no-bake wonder that takes all of 30 minutes to prepare; fittingly, this is nothing short of a marvel for the busy home. Rich creamy layers of taste explode upon the palate and seem equally enthralling to kids as well as grownups. Add to that, the bright colors are bound to lift any occasion making an ordinary dessert a merry centerpiece. It is he or she who prepares the food that will be most delighted with this sensory’s win!
Ingredients for Layered Candy Corn Pie
To create this festive Layered Candy Corn Pie, you’ll need a few simple ingredients that are easily found at your local grocery store. Here’s what you’ll gather:
- Pre-made graham cracker crust: This saves time and adds a delightful crunch to the pie.
- Instant vanilla pudding mix: This forms the creamy filling, with a rich flavor that kids love!
- Cold milk: Essential for mixing with the pudding mix, it helps create that smooth, velvety texture.
- Whipped topping: An airy element that lightens the pudding while adding a delightful fluffiness.
- Yellow & orange gel food coloring: These brighten the layers and make them eye-catching. If you prefer natural options, turmeric for yellow and carrot juice for orange work wonders.
- Additional whipped topping: This will crown the pie with a beautiful white layer, giving it a festive look.
- Candy corn, sprinkles, or chocolate drizzle: These are optional but add a fun, colorful touch to your pie, making it irresistible!
For precise measurements of these ingredients, just scroll down to the bottom of the article where you’ll find a handy printable version. Let’s get ready to create a masterpiece that not only looks good but tastes amazing!
How to Make Layered Candy Corn Pie
Now, let’s dive into making this splendid Layered Candy Corn Pie! Follow these simple steps, and you’ll have a colorful dessert ready to impress. Trust me, it’s easier than you might think.
Step 1: Make Pudding Base
Start by whisking the instant vanilla pudding mix with cold milk in a bowl. Do this for about two minutes. You’ll notice it thickening beautifully. Once it’s ready, let it rest for 3 to 5 minutes. This resting time is crucial as it allows the flavors to meld together, giving your pudding a rich taste and creamy texture.
Step 2: Fluff & Divide
Once the pudding has set, fold in half a cup of whipped topping gently. This adds a lovely lightness to the mixture. After combining, split the mixture evenly into two bowls. You want equal portions to create those vibrant layers, so don’t skimp on this step!
Step 3: Color Layers
Now comes the fun part! Take one bowl and tint it with yellow gel food coloring. In the other bowl, mix in orange gel food coloring. Stir the colors until they’re streak-free. If you’re using natural alternatives, add turmeric to make it yellow and carrot juice for a lovely orange hue. Embrace your creativity—these colors will create a feast for the eyes!
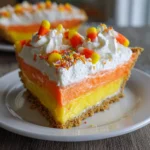
Step 4: Layer #1 (Yellow)
Time to build your pie! Spread the yellow pudding mixture evenly into the pre-made graham cracker crust. Make sure it’s smooth and even. Then, place the pie in the fridge to chill for about 10 minutes. This helps to set the layer before you add the next one, ensuring sharp, distinct layers that look stunning!
Step 5: Layer #2 (Orange)
After the yellow layer has chilled, it’s time for the orange pudding! Gently spread it over the yellow layer, smoothing it out to create a beautiful orange sea. Be careful while doing this; you don’t want the layers to mix! Patience is key here as you create that whimsical separation.
Step 6: Layer #3 (White)
Now, let’s finish this delightful masterpiece! Spread the additional whipped topping over the orange layer. This will act as your final layer. Consider creating peaks with a spatula for a playful touch. It’s not just about taste; it’s about making it a visual delight, right?
Step 7: Decorate & Chill
Your pie is almost ready! Garnish it with candy corn and colorful sprinkles for that finishing touch. If you’re feeling creative, drizzle some melted chocolate on top. It adds richness that perfectly complements the layers. Finally, chill the assembled pie for 2 to 4 hours before slicing. This cooling period allows all those flavors to mingle. Trust me; the wait is worth it!
Tips for Success
- Chill each layer briefly, especially after the yellow layer, to keep your colors distinct.
- Use gel food coloring for brighter hues; natural colors yield softer tones but are equally delightful.
- When garnishing, go wild with toppings! Chocolate drizzle, extra sprinkles, or even crushed nuts add flair.
- Consider using mini graham cracker crusts for individual servings; perfect for parties!
- Don’t rush the chilling time; it’s crucial for achieving the perfect slice.
Equipment Needed
- Mixing bowls: Any size will do; just make sure they’re big enough for whisking!
- Whisk: A hand whisk works great, but an electric mixer can save time.
- Spatula: Perfect for folding and smoothing those lovely layers.
- Refrigerator: Essential for chilling; consider a cool place if space is tight.
- Measuring cups: To ensure you get your pudding mix just right!
Variations
- Chocolate Layer: Add a layer of chocolate pudding between the yellow and orange for a rich twist!
- Fruit Infusion: Incorporate pureed fruit like pumpkin or pureed berries to each pudding layer for a unique flavor.
- Dairy-Free Version: Use coconut milk and dairy-free whipped topping to make it vegan-friendly.
- Gluten-Free Option: Swap the graham cracker crust for a gluten-free cookie crust or a nut-based crust.
- Nutty Delight: Add crushed nuts like pecans or almonds to the crust for an extra crunch.
Serving Suggestions
- Pair with Fresh Whipped Cream: A dollop of whipped cream elevates each slice!
- Accompany with Hot Cocoa: A warm mug of cocoa complements the sweet layers beautifully.
- Brighten with Fresh Fruit: Slices of fresh strawberries or berries add a refreshing touch.
- Presentation Tips: Serve on a festive platter and decorate with mini pumpkins for a seasonal vibe.
- Make it a Treat Table: Pair with other fall desserts like apple pie or pumpkin bars for an indulgent spread.
FAQs about Layered Candy Corn Pie
Can I make Layered Candy Corn Pie ahead of time?
Absolutely! This pie is perfect for prep in advance. You can prepare it a day before your gathering. Just be sure to cover it well in the fridge to keep it fresh!
What can I substitute for the graham cracker crust?
If you’re not a fan of graham crackers, you can use crushed Oreos or even a nut-based crust. Both provide a delicious twist!
How do I store leftovers?
Store any leftovers in an airtight container in the refrigerator. It should stay fresh for about 3 to 4 days. Just remember to keep it covered!
Can I use store-bought pudding instead of instant mix?
While instant pudding gives the pie a quick and easy prep, you can definitely use homemade pudding for a richer taste. Just let it set well before layering.
Is this Layered Candy Corn Pie suitable for vegans?
To make it vegan-friendly, simply swap the regular whipped topping for a plant-based version and use dairy-free milk. Voila! You have a tasty treat for everyone!
Final Thoughts
Making this Layered Candy Corn Pie is much more than making a dessert. It’s adding joy to your table and warmth to your gatherings. Bright colors and yummy layers surely kindle that feeling of nostalgia and reminds us that yes we can still enjoy cooking as an adventure amid our busy lives. Every single serving, happy faces of your dear ones – what a lovely way to spend time! Well, this pie surely will creep in to be the favorite amongst your recipe collection. Let’s enjoy life’s sweetness, one layer at a time!
PrintLayered Candy Corn Pie
Layered Candy Corn Pie is a delightful fall treat that combines vibrant colors and delicious flavors, perfect for festive occasions.
- Prep Time: 30 minutes
- Total Time: 2-4 hours (including chilling)
- Yield: 8 servings 1x
- Category: Dessert
- Method: No-Bake
- Cuisine: American
- Diet: Vegetarian
Ingredients
- 1 pre-made graham cracker crust
- 1 (3.4 oz) box instant vanilla pudding mix
- 1½ cups cold milk
- ½ cup whipped topping (fold-in)
- Yellow & orange gel food coloring (or turmeric/carrot juice for natural tones)
- 1½ cups whipped topping (for the top layer)
- Candy corn, sprinkles, chocolate drizzle (for garnish, optional)
Instructions
- Make Pudding Base: Whisk pudding mix and cold milk for 2 minutes until thick. Rest for 3–5 minutes.
- Fluff & Divide: Fold in ½ cup of whipped topping. Split evenly into 2 bowls.
- Color Layers: Tint one bowl yellow and the other orange. Stir until streak-free.
- Layer #1 (Yellow): Spread the yellow pudding evenly in the crust. Chill for 10 minutes.
- Layer #2 (Orange): Gently spread the orange pudding over the yellow layer and smooth the top.
- Layer #3 (White): Spread the whipped topping over the orange layer and create peaks if desired.
- Decorate & Chill: Garnish with candy corn and sprinkles. Chill for 2–4 hours before slicing.
Notes
- Layer Integrity: Chill between yellow and orange layers to prevent blending.
- Natural Colors: Use turmeric for yellow and carrot juice for orange for softer shades.
- Mini Version: Assemble in small cups for grab-and-go servings.
Nutrition
- Serving Size: 1 slice
- Calories: 300
- Sugar: 20g
- Sodium: 150mg
- Fat: 15g
- Saturated Fat: 7g
- Unsaturated Fat: 8g
- Trans Fat: 0g
- Carbohydrates: 38g
- Fiber: 1g
- Protein: 3g
- Cholesterol: 30mg