Introduction to Lemon Blueberry Layer Cake
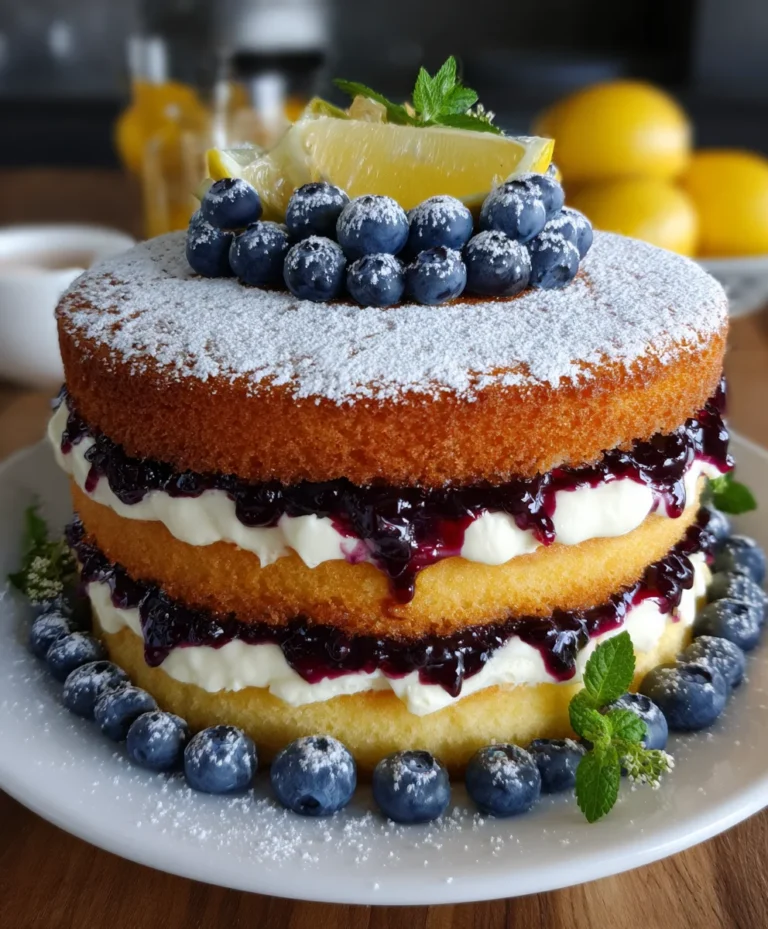
There’s something simply magical about a Lemon Blueberry Layer Cake. It’s like a burst of sunshine on a plate, perfect for brightening up any day. Whether you’re rushing to whip up something sweet for an impromptu gathering or just want to indulge in a slice of dessert after dinner, this cake fits the bill. With its zesty lemon flavor and sweet blueberry goodness, it’s sure to impress even your pickiest eaters. Let’s dive into this delightful recipe, which you might just consider your new go-to for special occasions or cozy evenings at home!
Why You’ll Love This Lemon Blueberry Layer Cake
This Lemon Blueberry Layer Cake is a delightful blend of flavors that truly shines. It’s easy to make, so you won’t be stuck in the kitchen for hours. The bright lemon zest paired with juicy blueberries creates a refreshing taste that’s both comforting and exciting. Plus, the fluffy buttercream frosting adds a creamy touch that everyone will adore. Trust me, this cake will become a favorite in your household!
Ingredients for Lemon Blueberry Layer Cake
Gathering the right ingredients makes a world of difference. Each component plays its part in creating this delightful cake. Here’s a quick rundown of what you’ll need:
- Granulated Sugar: The sweet backbone of your cake, helping it stay moist and fluffy.
- Fresh Lemon Juice: This brightens up the flavor, making each bite refreshing.
- Plain Greek Yogurt: Adds creaminess and a soft texture while also keeping the cake moist.
- Eggs: Use large eggs at room temperature; they help create that fluffy structure.
- Brown Sugar: Enhances the flavor with hints of caramel, complementing the fresh fruit.
- Vanilla Extract: A touch of vanilla deepens the flavor profile beautifully.
- Buttermilk: It adds a slight tang, giving the cake richness and moisture.
- Coconut Oil (or Butter/Canola Oil): Coconut oil keeps things vegan-savvy and adds a subtle hint of coconut flavor.
- Lemon Zest: The zest is the secret ingredient; it packs a punch of lemony goodness!
- All-Purpose Flour: The foundation of your cake, providing structure while keeping things soft.
- Baking Powder and Baking Soda: These are essential for that lovely rise, making your cake light and airy.
- Kosher Salt: Just a pinch helps balance the sweetness.
- Fresh or Frozen Blueberries: They burst with sweet juiciness, bringing life to each layer; frozen works just fine too!
- High-Quality Blueberry Jam: This amps up the blueberry flavor, making every bite explode with berry bliss.
- Salted Butter: Always use room temperature for frosting that’s easy to spread.
- Mascarpone or Cream Cheese: These bring a luscious creaminess to your frosting.
- Powdered Sugar: It helps create that fluffy buttercream consistency.
- Additional Blueberry or Blackberry Jam: For extra flavor and coloring in the buttercream frosting—adjust to your taste!
You can find exact measurements for these ingredients at the bottom of the article for easy printing. Happy baking!
How to Make Lemon Blueberry Layer Cake
Step 1: Prepare Your Baking Equipment
Before diving into this culinary adventure, let’s get organized. Preheat your oven to 175°C. This ensures your cake bakes evenly, giving it that perfect rise. Lightly grease three 20-cm round cake pans. Then, line them with parchment paper and give them a touch of butter or spray for easy removal later. Trust me, preparing your pans right is a crucial step in baking success. A calm, organized kitchen will spark joy and make the process smooth and satisfying!
Step 2: Mix the Wet Ingredients
Now, it’s time to bring those wet ingredients together! In a mixer bowl, combine the melted coconut oil, Greek yogurt, eggs, granulated sugar, brown sugar, vanilla extract, buttermilk, fresh lemon juice, and grated lemon zest. This vibrant blend is what creates a fluffy and moist cake. Beat them together until everything is well combined and smooth. A well-mixed batter is the foundation of your delicious lemon blueberry layer cake, so don’t rush this part—time spent here is time well spent!
Step 3: Combine Dry Ingredients
Next up, let’s add the dry ingredients! Introduce the all-purpose flour, baking powder, baking soda, and kosher salt to your wet mixture. Gently mix until just combined—overmixing can lead to a dense cake, and we definitely want light and fluffy! The batter should look a little lumpy but uniform. It’s that simple. Just remember, take care not to put too much muscle into it; treat it like a delicate friend that just needs a gentle touch!
Step 4: Add Blueberries and Jam
Here comes the fun part! Coat the blueberries in a tablespoon of flour. This little trick helps them stay suspended in the batter, preventing them from sinking to the bottom. Gently fold the blueberries into the mixture, and then swirl in the high-quality blueberry jam without fully blending. This technique adds pops of fruitiness and lovely bursts of sweet flavor in each slice. It’s like a treasure hunt for blueberries with every bite!
Step 5: Bake the Cake
Now it’s time to bring that batter to life! Evenly pour it into your prepared cake pans. Slide them into the oven and bake for 30–35 minutes. You’ll know they are done when the tops are firm, and they spring back when gently pressed. Also, a toothpick should come out clean. Trust your nose—the warm, sweet aroma will guide you. Excitement is in the air as your cake rises and fills the kitchen with delightful scents!
Step 6: Cool the Cake
Once baked, let the cakes cool in their pans for about 5 minutes. Run a knife around the edges to loosen them up, then flip them onto wire racks to cool completely. Don’t skip this step—cooling is essential for a fluffy texture. If you frost a warm cake, the buttercream will melt, turning your masterpiece into a gooey mess. Patience is truly a virtue in the baking world!
Step 7: Make the Buttercream Frosting
Let’s whip up that dreamy blueberry mascarpone buttercream! In a mixer bowl, beat together your room-temperature salted butter, mascarpone cheese, and powdered sugar until fluffy. This process is what gives your frosting that light, airy texture. Split the buttercream into three bowls. In the first bowl, mix in 1–2 tablespoons of blueberry jam; the second bowl gets 2–3 tablespoons. Leave the third bowl plain for a beautiful layered effect. Utilizing room temperature ingredients here is key—it helps everything blend together wonderfully!
Step 8: Assemble the Cake
Get ready for the best part—layering your masterpiece! Place the first cake layer on a serving plate and slather on the darkest blueberry buttercream. Then, top it with the second layer and spread on the lighter buttercream. Finally, cover the last layer with the plain buttercream. You can lightly frost the sides to create a marbled effect with the different shades. This visual beauty only adds to the taste—everyone’s eyes will light up with excitement!
Step 9: Chill and Store
Before indulging, chill your layered cake in the fridge for about 30 minutes to set the buttercream. This little chill time ensures that each slice holds its shape beautifully. Store any leftovers covered in the fridge, where they’ll stay fresh for up to three days. But let’s be real—it won’t last that long in your house!
Tips for Success
- Always use room temperature ingredients for a smooth batter and frosting.
- Coat blueberries in flour to prevent sinking in the cake.
- Don’t overmix your batter; it should just come together to stay fluffy.
- Chill the cake after frosting to set everything properly.
- For a more intense flavor, use fresh blueberries and high-quality jam!
Equipment Needed
- Cake pans: Use three 20-cm round pans, or you can bake in two pans and slice the layers later.
- Mixing bowls: Any mixing bowls will do, but stainless steel or glass are best.
- Electric mixer: A hand mixer works if you don’t have a stand mixer on hand.
- Wire racks: Cooling racks are ideal, but a simple plate can work in a pinch.
Variations
- Coconut Lemon Blueberry Cake: Substitute part of the buttermilk with coconut milk for a tropical twist.
- Lemon Blueberry Layer Cake with Almond Flavor: Add a teaspoon of almond extract for an extra layer of flavor.
- Gluten-Free Option: Use a 1:1 gluten-free baking flour blend in place of all-purpose flour.
- Vegan Lemon Blueberry Layer Cake: Replace eggs with flax eggs and use plant-based yogurt and butter.
- Mixed Berries Variation: Use a blend of raspberries and strawberries along with blueberries for a berry medley flavor.
Serving Suggestions
- Pair slices with a dollop of freshly whipped cream for an extra treat.
- Enjoy with a hot cup of tea or a refreshing glass of lemonade.
- Garnish with fresh blueberries and mint leaves for a beautiful presentation.
- For a brunch gathering, serve alongside a fruit salad for a delightful spread.
FAQs about Lemon Blueberry Layer Cake
Can I use frozen blueberries in my Lemon Blueberry Layer Cake?
Absolutely! If you’re short on fresh berries, frozen blueberries work great. Just toss them into the batter straight from the freezer, and they’ll add sweet bursts of flavor without any fuss.
How can I make the frosting less sweet?
If you find the buttercream frosting too sweet for your taste, consider reducing the powdered sugar by a quarter. You can also add a bit more lemon juice or zest to brighten the flavor while cutting the sweetness.
Can I make this cake ahead of time?
Yes! This Lemon Blueberry Layer Cake actually stays fresh for a couple of days in the fridge. You can bake it a day in advance and frost it the next day. Just remember to chill it for the best results!
What’s the best way to store leftover cake?
Store any leftover slices covered in an airtight container in the fridge. The cake will stay delicious for up to three days. Just make sure to keep it well protected from any other strong flavors in your fridge!
Can I make a gluten-free version of this cake?
Definitely! Simply swap out the all-purpose flour for a 1:1 gluten-free baking blend. Most brands work well, but make sure yours is suitable for cakes to ensure the best results.
Final Thoughts
Baking a Lemon Blueberry Layer Cake is more than just following a recipe; it’s about creating joyful memories in the kitchen. The aroma of lemons and blueberries wafting through your home will awaken cherished moments with family and friends. This cake isn’t just a dessert; it’s a symbol of love and sharing. When you slice into this beauty, presenting its colorful layers, you’ll see the smiles light up the room. Whether it’s for a special occasion or a simple weeknight treat, this delightful cake will bring warmth to your heart and happiness to your table. Enjoy every delicious bite!
PrintLemon Blueberry Layer Cake
Lemon Blueberry Layer Cake is a delightful dessert that combines zesty lemon flavor with sweet blueberries, layered and frosted with a creamy blueberry mascarpone buttercream.
- Prep Time: 40 minutes
- Cook Time: 35 minutes
- Total Time: 1 hour 15 minutes
- Yield: 12 servings 1x
- Category: Dessert
- Method: Baking
- Cuisine: American
- Diet: Vegetarian
Ingredients
- 300 g granulated sugar
- 120 ml fresh lemon juice
- 120 g plain Greek yogurt
- 3 large eggs, room temperature
- 55 g packed brown sugar
- 1 tablespoon vanilla extract
- 240 ml buttermilk
- 240 ml melted coconut oil (or melted unsalted butter or canola oil)
- 1 tablespoon finely grated lemon zest
- 480 g all-purpose flour, plus 8 g (1 tablespoon) for blueberries
- 2 teaspoons baking powder
- 1 teaspoon baking soda
- 1 teaspoon kosher salt
- 300 g fresh or frozen blueberries (if using frozen, leave them as is)
- 320 g high-quality blueberry jam
- 340 g salted butter, at room temperature
- 115 g mascarpone or cream cheese, at room temperature
- 360 g powdered sugar
- 60–70 g blueberry or blackberry jam (high-quality, adjust to taste)
Instructions
- Preheat your oven to 175°C. Lightly grease three 20-cm round cake pans, line with parchment paper, and give them a light butter or spray treatment.
- In a mixer bowl, combine melted coconut oil, Greek yogurt, eggs, sugars, vanilla, buttermilk, lemon juice, and zest. Beat until everything’s smooth.
- Add the flour, baking powder, baking soda, and salt to the mixture and blend until just combined.
- Coat the blueberries in 8 g of flour. Gently fold them into the batter, and swirl in the jam while keeping some swirls visible.
- Evenly pour the batter into the prepared pans. Bake for 30–35 minutes until the tops are firm and spring back when touched. Remove from oven and let cool.
- After 5 minutes, use a knife to loosen the edges and flip the cakes onto wire racks to cool completely.
- In a mixer bowl, beat together butter, mascarpone, and sugar until fluffy. Split the buttercream into three bowls.
- Mix 1–2 tablespoons of blueberry jam into the first bowl, 2–3 into the second, and keep the third bowl plain.
- Place the first cake layer on a serving plate, slather on the darkest buttercream, and top with the second layer and add the lighter buttercream.
- Finish with the last layer and spread on the plain buttercream. Lightly frost the sides using different shades of buttercream for a marbled effect.
- Chill in the fridge for 30 minutes before serving. Store covered in the fridge for up to 3 days.
Notes
- For best results, use high-quality ingredients, especially the blueberries and jam.
- Allow the cake to cool completely before frosting to prevent the buttercream from melting.
- This cake can be made a day in advance and stored in the fridge.
- To enhance the blueberry flavor, consider using fresh blueberries if available.
Nutrition
- Serving Size: 1 slice
- Calories: 450
- Sugar: 35 g
- Sodium: 300 mg
- Fat: 22 g
- Saturated Fat: 15 g
- Unsaturated Fat: 7 g
- Trans Fat: 0 g
- Carbohydrates: 53 g
- Fiber: 2 g
- Protein: 4 g
- Cholesterol: 80 mg