Introduction to Little Debbie Christmas Tree Cake Balls
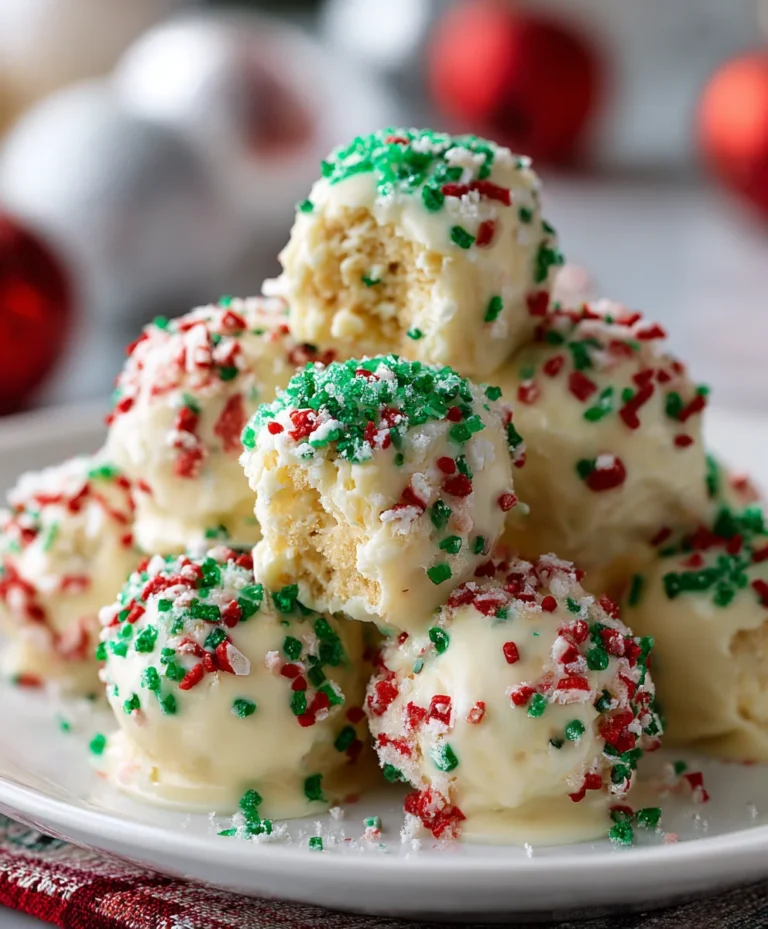
Ah, the holiday season! That magical time when the air fills with warmth, joy, and the scent of baked treats. If you’re like me, balancing life as a busy mom or professional, you need something easy and delightful to bring to the festivities. Enter my favorite dessert: Little Debbie Christmas Tree Cake Balls! These no-bake delights are not only ridiculously simple but also a sure-fire way to impress friends and family. Who wouldn’t love a sweet, festive treat that looks as delightful as it tastes? Let’s dive into this scrumptious recipe together!
Why You’ll Love This Little Debbie Christmas Tree Cake Balls
These Little Debbie Christmas Tree Cake Balls are a home cook’s dream! They’re a breeze to whip up, taking just a little over an hour from start to finish. Plus, they bring festive cheer with each bite of creamy cake coated in white chocolate. Perfect for busy moms like me, they delight both young and old, making every gathering feel special. Trust me, these treats will quickly become a holiday favorite!
Ingredients for Little Debbie Christmas Tree Cake Balls
Gathering the right ingredients is key to creating these delightful Little Debbie Christmas Tree Cake Balls. Here’s what you’ll need:
- Little Debbie vanilla Christmas tree snack cakes: These little beauties lay the foundation. Their sweet vanilla flavor and iconic shape make them perfect for this holiday treat.
- Cream cheese: This acts as a binder, adding rich creaminess and balancing the sweetness. Ensure it’s softened to mix well.
- White chocolate melting wafers: Coating these cake balls in smooth, velvety white chocolate provides that luscious finish that makes them simply irresistible.
- Red vanilla flavored melting candy wafers: These add a festive flair when piped on top. If you can’t find them, feel free to use any colored candy melts!
- Green sanding sugar sprinkles: These give a cheerful holiday sparkle, making your cake balls truly festive. You can substitute with any favorite sprinkles for a fun twist.
You can find these ingredients at your local grocery store or online. Exact measurements for everything are detailed at the bottom of the article and available for easy printing. Let’s get ready to create something magical!
How to Make Little Debbie Christmas Tree Cake Balls
Now that we have everything ready, let’s dive into the fun part: making these delightful Little Debbie Christmas Tree Cake Balls! I promise it’s easier than putting up holiday lights. Just follow these simple steps and let your inner baker shine!
Prepare for Coating
Line Baking Sheets and Mix Cream Cheese
Start by lining two large baking sheets with parchment paper or a silicone baking mat. This helps in keeping the cake balls from sticking later. Next, grab a large mixing bowl.
Add the softened cream cheese, and beat it on medium speed for about 1-2 minutes. You’ll want it fluffy and smooth, like whipped cream. This is the heart of our cake ball mixture, giving that wonderful creaminess we all love!
Combine Cake and Cream Cheese
Break and Mix the Cake Balls
Now, let’s get those Little Debbie vanilla Christmas tree snack cakes involved! Break the cakes into smaller pieces and toss them into the mixing bowl with the cream cheese.
Mix everything on low speed until combined. Be careful not to overmix—it should look like a festive cake batter ready to party! This is where the magic starts; your kitchen will smell heavenly.
Shape the Cake Balls
Use a Cookie Scoop for Uniform Sizes
Time to shape our little holiday treasures! Using a small cookie scoop, take about a tablespoon of the mixture. Roll it gently in your hands until it forms a smooth ball.
Repeat this process, placing each ball onto one of the prepared baking sheets. Don’t worry if they aren’t perfect; a little character makes them more special!
Freeze the Cake Balls
Ensure Firmness Before Coating
Once all your balls are shaped, it’s time to freeze them. Pop them into the freezer for about 30-45 minutes. This step is crucial, as it ensures they’re sturdy for the coating to come. Trust me; a solid cake ball makes for a much cleaner dip!
Melt the Chocolate Coatings
Dip Each Cake Ball in White Chocolate
While the cake balls are chilling, let’s prepare the sweetest part! Melt the white chocolate melting wafers in a medium bowl according to package directions. Stir until the chocolate is smooth and ready to coat those lovely cake balls.
When the cake balls are fully frozen, dip each one into the melted white chocolate using a fork. Gently lift them out, tapping with the fork to let any excess chocolate drip off. This will give you that beautiful, even coating!
Decorate the Cake Balls
Pipe Red and Sprinkle Green
After layering on the white chocolate, it’s time to add some festive flair! Place the coated cake balls onto the second baking sheet.
Using a piping bag filled with the melted red vanilla flavored candy wafers, pipe a cute zigzag design on top. Follow that up with a sprinkle of green sanding sugar. Just like that, you’ve transformed them into cheerful holiday masterpieces!
Let the decorated cake balls set for about 15-20 minutes until the coating firms up. Then, they’re ready to shine at your holiday gathering!
Tips for Success
- Always ensure your cream cheese is fully softened for smooth mixing.
- Use a fork with wide tines for tapping excess chocolate off the cake balls.
- For a fun twist, mix in crushed peppermint candy for a holiday flavor boost!
- Keep the coated cake balls in a cool place to prevent melting.
- Experiment with different colors of sanding sugar or sprinkles for personalized designs!
Equipment Needed
- Mixing bowl: A large bowl for mixing ingredients; a stand mixer works too if you have one.
- Handheld mixer: Makes beating the cream cheese a breeze; a whisk can also do the job.
- Baking sheets: Needed for shaping and cooling; you can use any large flat tray.
- Parchment paper: Prevents sticking; silicone mats are a great reusable alternative.
- Cookie scoop: For uniform cake balls; a tablespoon can work just fine!
Variations
- Chocolate Cake Balls: Substitute Little Debbie chocolate snack cakes for a richer flavor. You’ll still get that delightful cake ball experience, but with a chocolate twist!
- Nutty Feast: Incorporate crushed nuts, like almonds or pecans, into the mixture for extra crunch and flavor. Just be mindful of potential nut allergies!
- Gluten-Free Option: Use gluten-free cake mixes to cater to those with dietary restrictions. There are several great brands that replicate the taste so well.
- Dairy-Free Alternative: Swap cream cheese for a dairy-free alternative and use dark chocolate melting wafers to make these treats vegan-friendly. You won’t sacrifice flavor!
- Minty Delight: Add a few drops of peppermint extract to the cream cheese mixture for a refreshing holiday twist. It pairs beautifully with chocolate or vanilla!
Serving Suggestions
- Pair with Hot Cocoa: Enjoy these cake balls alongside a cozy cup of hot chocolate for the ultimate holiday treat.
- Festive Platter: Arrange the cake balls on a decorative platter, garnished with peppermint sticks and sprigs of mint for a cheerful presentation.
- Gift Treats: Package these cake balls in festive boxes as thoughtful holiday gifts for friends and family.
FAQs about Little Debbie Christmas Tree Cake Balls
Have some questions about making these festive delights? Don’t worry, I’ve got you covered! Below are some common queries that might pop up while preparing those scrumptious Little Debbie Christmas Tree Cake Balls.
Can I use other flavors of Little Debbie cakes?
Absolutely! While I love the vanilla Christmas tree cakes, feel free to experiment with other flavors. Hostess and Little Debbie offer delightful options like chocolate or strawberry that could work wonders!
What if I can’t find red vanilla flavored melting candy wafers?
No problem at all! You can simply use any colored candy melts you have on hand. Just remember to melt them according to the package instructions. Your cake balls will still look amazing!
How should I store the cake balls after making them?
Store your Little Debbie Christmas Tree Cake Balls in an airtight container in a cool place. If you live in a warmer climate, consider refrigeration to keep the chocolate coating firm.
Can I make these cake balls ahead of time?
Yes, you can! These cake balls are perfect for prep in advance. Just make sure they are stored properly, and they’ll be even more flavorful when you’re ready to serve them!
Can I freeze the cake balls?
Definitely! After rolling the cake balls but before coating them, you can freeze them. Just wrap them tightly in plastic wrap or place them in an airtight container for up to three months. Thaw before coating and decorating.
Final Thoughts
Making Little Debbie Christmas Tree Cake Balls is like adding a sprinkle of magic to your holiday celebrations. The joy of transforming simple ingredients into delightful treats never gets old. Imagine the laughter and excitement as friends and family gather around to savor these festive delights. Every bite bursts with nostalgia, reminding us of cherished memories from our childhood. Plus, they’re a wonderful way to involve the kids in the kitchen! So grab those ingredients, and let’s create something that not only tastes good but also fills your home with warmth and love this holiday season!
PrintLittle Debbie Christmas Tree Cake Balls
Delightful cake balls made with Little Debbie Christmas tree snack cakes and coated in white chocolate.
- Prep Time: 30 minutes
- Cook Time: 0 minutes
- Total Time: 1 hour 15 minutes
- Yield: 20 cake balls 1x
- Category: Dessert
- Method: No-bake
- Cuisine: American
- Diet: Vegetarian
Ingredients
- 10 Little Debbie vanilla Christmas tree snack cakes, unwrapped (from 2 – 8.62 oz. boxes)
- 8 ounces cream cheese, softened to room temperature
- 20 ounces white chocolate melting wafers, Ghirardelli brand used
- 6 ounces red vanilla flavored melting candy wafers, Wilton brand used
- 1 tablespoon green sanding sugar sprinkles
Instructions
- Line two large baking sheets with parchment paper or a silicone mat and set aside.
- To a large mixing bowl, add the softened cream cheese and beat on medium speed, using a handheld mixer, for 1-2 minutes or until fluffy and smooth.
- Break the Little Debbie vanilla Christmas tree Snack Cakes into smaller pieces and add to the bowl of beaten cream cheese. Mix on low speed just until fully combined.
- Using a small cookie scoop, scoop out a 1 tablespoon sized portion of cake ball mixture and place into the palm of your hand. Gently roll to form a smooth ball.
- Place the Little Debbie Christmas tree cake ball onto one of the prepared baking sheets. Repeat with the remaining mixture until all the cake balls have been formed.
- Freeze the cake balls for 30-45 minutes, or until completely solid.
- Melt the white chocolate wafers in a medium bowl according to package directions and stir to a smooth consistency.
- In a separate small bowl, melt the red vanilla flavored candy wafers according to package directions and stir until smooth. Transfer to a small piping bag with the tip cut off.
- Coat each cake ball in the melted white chocolate, lifting it out with a fork and tapping to remove excess.
- Place the coated cake ball on the second baking sheet, pipe a decorative ziz-zag pattern with red candy and sprinkle with green sanding sugar.
- Let the cake balls set for 15-20 minutes until the coating is firm before serving.
Notes
- Ensure cream cheese is fully softened for best mixing.
- Use a fork with wide tines to tap excess chocolate off the cake ball.
- Store in a cool place to keep chocolate from melting.
Nutrition
- Serving Size: 1 cake ball
- Calories: 150
- Sugar: 10g
- Sodium: 60mg
- Fat: 8g
- Saturated Fat: 5g
- Unsaturated Fat: 2g
- Trans Fat: 0g
- Carbohydrates: 18g
- Fiber: 0g
- Protein: 2g
- Cholesterol: 15mg