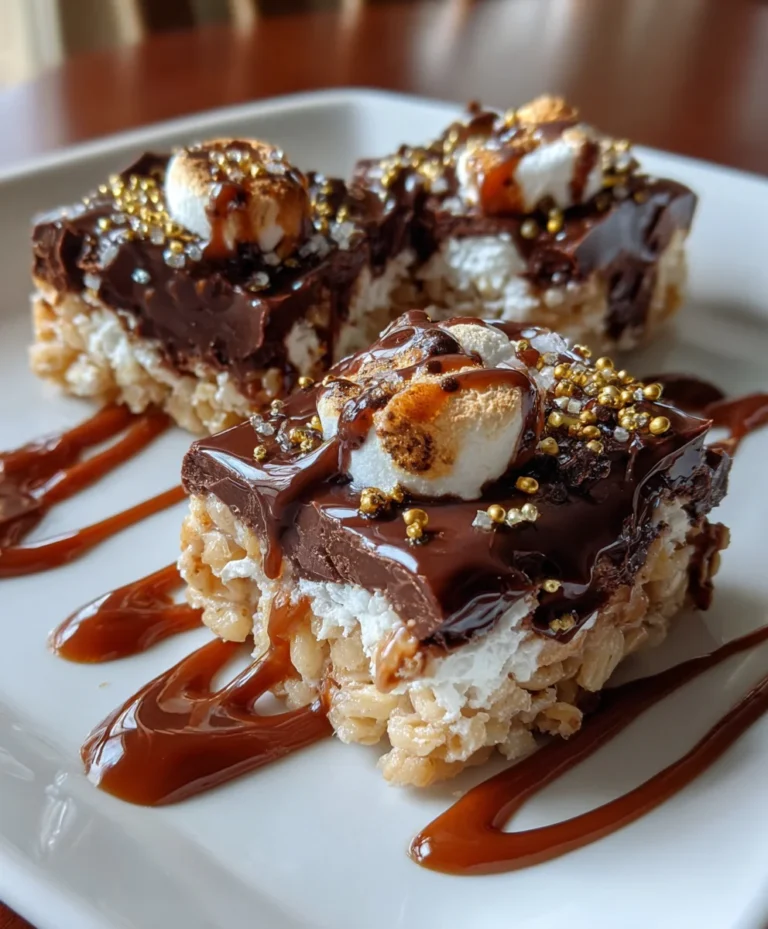
Introduction to Marshmallow Peanut Butter Chocolate Bliss Bars
When life gets busy, we all crave a moment of sweetness, don’t we? That’s where my Marshmallow Peanut Butter Chocolate Bliss Bars come into play. These delightful treats are perfect for busy moms like me, seeking a little joy amidst the chaos. They’re quick to whip up, and they satisfy the sweet tooth of both kids and adults. Imagine sinking your teeth into layers of chocolate, peanut butter, and marshmallow bliss. This recipe isn’t just delicious; it’s a simple solution that might just win you a few brownie points with your family!
Why You’ll Love This Marshmallow Peanut Butter Chocolate Bliss Bars
These Marshmallow Peanut Butter Chocolate Bliss Bars are not only easy to make, but they are also a crowd-pleaser. With a no-bake method, you can whip them up in no time, perfect for busy days. The combination of creamy peanut butter and sweet marshmallow creates a taste explosion that will leave everyone wanting more. Plus, they’re perfect for any occasion, from family gatherings to simple after-school treats!
Ingredients for Marshmallow Peanut Butter Chocolate Bliss Bars
Gathering the right ingredients is key to creating these delectable Marshmallow Peanut Butter Chocolate Bliss Bars. Here’s what you’ll need:
- Chocolate chips: Choose from milk, semi-sweet, or dark. The chocolate is the star of the show, so pick what you love most!
- Coconut oil: Just a tablespoon adds a glossy sheen to the chocolate, making it irresistible.
- Optional toppings: Sprinkles, chocolate drizzles, edible glitter, or flaky sea salt can elevate the bars’ appearance and taste.
- Butter: Softened butter brings richness to the peanut butter layer. You can substitute it with margarine if you’re out.
- Creamy peanut butter: This is the heart of the bars. You can use your favorite brand or even a natural alternative.
- Powdered sugar: For sweetness and a smooth texture, this sugar blends seamlessly into the mixture.
- Vanilla extract: A teaspoon adds a delightful aroma and enhances flavor.
- Salt: Just a pinch brings out the best in all the sweet ingredients.
- Rice Krispies: These give the bars a delightful crunch and a fun texture contrast!
- Marshmallow fluff: This luxurious ingredient creates that heavenly, gooey layer we all adore.
If you want to explore more ingredient options or need the precise amounts, check out the list at the end of the article; it’s available for printing!
How to Make Marshmallow Peanut Butter Chocolate Bliss Bars
Melt the Chocolate Base
Let’s start by melting the chocolate chips. In a microwave-safe bowl, combine your chocolate chips with a tablespoon of coconut oil. Heat them in bursts of 20 to 30 seconds, stirring well between each interval. This technique prevents the chocolate from burning, which is crucial! Once the mixture is smooth and glossy, spoon about a tablespoon into each silicone mold cavity. Gently tilt or tap the mold to spread the chocolate evenly across the bottom. Now, pop it into the refrigerator for about 5 to 10 minutes to chill and set.
Prepare the Peanut Butter Layer
Next up is the peanut butter layer! In a mixing bowl, beat the softened butter until it’s creamy. Gradually mix in your creamy peanut butter, powdered sugar, vanilla extract, and a pinch of salt. Keep whisking until everything is smooth and well combined. Now, it’s time to fold in the Rice Krispies. You want a thick yet fluffy texture that you can spread. Don’t be afraid to get your hands in there, but it should still hold its shape well!
Assemble the Bars
Now comes the fun part—assembling the bars! Carefully divide the peanut butter mixture over your chilled chocolate base. Use the back of a spoon or an offset spatula to gently press it down into an even layer. Firmly but gently, make sure it’s compact and smooth. Once you’re satisfied with the layer, pop it back into the fridge for about 10 minutes, allowing it to set nicely.
Add the Marshmallow Fluff
After the peanut butter layer has set, it’s time for the marshmallow fluff! Spoon the marshmallow fluff generously over the peanut butter layer. Using a spoon or offset spatula, spread it out evenly across the top. Achieving a smooth layer can be a little sticky, but it’s worth it! Chill this for another 10 to 15 minutes, letting it firm up perfectly.
Final Chocolate Layer
Now, we’re almost there! If necessary, rewarm the remaining melted chocolate to ensure it’s pourable. Carefully spoon or pour the chocolate over the marshmallow layer, making sure to cover it completely. Want to add some flair? Toss on a few sprinkles, a drizzle of chocolate, or flaky sea salt! Then, chill the whole thing for about 20 to 30 minutes until it sets completely.
Serve and Enjoy
Finally, it’s showtime! Gently pop each bar out of the silicone mold and arrange them on a platter. These Marshmallow Peanut Butter Chocolate Bliss Bars are ready to delight your family and friends! If you have leftovers, store them in an airtight container at room temperature for up to a week. Trust me, they won’t last long!
Tips for Success
- Make sure your butter is room temperature for easier mixing.
- Use quality chocolate chips for the best flavor.
- Ensure your silicone molds are completely dry for easy removal.
- Don’t skip chilling steps; they help set each layer nicely!
- Feeling adventurous? Try adding nuts or dried fruit for extra texture!
Equipment Needed for Marshmallow Peanut Butter Chocolate Bliss Bars
- Microwave-safe bowl: Any heatproof bowl will do, even a glass mixing bowl.
- Silicone molds: If you don’t have these, a lined baking dish works too.
- Mixing bowls: You can use any size you have on hand.
- Spoon or offset spatula: A regular spatula is just fine for spreading.
- Measuring cups and spoons: If you’re a free spirit in the kitchen, eyeballing works sometimes!
Variations of Marshmallow Peanut Butter Chocolate Bliss Bars
- Nutty Bliss Bars: Add chopped nuts like almonds, peanuts, or walnuts for an extra crunch and protein boost.
- Nut-Free Option: Swap peanut butter for sunflower seed butter or a soy-based spread if nut allergies are a concern.
- Healthier Version: Use dark chocolate chips and natural nut butter with no added sugar for a more nutritious treat.
- Flavored Marshmallow: Opt for flavored marshmallow fluff, like strawberry or vanilla, to change up the taste profile.
- Cookie Dough Bars: Mix in mini chocolate chips and sprinkle dough-like bits into the peanut butter layer for a cookie dough vibe.
- Vegan Bliss Bars: Substitute butter with coconut oil and use a plant-based chocolate for a delightful vegan-friendly treat!
Serving Suggestions for Marshmallow Peanut Butter Chocolate Bliss Bars
- Pair these bars with a cold glass of milk for the ultimate childhood nostalgia.
- Serve with fresh fruit like strawberries or bananas for a refreshing contrast.
- For a fun twist, present them on a colorful platter with whimsical toothpicks.
- Consider drizzling a bit more chocolate on top for added flair.
- These bars are perfect for birthday parties or special celebrations!
FAQs about Marshmallow Peanut Butter Chocolate Bliss Bars
Can I substitute the marshmallow fluff?
Absolutely! If you’re looking for a healthier option, you can use Greek yogurt mixed with a bit of honey or maple syrup to achieve a creamy layer. It won’t have the same sweetness, but it can add a nice tang.
How do I store leftover bliss bars?
These Marshmallow Peanut Butter Chocolate Bliss Bars can be stored in an airtight container at room temperature for up to a week. If you want to keep them longer, you can refrigerate them for extra freshness.
Can I make these bliss bars ahead of time?
Yes! They make a fantastic make-ahead treat. Just prepare them a day or two in advance and store them in the fridge until you’re ready to serve!
What’s the best way to cut these bars?
To get clean cuts, allow the bars to chill completely. Use a sharp knife warmed under hot water for perfect slices. This way, you’ll keep those layers intact and looking fabulous!
Can I add other mix-ins?
Definitely! Feel free to add mini chocolate chips, shredded coconut, or even dried fruit for a unique twist on these Marshmallow Peanut Butter Chocolate Bliss Bars. Your creativity is the limit!
Final Thoughts on Marshmallow Peanut Butter Chocolate Bliss Bars
Making these Marshmallow Peanut Butter Chocolate Bliss Bars is more than just following a recipe; it’s about creating sweet moments that can brighten even the busiest days. Every layer, from the rich chocolate base to the fluffy marshmallow top, works together in delicious harmony. I can guarantee that the smiles on my family’s faces as they enjoy these treats are worth every minute spent in the kitchen. So, gather your loved ones, whip up a batch, and share the joy! You might find your afternoons sprinkled with laughter, and isn’t that what we all crave?
PrintMarshmallow Peanut Butter Chocolate Bliss Bars
Delicious Marshmallow Peanut Butter Chocolate Bliss Bars that are easy to make and perfect for a sweet treat.
- Prep Time: 15 minutes
- Cook Time: 10 minutes
- Total Time: 55 minutes
- Yield: 12 bars 1x
- Category: Dessert
- Method: No-bake
- Cuisine: American
- Diet: Vegetarian
Ingredients
- 1 cup chocolate chips (milk, semi-sweet, or dark)
- 1 tablespoon coconut oil
- sprinkles, chocolate drizzles, edible glitter, or flaky sea salt (optional toppings)
- 2 tablespoons butter (softened)
- ¾ cup creamy peanut butter
- ⅓ cup powdered sugar
- 1 teaspoon vanilla extract
- pinch of salt
- ½ cup Rice Krispies
- 1 cup marshmallow fluff
Instructions
- Melt 1 cup chocolate chips with 1 tablespoon coconut oil in 20 to 30 second microwave bursts, stirring between each until smooth. Spoon about 1 tablespoon melted chocolate into the bottom of each silicone mold cavity. Tilt or tap to spread evenly. Chill for 5 to 10 minutes.
- Beat 2 tablespoons softened butter until smooth. Mix in ¾ cup peanut butter, ⅓ cup powdered sugar, 1 teaspoon vanilla, and a pinch of salt. Fold in ½ cup Rice Krispies.
- Divide the peanut butter mixture evenly over the set chocolate base. Press gently into a smooth, compact layer. Chill for 10 minutes.
- Spoon 1 cup marshmallow fluff onto the peanut butter layer. Spread gently with a spoon or offset spatula. Chill for 10 to 15 minutes.
- Rewarm the remaining melted chocolate if needed. Spoon or pour chocolate over each bar to fully cover the marshmallow layer. Add sprinkles if desired. Chill for 20 to 30 minutes until fully set.
- Pop each bar out of the silicone mold and serve.
Notes
- Store in an airtight container for up to a week.
- Experiment with different types of chocolate chips.
- Optional toppings can enhance the bars’ appearance and taste.
Nutrition
- Serving Size: 1 bar
- Calories: 200
- Sugar: 15g
- Sodium: 45mg
- Fat: 10g
- Saturated Fat: 3g
- Unsaturated Fat: 7g
- Trans Fat: 0g
- Carbohydrates: 25g
- Fiber: 1g
- Protein: 4g
- Cholesterol: 5mg