Introduction to Martha Washington Candies
Martha Washington Candies. Oh, the indulgence of these little bites of joy. Not so much treats as a small sweet hug for your taste buds – whether you are a mom on the run with errands to be juggled; whether you are a professional trying to find a moment’s breather…here’s a no-bake dessert remedy for hectic days. Just imagine the look on your loves one’s faces for that great impromptu special treat! Well, this recipe calls you and your family to gather around the kitchen table beaming and make lifetime photos only. Mark my words, you will find innumerable excuses to make these heavenly candies.
Why You’ll Love This Martha Washington Candies
Martha Washington Candies are all about simplicity and flavor. Quick to come together, they are perfect for those busy days. No oven is required, just a rich, buttery coconut filling that begs for more. And best of all, totally adaptable—you can make them your own in any way you want. Best of all, the perfect sweet treat to show your love in every bite.
Ingredients for Martha Washington Candies
Gathering the right ingredients is a joyful part of making Martha Washington Candies. Let’s keep it simple:
- Butter: The melted butter adds richness and a smooth texture to our candy. Look for unsalted butter to keep the sweetness balanced.
- Powdered Sugar: This sweetener gives the candies their delightful sweetness and creamy consistency. No granules here—just pure, luscious luck!
- Vanilla Extract: A splash of vanilla elevates the flavor. The warm, aromatic notes create a comforting backdrop for the coconut.
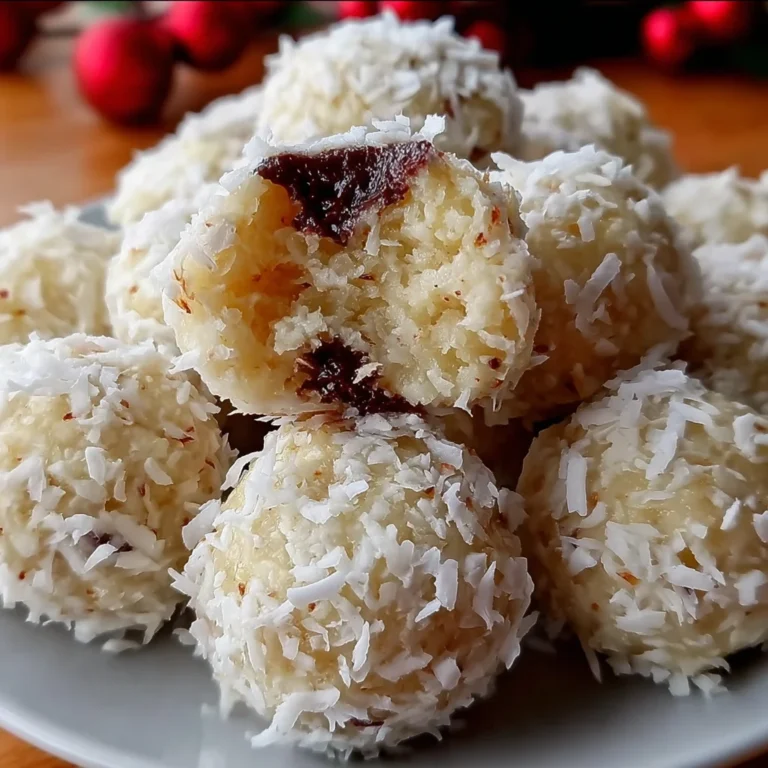
- Sweetened Shredded Coconut: This is the star ingredient! It offers a chewy texture and tropical flavor that make these candies irresistible. Make sure it’s sweetened for that delightful contrast.
- Sweetened Condensed Milk: This creamy goodness binds everything together, adding moisture and sweetness. It’s a miracle worker in no-bake desserts!
If you want to get a bit creative, consider these optional ingredients:
- Chocolate: Dipping the candies in chocolate gives them that upscale treat vibe. Semi-sweet or dark chocolate works beautifully.
- Nuts: Feel free to toss in some chopped nuts for crunch or to roll your candies in finely chopped nuts before serving.
You’ll find exact measurements for each of these ingredients at the bottom of the article, available for printing. Happy prepping!

How to Make Martha Washington Candies
Now that you have all your ingredients in place, let’s dive into making these delectable Martha Washington Candies! Follow these simple steps, and trust me, you’ll wonder why you didn’t make them sooner!
Step 1: Prepare Your Mixture
In a large mixing bowl, start by pouring in your melted butter. Next, add the powdered sugar, vanilla extract, sweetened shredded coconut, and sweetened condensed milk. Mix everything together until it’s combined into a thick, sticky mixture. Don’t rush this step—give it a good stir until all the ingredients are evenly distributed. It should feel like a tropical dream in your bowl!
Step 2: Shape the Candies
Once your mixture is ready, it’s time to get hands-on! Scoop out small portions of the mixture. Use your palms to roll them into little balls or press them into flat patties. Place your creations on a baking sheet lined with parchment paper. This step is fun, and it’s okay if they aren’t all perfectly shaped—after all, treats made with love don’t need to be perfect!
Step 3: Chill the Mixture
Now, here’s my favorite part—chilling! Pop the baking sheet into the refrigerator and let those candies chill for at least 2 hours. This helps them firm up and hold their shape better when you finally dig into them. Plus, the flavors meld together beautifully as they chill. Patience is a virtue, right?
Step 4: Optionally Dip in Chocolate
If you want to take your Martha Washington Candies to the next level, dipping them in chocolate is the way to go! Melt your choice of chocolate in a microwave-safe bowl or on the stovetop. Once melted, quickly dip each chilled candy into the chocolate, letting the excess drip off. Place them back on the parchment-lined sheet and let the chocolate set. Who can resist that extra layer of goodness?
Step 5: Serve and Enjoy
When it’s time to serve, arrange your beautiful candies on a platter. They make for a stunning presentation at any gathering. These bites of joy are perfect for sharing with friends and family, or you might just want to keep them all to yourself! Enjoy every morsel, savoring that buttery coconut filling. Trust me, they never last long!
Tips for Success
- Chill your mixture longer if it feels too soft. A firmer mixture rolls better!
- Use a cookie scoop for uniform candy sizes—perfect for sharing and looks appealing!
- Experiment with different chocolate types for dipping; milk, dark, or white chocolates add unique flavors.
- Keep your hands slightly damp while shaping to prevent sticking.
- For a fun twist, sprinkle some sea salt over the chocolate after dipping!
Equipment Needed for Martha Washington Candies
- Mixing Bowl: Any large bowl works, but a sturdy glass or metal bowl is ideal for mixing.
- Spoon or Spatula: Use either to mix your ingredients well; a rubber spatula is great for scraping!
- Baking Sheet: A standard baking sheet is perfect for chilling your candies, but a platter can work in a pinch.
- Parchment Paper: Essential for preventing sticking; aluminum foil is an alternative!
- Measuring Cups: Accurate measurements are key, but you can estimate if you’re feeling adventurous!
Variations on Martha Washington Candies
- Peanut Butter Bliss: Mix in a tablespoon of creamy peanut butter for a nutty twist that complements the coconut beautifully.
- Chocolate Coconut: Roll the candies in cocoa powder or finely chopped chocolate instead of coconut for a rich flavor.
- Minty Fresh: Add a few drops of peppermint extract to the mixture for a refreshing mint flavor, perfect for the holidays!
- Dried Fruit Delight: Fold in some chopped dried cranberries or raisins for a fruity touch that brings a chewy surprise!
- Vegan Alternative: Substitute coconut cream for condensed milk and use vegan butter to make a delicious plant-based version.
Serving Suggestions for Martha Washington Candies
- Pair them with a hot cup of coffee or tea for a delightful afternoon treat.
- Serve alongside fresh fruit for a colorful dessert platter.
- Present them on a beautiful cake stand to impress your guests.
- Wrap them in decorative boxes as thoughtful gifts for friends.
- Use festive plates during holidays to make them extra special!
FAQs about Martha Washington Candies
As I’ve shared this scrumptious recipe, I’ve noticed a few questions pop up time and again. Here’s a little Q&A to help clear things up!
Can I make Martha Washington Candies in advance?
Absolutely! These candies are perfect for prepping ahead of time. Just store them in an airtight container in the refrigerator. They can last for about a week, so you can enjoy them at your leisure!
Do I need to use sweetened shredded coconut?
Yes, using sweetened shredded coconut is essential for that delightful, sugary contrast. Unsweetened coconut won’t give you the same luscious flavor and texture that makes Martha Washington Candies a real treat!
What’s the best type of chocolate to dip them in?
It really depends on your taste! Semi-sweet chocolate offers a nice balance of sweetness, while dark chocolate brings a rich flavor. If you’re more of a white chocolate enthusiast, that’s a fabulous option too!
Can I freeze these candies?
Yes! You can freeze them for up to three months. Just make sure to place them in a single layer on a baking sheet first, then transfer them to an airtight container once they are frozen.
How can I make these candies less sweet?
If you prefer a less sweet version, you can reduce the amount of powdered sugar or use dark chocolate for dipping. You might also consider adding a pinch of salt to balance the sweetness.
Final Thoughts
Making Martha Washington Candies is more like making memories rather than just sweet treats in your kitchen. The happiness of these no-bake treats is in their simplicity and the smiles that they bring to your family and friends whether you’re having a special occasion, celebrating the day with laughter, or just filling up an idle afternoon, these candies are sure to hit the spot. With its buttery coconut taste and simple taste of giving, each bite reminds one of the love put into homemade creations. Well, go on and indulge yourself and the people you love rue herein comfort and sweetness in every heavenly piece.
PrintMartha Washington Candies
Martha Washington Candies are a delicious treat made with a buttery coconut filling that can be rolled into balls and optionally dipped in chocolate.
- Prep Time: 15 minutes
- Cook Time: 0 minutes
- Total Time: 2 hours 15 minutes
- Yield: 24 servings 1x
- Category: Dessert
- Method: No-bake
- Cuisine: American
- Diet: Vegetarian
Ingredients
- 1 cup butter, melted
- 1 pound powdered sugar
- 1 tablespoon vanilla extract
- 14 ounces sweetened shredded coconut
- 14 ounces sweetened condensed milk
Instructions
- In a large mixing bowl, combine melted butter, powdered sugar, vanilla extract, shredded coconut, and sweetened condensed milk. Mix until well combined.
- Shape the mixture into small balls or patties and place them on a baking sheet lined with parchment paper.
- Chill in the refrigerator for at least 2 hours until firm.
- Optionally, you can dip the candies in chocolate for added flavor.
- Serve and enjoy!
Notes
- Chilling the mixture helps it hold its shape better.
- These candies can be stored in the refrigerator for a longer shelf life.
- Feel free to experiment with other toppings or rolling options.
Nutrition
- Serving Size: 1 candy
- Calories: 150 kcal