Introduction to No Bake Grinch Pie
As the holiday season creeps upon us, I always find myself daydreaming about festive treats that bring joy to family gatherings. That’s where this delightful No Bake Grinch Pie comes into play! This pie isn’t just easy to whip up; it’s also a showstopper that packs flavor and fun. Perfect for busy mothers and professionals, it’s designed to fit seamlessly into your holiday hustle, allowing you to celebrate without the stress. Trust me, your loved ones will adore this bright green charm!
The Fun of Holiday Desserts
Ah, holiday desserts! They’re not just meals; they’re the heart and soul of every gathering. The aroma of baked goods fills the air, while laughter dances around the room. Whether you’re making classic recipes passed down through generations or trying something new like this No Bake Grinch Pie, there’s a certain magic in sharing sweets with friends and family. I cherish those moments when kids eagerly await dessert, their eyes wide with excitement. The tradition of dessert brings us closer and creates memories that last a lifetime.
Why You’ll Love This No Bake Grinch Pie
This No Bake Grinch Pie is a lifesaver for busy holiday schedules! In just 15 minutes of prep time, you can create a stunning dessert that requires no baking. It’s unbelievably creamy with the perfect blend of sweet chocolate and festive cheer. Plus, the kids will love its bright green hue, making dessert time a delightful experience for everyone. Who wouldn’t want to indulge in a treat that’s as easy as it is delicious?
Ingredients for No Bake Grinch Pie
This No Bake Grinch Pie is surprisingly simple to assemble, making it an ideal dessert for any holiday celebration. Here’s what you’ll need to create this show-stopping pie:
- Oreo cookie pie crust: This ready-made crust is perfect for a hint of chocolatey crunch. For those with dietary restrictions, consider using a gluten-free or homemade graham cracker crust.
- White chocolate instant pudding mix: It provides a luscious and silky filling. If you’re feeling adventurous, a vanilla pudding mix works well, too!
- Cold 2% milk: Essential for helping the pudding mix set and create that creamy texture. Whole milk can be a richer alternative if desired.
- Whipped topping (Cool Whip): This light and fluffy topping adds volume and enhances the dessert’s visual appeal. For a lighter option, try using homemade whipped cream.
- Neon green gel food coloring: This gives the pie its vibrant Grinch-like hue! Gel food coloring is preferred since it doesn’t water down the mixture.
- Green food coloring: A touch of this liquid dye complements the neon green, ensuring a cheerful shade. Adjust to your preferred Grinch green!
- Green sanding sugar: Adds a sparkly finish, creating a festive shimmer on top of the pie. Feel free to swap in edible glitter for extra pizzazz!
- Mini red heart-shaped sprinkles: These tiny sprinkles bring balance and a pop of color, perfect for a whimsical touch.
- Large red heart-shaped sprinkles: A charming garnish for each slice, they finish off the presentation beautifully.
Pie Crust Options
If Oreos aren’t your thing, worry not! You can easily substitute the cookie crust with other options. Gluten-free graham cracker crusts are widely available, or you can craft a homemade crust using crushed nuts and butter. For a lighter twist, consider a simple shortcrust pastry that holds up just as well. The possibilities are endless!
The Pudding Base
The white chocolate pudding mix is the star of this dessert. It lends a creamy, dreamy consistency that perfectly complements the crunch of the pie crust. Mixing it with milk brings it to life, ensuring a rich and smooth filling that melts in your mouth. It’s the foundation of happiness in each slice!
Food Colorings
The key to achieving the iconic Grinch look lies in the food coloring. The neon green gel helps create that bold, eye-catching hue, while the additional drops of green liquid coloring enhance the festive spirit. Together, they transform the ordinary dessert into a cheerful centerpiece that will delight both kids and adults alike.
Toppings and Decorations
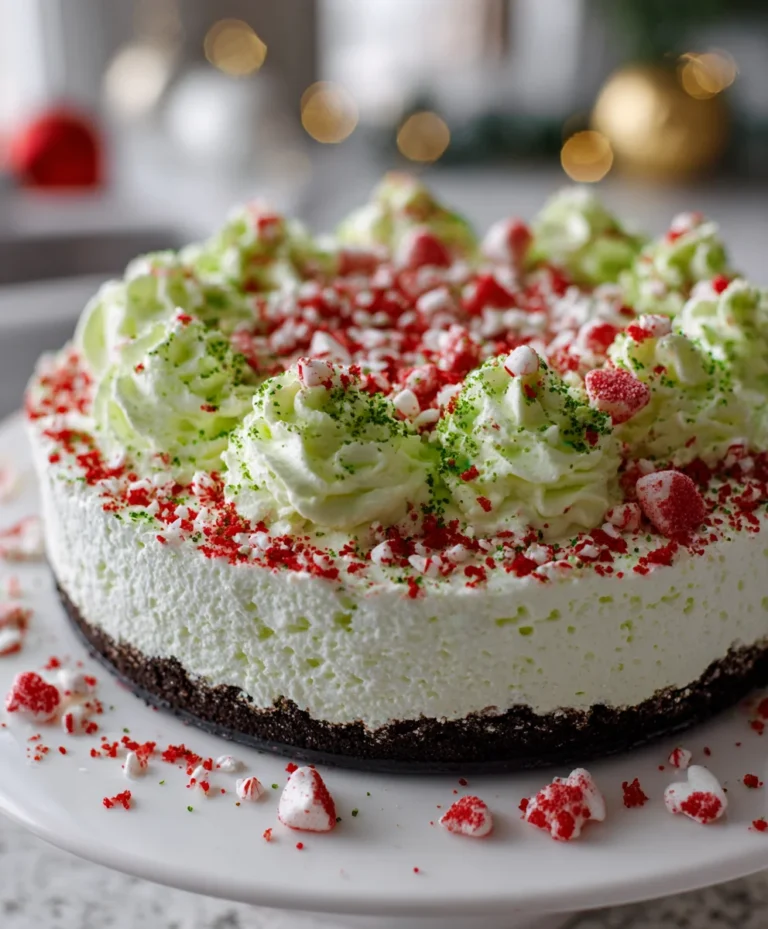
Presentation is everything, and toppings play a major role! The whipped topping adds a light, airy finish that contrasts with the rich pudding layer. The green sanding sugar sprinkles a whimsical sparkle, and the red heart-shaped sprinkles bring joy and playfulness to each serving. These decorative touches make the No Bake Grinch Pie not just delicious, but also a feast for the eyes!
How to Make No Bake Grinch Pie
Creating this festive No Bake Grinch Pie is as simple as it is fun! Let’s dive into the steps that will transform your ingredients into a holiday masterpiece. Trust me, it’s a satisfying journey filled with sweet anticipation!
Step 1: Prepare the Pudding Mixture
Start by grabbing a large mixing bowl. Combine the white chocolate pudding mix and cold 2% milk. This step is crucial! It’s where all the magic begins. Whisk them together vigorously for about 2–3 minutes, until the mixture thickens and soft peaks form. The pudding should have a silky texture—smooth like a cozy blanket!
Step 2: Fill the Pie Crust
Now comes the fun part—filling that crust. Gently scoop the thickened pudding mixture into your Oreo cookie pie crust. Use a spatula to spread it evenly. Take your time here; an even layer ensures every slice has that creamy goodness. Imagine slicing in, revealing those delightful layers!
Step 3: Chill the Pie
Next, it’s time for the pie to chill out! Place it in the refrigerator for at least 3 hours. This step is essential for the texture. Patience is key to achieving that firm filling! While the pie is chilling, you can daydream about serving it at your festive gathering.
Step 4: Add Whipped Topping
After those impatiently long hours, take the pie out of the fridge. Spoon half of the whipped topping over the set pudding layer. Gently spread it out; we want a light touch here. This fluffy layer adds a delightful contrast to the creamy pudding. It’s like adding a cloud to your dessert!
Step 5: Decorate Your Pie
Time to get creative! Sprinkle the green sanding sugar evenly over the whipped topping. This bit of sparkle makes the pie shine like holiday lights. Then, toss on the mini red heart-shaped sprinkles. These tiny accents bring a festive touch, perfect for finishing your Grinch Pie!
Step 6: Presenting the Pie
Now for the thrilling moment—serving the pie! Slice it carefully, revealing the luscious layers within. Just before serving, add one large red heart-shaped sprinkle on each slice for that final touch. Watch as everyone’s eyes light up! Each slice is not just a treat; it’s a piece of holiday magic!
Tips for Success
- Whisk the pudding mixture well—it’s crucial for that creamy texture.
- Be patient while chilling; give it at least 3 hours to set properly.
- Use gel food coloring for vibrant results that won’t water down the mixture.
- Spread the whipped topping gently to keep it fluffy and light.
- Don’t skip the sprinkles—they add festive flair!
Common Mistakes to Avoid
Avoid over-mixing the pudding, which may result in a runny consistency. Ensure the pie crust is firmly packed to hold the filling. Don’t rush the chilling time; it’s vital for a perfect slice. Also, be careful not to overdo the food coloring—less is often more for achieving that ideal Grinch green!
Equipment Needed
- Mixing bowls: A large bowl for the pudding mixture and a smaller one for toppings.
- Whisk or hand mixer: Ensure a smooth and creamy pudding base.
- Spatula: Perfect for spreading the pudding and whipped topping evenly.
- Refrigerator: Essential for chilling the pie to achieve the perfect texture.
Must-Have Kitchen Tools
- Measuring cups: For precise ingredient measurements.
- Mixing spoons: Handy for incorporating the pudding mix thoroughly.
- Pie dish: A 9-inch pie plate to hold your masterpiece.
Variations
- Swap the Toppings: Instead of whipped topping, try using a layer of fresh whipped cream for a homemade touch. You can also add fresh fruit like sliced strawberries or blueberries on top for a burst of flavor and color. If you’re feeling adventurous, drizzle some chocolate sauce over the whipped topping for an extra tasty treat!
- Healthier Options: To lighten up the No Bake Grinch Pie, consider using low-fat milk and light whipped topping. You can even opt for a sugar-free pudding mix for a lighter version without compromising taste. For a gluten-free adaptation, simply use a gluten-free pie crust, ensuring everyone can enjoy this festive dessert!
Serving Suggestions
- Serve with a dollop of fresh whipped cream for an extra creamy layer.
- Pair it with warm mulled cider for a cozy winter drink.
- Complement with festive fruit salads for a refreshing contrast.
- Consider serving alongside hot cocoa topped with marshmallows for a sweet treat combo.
Perfect Pairings
- A glass of chilled milk enhances the creamy goodness of the pie.
- Hot chocolate with a hint of peppermint brings out the festive spirit.
- For adults, a light sparkling wine pairs beautifully with the sweetness.
FAQs about No Bake Grinch Pie
How far in advance can I make No Bake Grinch Pie?
You can prepare the No Bake Grinch Pie up to two days in advance! Simply make the pie, let it set in the refrigerator, and keep it covered. This means you can focus on other holiday preparations without sacrificing dessert! Just remember to add the decorative toppings closer to serving time for that fresh look and delicious crunch.
Can I freeze No Bake Grinch Pie?
Yes, you can freeze the No Bake Grinch Pie, but keep a few tips in mind. To freeze, wrap the pie tightly in plastic wrap, then cover it with aluminum foil. When ready to enjoy, transfer it to the fridge for several hours to thaw. Keep in mind that the texture might change slightly after freezing, but it will still taste delightful! Avoid freezing any whipped topping or sprinkles, as they don’t fare well in the freezer.
Final Thoughts
This No Bake Grinch Pie isn’t just a dessert; it’s a canvas for holiday joy! From the vibrant green hue to the delightful toppings, each slice celebrates the spirit of the season. Not only is it incredibly easy to prepare, but it also brings smiles and laughter to your table. It reminds us that the holidays are all about connection, celebration, and indulging in sweet treats. So, gather your loved ones, slice into this festive pie, and let’s make memories that will warm our hearts for years to come!
Create Memorable Moments
As you serve the No Bake Grinch Pie, take a moment to soak in the laughter and joy around you. Use this delicious treat to spark conversations and share stories. Encourage your loved ones to embrace the spirit of the season, creating memories that will linger long after the last bite. After all, the sweetest moments often come from simple delights shared with those we love!
PrintNo Bake Grinch Pie
A delicious and festive No Bake Grinch Pie perfect for holiday celebrations.
- Prep Time: 15 minutes
- Cook Time: 0 minutes
- Total Time: 3 hours 15 minutes
- Yield: 8 servings 1x
- Category: Dessert
- Method: No Bake
- Cuisine: American
- Diet: Vegetarian
Ingredients
- 1 Oreo cookie pie crust
- 1 box (110 g) white chocolate instant pudding mix
- 480 ml cold 2% milk
- 120 g whipped topping (Cool Whip), divided
- 2–3 drops neon green gel food colouring
- 1–2 drops green food colouring
- 70 g green sanding sugar
- 70 g mini red heart-shaped sprinkles
- 70 g large red heart-shaped sprinkles
Instructions
- In a large mixing bowl, combine white chocolate pudding mix, cold 2% milk, neon green gel food colouring, and green food colouring. Beat together using a whisk or hand mixer for 2–3 minutes, or until the mixture thickens and soft peaks form.
- Transfer the prepared pudding mixture into the Oreo cookie pie crust, spreading it evenly with a spatula.
- Place the pie in the refrigerator and chill for at least 3 hours to allow the filling to set firmly.
- Remove the pie from the refrigerator. Spoon half of the whipped topping over the set pudding layer and spread gently to cover.
- Evenly sprinkle green sanding sugar and mini red heart-shaped sprinkles over the whipped topping.
- Slice the pie and, just before serving, place one large red heart-shaped sprinkle on each slice as a decorative garnish.
Notes
- Make sure to chill the pie for at least 3 hours for proper setting.
- Adjust the food coloring to achieve your desired shade of green.
- Decorate with additional sprinkles according to your preference.
Nutrition
- Serving Size: 1 slice
- Calories: 250
- Sugar: 12 g
- Sodium: 150 mg
- Fat: 12 g
- Saturated Fat: 6 g
- Unsaturated Fat: 4 g
- Trans Fat: 0 g
- Carbohydrates: 35 g
- Fiber: 1 g
- Protein: 3 g
- Cholesterol: 30 mg