Introduction to No-Bake Lotus Biscoff Cheesecake
Hey there, fellow dessert lovers! If you’re anything like me, you adore a sweet treat that’s not only delicious but also hassle-free. That’s where the No-Bake Lotus Biscoff Cheesecake comes to the rescue, offering a creamy indulgence without the fuss of baking. Picture this: a dreamy cheesecake kissed with the warm, spiced flavors of Lotus Biscoff cookies—perfect for busy moms or professionals who still want to impress at gatherings. Whether it’s a spontaneous get-together or a well-planned celebration, this recipe is your secret weapon to delight your loved ones and satisfy your sweet cravings!
Why You’ll Love This No-Bake Lotus Biscoff Cheesecake
This No-Bake Lotus Biscoff Cheesecake is a dream come true for busy lives! In just 30 minutes, you can whip up a dessert that rivals any bakery creation. The creamy texture bursts with flavors you crave, while the cookie crust adds that perfect crunch. Plus, it sets in the fridge, so you can focus on other things while it works its magic. It’s the ultimate treat without the hassle!
Ingredients for No-Bake Lotus Biscoff Cheesecake
Let’s gather the stars of our No-Bake Lotus Biscoff Cheesecake! Each ingredient plays a vital role in crafting this heavenly dessert and comes together seamlessly. Here’s what you’ll need:
- Lotus Biscoff cookies: The star of the show! These spiced cookies provide a rich flavor and delightful crunch for the crust.
- Melted butter: This helps bind the cookie crumbs together, creating a sturdy base that’s both tasty and satisfying.
- Cream cheese: The creamy foundation of our cheesecake, offering that luscious and rich mouthfeel. Make sure it’s at room temperature for easy mixing.
- Powdered sugar: A touch of sweetness balances the tanginess of cream cheese, ensuring each bite is just the right amount of indulgent.
- Vanilla extract: A splash of pure vanilla elevates the flavor, adding warmth and depth to the filling.
- Heavy whipping cream: This creates that cloud-like texture. Whip it well for fluffy goodness that enhances our cheesecake.
- Lotus Biscoff spread: This is the secret to amplifying the flavor! It adds a creamy, caramel-like twist that coaxes out even more of those delicious cookie notes.
If you’re feeling adventurous or have dietary restrictions, feel free to experiment! For instance, gluten-free options can be made using gluten-free cookies, and you can also opt for low-fat cream cheese and whipping cream for a lighter version.
The detailed measurements for each ingredient are available at the bottom of the article for easy printing. Let’s dive into making this sensational cheesecake!

How to Make No-Bake Lotus Biscoff Cheesecake
Now that we’ve gathered our ingredients, let’s roll up our sleeves and dive into making this No-Bake Lotus Biscoff Cheesecake! These practical steps will guide you through the process, ensuring each moment in the kitchen is enjoyable.
Step 1: Prepare the Cookie Base
Let’s start with the cookie base!
Take those Lotus Biscoff cookies and crush them until they resemble fine crumbs. You can use a food processor for quick results, or if you want to get your hands dirty, pop them in a sealed plastic bag and give them a good whack with a rolling pin.
Next, transfer those lovely crumbs into a bowl, and pour in the melted butter. Mix until everything looks like wet sand. This consistency is key for a sturdy base!
Now, press this mixture firmly into the bottom of an 8-inch springform pan, packing it down with the back of a measuring cup or your hands. Pop it in the fridge while we whip up the filling.
Step 2: Make the Cream Cheese Mixture
In a large mixing bowl, grab your cream cheese. Using a hand mixer, beat it until it’s smooth and creamy.
Next, add in the powdered sugar, then mix until well combined and fluffy. This step is essential for achieving that sweet, creamy goodness.
Don’t forget the vanilla extract! It adds warmth and depth. Just beat for a few seconds to blend it in perfectly.
Step 3: Fold in the Whipped Cream
In another bowl, pour your heavy whipping cream and whip it until stiff peaks form. You want it to hold its shape without collapsing.
Now, gently fold the whipped cream into the cream cheese mixture. Use a spatula and be careful not to deflate all that airy goodness. Keep folding until you no longer see any streaks.
Step 4: Assemble the Cheesecake
The fun part is here! Add the Lotus Biscoff spread to the cream cheese and whipped cream mixture, folding it in until it’s evenly combined. Each spoonful should be divine!
Spoon this luscious filling onto your chilled cookie crust. Smooth the top with a spatula or the back of a spoon, creating an inviting surface that begs to be enjoyed!
Step 5: Chill and Serve
Cover the cheesecake with plastic wrap and return it to the fridge.
If you can resist, let it chill for at least four hours—or better yet, overnight for optimal results. This helps the flavors mingle beautifully and the cheesecake set properly.
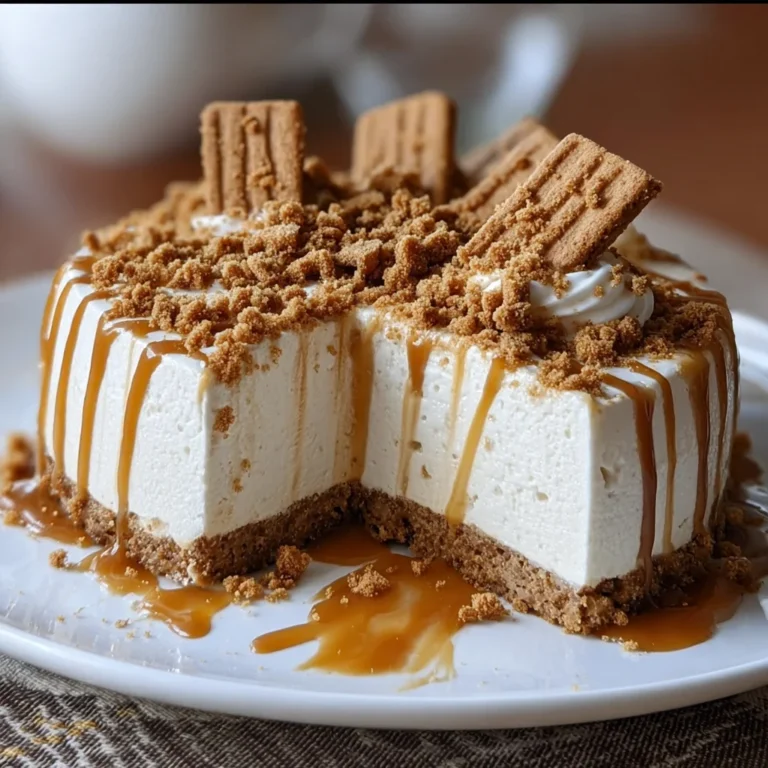
Once it’s firm, carefully remove the cheesecake from the springform pan. Transfer it to a serving platter, and if you like, sprinkle some more crushed Lotus Biscoff cookies on top or drizzle with extra spread before serving. Slice into pieces and enjoy your magnificent creation!
Tips for Success
- Ensure your cream cheese is at room temperature for easy mixing.
- Whip the heavy cream until stiff peaks form to maintain fluffiness.
- For a smoother texture, fold gently to keep the mixture light.
- Refrigerate overnight for best flavor and firmness.
- Experiment with toppings like chocolate drizzle or fresh fruit for variety.
Equipment Needed
- Mixing bowls: Any size works, but a large one is ideal for the cream cheese mixture.
- Hand mixer: A convenient tool for beating ingredients, but a whisk can also do the job.
- Food processor: Perfect for crushing cookies, but you can use a rolling pin if that’s not available.
- Springform pan: An essential for easy removal; a regular cake pan can be used as an alternative.
Variations on No-Bake Lotus Biscoff Cheesecake
- Chocolate Lover’s Twist: Swirl in some melted chocolate into the cream cheese mixture for a rich chocolate flavor.
- Nutty Delight: Add crushed nuts like almonds or hazelnuts into the cookie base for an extra crunch.
- Fruit-Filled Version: Layer fresh fruits like strawberries or bananas between the cheesecake filling and crust for a refreshing touch.
- Vegan Option: Use vegan cream cheese and coconut whipping cream to create a dairy-free delight.
- Different Cookie Bases: Substitute Lotus Biscoff cookies with Oreos or digestive biscuits for a unique flavor profile.
- Cheesecake Jars: Serve in individual jars for a fun and portable dessert option!
Serving Suggestions for No-Bake Lotus Biscoff Cheesecake
- Serve with a dollop of whipped cream on top for added decadence.
- Pair with fresh berries like strawberries or raspberries for a pop of color and freshness.
- Drizzle caramel sauce over each slice for an extra sweet touch.
- Enjoy alongside a hot cup of coffee or a chilled glass of dessert wine.
- Garnish with mint leaves for a beautiful presentation that wows!
FAQs about No-Bake Lotus Biscoff Cheesecake
Can I use other cookies for the crust?
Absolutely! While Lotus Biscoff cookies are fantastic, feel free to substitute them with Oreos, digestive biscuits, or any cookie you love. Just remember, each type will impart a different flavor to your cheesecake.
How long does the No-Bake Lotus Biscoff Cheesecake need to chill?
For optimal results, I recommend chilling it for at least four hours. However, overnight is best! This allows the cheesecake to set properly and the flavors to mingle beautifully.
Can I make this cheesecake ahead of time?
Yes! This No-Bake Lotus Biscoff Cheesecake is perfect for prepping in advance. Make it one or two days ahead, and it will stay delicious in the fridge!
How should I store leftovers?
If you have any leftovers, simply cover the cheesecake and store it in the refrigerator. It should stay fresh for about 3–4 days, though I doubt it’ll last that long!
Is it possible to make a dairy-free version?
Definitely! You can create a dairy-free version by using vegan cream cheese and coconut whipped cream. It will taste just as delightful without the dairy!
Final Thoughts
Creating this No-Bake Lotus Biscoff Cheesecake is more than just whipping up a dessert—it’s a joyful experience that transforms any gathering into a special occasion. The simplicity of the recipe allows you to focus on what truly matters: delighting family and friends with something truly irresistible.
Every creamy slice reveals deep flavors that evoke warmth and coziness, reminding you of home. So next time you’re short on time or looking to impress, dive into this delightful cheesecake. You’ll not only savor the deliciousness but also create beautiful memories along the way!
PrintNo-Bake Lotus Biscoff Cheesecake: Indulge in Creamy Bliss!
Indulge in this creamy and delicious No-Bake Lotus Biscoff Cheesecake, a perfect dessert for any occasion.
- Prep Time: 30 minutes
- Cook Time: 0 minutes
- Total Time: 4 hours 30 minutes
- Yield: 8 slices 1x
- Category: Dessert
- Method: No-Bake
- Cuisine: American
- Diet: Vegetarian
Ingredients
- 1 1/2 cups Lotus Biscoff cookies
- 1/4 cup melted butter
- 2 cups cream cheese
- 1/2 cup powdered sugar
- 1 teaspoon vanilla extract
- 1 1/2 cups heavy whipping cream
- 1/2 cup Lotus Biscoff spread
Instructions
- Place the Lotus Biscoff cookies into a food processor or a sealed plastic bag and crush until finely ground.
- Transfer the crushed cookies to a mixing bowl, pour in the melted butter, and mix until it resembles wet sand.
- Press the cookie-butter mixture into the base of an 8-inch springform pan and refrigerate to chill.
- In a large mixing bowl, beat the cream cheese with a mixer until smooth and creamy.
- Add the powdered sugar to the cream cheese and mix until fully incorporated and fluffy.
- Mix in the vanilla extract and beat for a few seconds.
- In another bowl, beat the heavy whipping cream until stiff peaks form.
- Gently fold the whipped cream into the cream cheese mixture until no streaks remain.
- Add the Lotus Biscoff spread and fold until evenly combined.
- Spoon the cheesecake filling onto the chilled cookie crust and smooth the top.
- Refrigerate for at least four hours or overnight to set.
- Remove from the pan and transfer to a serving platter.
- Optional: Garnish with extra crushed Lotus Biscoff cookies or drizzles of spread before serving.
- Slice and serve chilled.
Notes
- For best results, refrigerate overnight.
- Adjust the sweetness by modifying the amount of powdered sugar.
- Store any leftovers covered in the refrigerator.
Nutrition
- Serving Size: 1 slice
- Calories: 350
- Sugar: 22g
- Sodium: 220mg
- Fat: 24g
- Saturated Fat: 14g
- Unsaturated Fat: 8g
- Trans Fat: 0g
- Carbohydrates: 30g
- Fiber: 1g
- Protein: 4g
- Cholesterol: 70mg