Introduction to No-Bake Pinecone Truffles
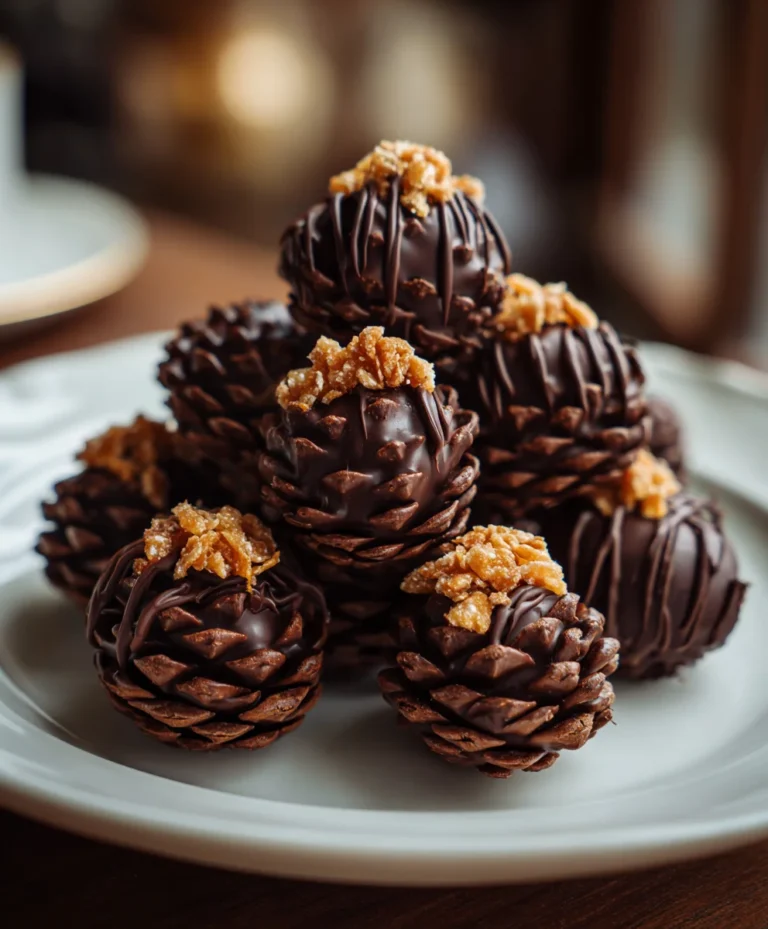
Hey there, fellow home cooks! If you’re anything like me, finding delightful desserts that don’t require hours in the kitchen can feel like striking gold. That’s where my No-Bake Pinecone Truffles come in! These adorable treats are not only a breeze to whip up, but they also look so whimsical that they’ll charm the socks off anyone who sees them. Whether it’s a family gathering or a potluck, this easy dessert is your perfect companion—and you don’t even need to turn on the oven! It’s a winner for those busy days when time is short, but the need for sweetness is essential.
Why You’ll Love This No-Bake Pinecone Truffles
These No-Bake Pinecone Truffles are a delightful blend of convenience and taste. They come together in just 20 minutes, making them a perfect quick treat for those busy afternoons. The rich, chocolatey flavor pairs beautifully with the crunch of cornflakes, creating a fun dessert experience. Plus, everyone can join in on the fun of shaping and decorating these charming little confections!
Ingredients for No-Bake Pinecone Truffles
Gathering the right ingredients is half the fun! For these No-Bake Pinecone Truffles, you’ll need a few simple items that pack a punch in flavor and texture. Here’s what you’ll need:
- Vegan chocolate biscuits: These are the base of your truffles, adding sweetness and texture. Gluten-free options work perfectly if needed.
- Dairy-free cream cheese: This gives your truffles a creamy, rich flavor without the dairy. Truly makes the mixture hold together well!
- Unsweetened cocoa powder: A spoonful of cocoa brings depth to the chocolatey goodness of these treats.
- Dairy-free dark chocolate: For the final dipping, this adds a luscious outer layer of flavor. Choose brands that suit your dietary needs!
- Vegan cornflakes: These act as the decoration and give your truffles that pinecone appearance. Gluten-free cornflakes are an excellent substitute!
- Icing sugar: A light dusting of this sugar creates a beautiful finish and adds just a hint of sweetness.
For exact quantities of each ingredient, don’t forget to check the bottom of this article, where I have the details for you. Happy cooking!
How to Make No-Bake Pinecone Truffles
Now, let’s dive into the fun part—making these No-Bake Pinecone Truffles! Each step is simple, allowing you to feel like a pro in no time. Here we go!
Step 1: Prepare Your Tray
Start by lining a baking tray with greaseproof paper. This will prevent the truffles from sticking and make cleanup a breeze. Trust me, your future self will thank you!
Step 2: Crush the Biscuits
Next, grab your vegan chocolate biscuits. You can use a food processor to turn them into fine crumbs, which makes it easier. If you don’t have one, just place the biscuits in a ziplock bag and crush them with a rolling pin. Every little piece counts!
Step 3: Mix the Ingredients
Transfer those crunchy biscuit crumbs into a large mixing bowl. Add in your dairy-free cream cheese and unsweetened cocoa powder. Use a spatula or your hands to mix until everything is well combined. The mixture should feel slightly damp and hold together when pressed. If it’s too crumbly, just add a bit more cream cheese.
Step 4: Shape Your Truffles
Now, it’s time to get your hands a little dirty! Roll tablespoon-sized portions of the mixture into balls, roughly 20g each. Pinch the tops gently to create that cute, oval pinecone shape. Arrange these on your prepared tray, giving them some space to breathe.
Step 5: Decorate with Cornflakes
Here comes the fun part! Take your vegan cornflakes and start pressing them onto the truffles, beginning from the bottom. Layer them up to mimic pinecone scales. I like to use smaller flakes near the top for that authentic look. Get creative—it’s your edible artwork!
Step 6: Freeze for Firmness
Pop the tray into the freezer for about 25 minutes. This will firm them up, making it easier to coat them in chocolate later. Plus, you can take a moment to relax (or sneak a taste of the mixture!).
Step 7: Melt the Chocolate
While you wait, melt your dairy-free dark chocolate. Use a heatproof bowl over a pan of simmering water, or simply microwave it in short bursts of 20 seconds, stirring in between. Melt until it’s smooth and luscious—temptation will be high, but resist the urge to dive in too soon!
Step 8: Coat the Truffles
Take your chilled truffles out of the freezer. Dip each one into the melted chocolate using a fork, making sure they’re well-coated. Let any excess chocolate drip back into the bowl. The richer, the better, right?
Step 9: Dust and Serve
Return the chocolate-coated truffles to the tray and freeze them for another 5 to 10 minutes, until the chocolate sets. Finally, give them a light dusting of icing sugar for that finishing touch. Serve immediately and watch the joy on everyone’s faces as they enjoy your beautiful No-Bake Pinecone Truffles!
Tips for Success
- Keep your hands damp when shaping truffles to prevent sticking.
- For a richer flavor, let the truffle mixture chill for 10 minutes before rolling.
- Experiment with toppings like crushed nuts or sprinkles for added crunch.
- Make ahead and store in the fridge for busy days.
- Use quality chocolate for coating—it makes all the difference!
Equipment Needed
- Baking tray: Use any flat tray you have; a cookie sheet can work too!
- Greaseproof paper: Parchment paper also does the trick for easy cleanup.
- Food processor: A blender is a good alternative for crushing biscuits.
- Mixing bowl: Any large bowl will suffice; just ensure it’s easy to mix in.
- Fork: Essential for dipping truffles; a slotted spoon could work as well.
Variations
- Nutty Delight: Add crushed almonds or walnuts to the truffle mixture for an extra crunch.
- Flavored Truffles: Mix in a teaspoon of vanilla extract or almond extract to enhance flavor.
- Spicy Kick: Incorporate a pinch of cinnamon or cayenne pepper for a unique twist.
- Fruit Fusion: Fold in some finely chopped dried fruits like cranberries or apricots for sweetness and texture.
- Chocolate Lovers: Mix in chocolate chips for double the chocolatey goodness!
Serving Suggestions
- Pair your No-Bake Pinecone Truffles with a rich cup of coffee or herbal tea for a cozy treat.
- Display them on a decorative platter with fresh berries for a pop of color.
- For larger gatherings, stack truffles in a tiered dessert stand for an eye-catching presentation.
- Consider adding a sprinkle of sea salt on top for a sweet and salty contrast.
FAQs about No-Bake Pinecone Truffles
Got questions about these adorable No-Bake Pinecone Truffles? Don’t worry—I’ve got you covered! Here are some common inquiries about this fun dessert that might be on your mind.
Can I make these truffles gluten-free?
Absolutely! Just choose gluten-free vegan chocolate biscuits and cornflakes to make sure everyone can enjoy them without worry.
How should I store leftover truffles?
Keep any leftover truffles in an airtight container in the fridge. They should stay fresh for up to a week. But let’s be real—will there be leftovers?
Can I add other toppings instead of cornflakes?
You bet! Get creative with nuts, sprinkles, or even coconut flakes. Just remember, the goal is to make them pinecone-like!
Can I use regular chocolate instead of dairy-free?
Of course! If dairy isn’t an issue for you, feel free to swap in regular chocolate for the coating. It’ll taste just as divine!
What if my truffle mixture is too dry?
If it feels crumbly, mix in a bit more dairy-free cream cheese until it holds together nicely. A little moisture goes a long way!
Final Thoughts
Creating No-Bake Pinecone Truffles is more than just a cooking experience; it’s a chance to have fun with family and friends. Watching their faces light up as they shape the truffles or sneak a quick taste is pure joy! This whimsical dessert brings excitement to any gathering, making it memorable. The beauty of these treats lies not just in their deliciousness but in the laughter and creativity they inspire. So, gather your loved ones, roll up your sleeves, and let the kitchen become a place of happiness. You won’t just create sweets; you’ll create sweet memories!
PrintNo-Bake Pinecone Truffles
No-Bake Pinecone Truffles are a fun and easy dessert that resembles pinecones, perfect for any occasion.
- Prep Time: 20 minutes
- Cook Time: 0 minutes
- Total Time: 45 minutes
- Yield: Approximately 15 truffles 1x
- Category: Dessert
- Method: No-Bake
- Cuisine: Vegan
- Diet: Vegan
Ingredients
- 150g vegan chocolate biscuits, finely crushed (use gluten-free if needed)
- 60g dairy-free cream cheese
- 1 tablespoon unsweetened cocoa powder
- 200g dairy-free dark chocolate
- Vegan cornflakes (gluten-free optional), as needed for decoration
- Icing sugar, for dusting
Instructions
- Line a baking tray with greaseproof paper and set aside.
- Process chocolate biscuits in a food processor or blender until fine crumbs form, or crush manually with a rolling pin.
- Transfer biscuit crumbs to a large mixing bowl. Add dairy-free cream cheese and cocoa powder. Mix until evenly incorporated and the mixture holds together when pressed.
- Using clean hands, roll tablespoon-sized portions (approximately 20g each) into balls. Pinch the tops to create an oval, pinecone-like shape and place them on the prepared tray.
- Starting from the base, press cornflakes into each truffle, layering upwards to resemble pinecone scales, using smaller flakes as you ascend.
- Place tray in the freezer for 25 minutes until firm enough for coating.
- Five minutes before removing truffles from the freezer, melt dark chocolate in a heatproof bowl set over a pan of simmering water (bain-marie), or in a microwave in 20-second intervals until smooth.
- Using a fork, dip each chilled truffle into the melted chocolate, spooning over to cover. Allow any excess chocolate to drip off.
- Return coated truffles to the tray and place in the freezer for 5–10 minutes, until the chocolate sets.
- Lightly dust cooled truffles with icing sugar and serve immediately.
Notes
- For a gluten-free alternative, ensure the biscuits and cornflakes are certified gluten-free.
- Store any leftovers in the fridge for up to a week.
- Decoration can be customized with different toppings if desired.
Nutrition
- Serving Size: 1 truffle
- Calories: 150
- Sugar: 10g
- Sodium: 50mg
- Fat: 9g
- Saturated Fat: 4g
- Unsaturated Fat: 5g
- Trans Fat: 0g
- Carbohydrates: 16g
- Fiber: 2g
- Protein: 2g
- Cholesterol: 0mg