Introduction to Old-Fashioned Chocolate Pie
Ah, the sweet nostalgia of an Old-Fashioned Chocolate Pie! This delightful treat is like wrapping yourself in a warm blanket on a chilly evening. The rich chocolate filling paired with a flaky crust creates a symphony of flavors that will put a smile on any face. It’s perfect for those busy days when you need a quick dessert that impresses loved ones without keeping you in the kitchen for hours. Trust me, this pie is a slice of happiness that brings joy to every gathering. Let’s dive into this timeless recipe together!
Why You’ll Love This Old-Fashioned Chocolate Pie
This Old-Fashioned Chocolate Pie is not just about taste; it’s about simplicity and satisfaction. With a total prep time of just 20 minutes, you can whip this masterpiece up even on your busiest days. As you savor each creamy slice, you’ll appreciate the rich flavor that speaks of love and care. It’s a timeless recipe that captures the essence of home, making every bite a cherished moment.
Ingredients for Old-Fashioned Chocolate Pie
Gathering the right ingredients is the first step to creating this scrumptious Old-Fashioned Chocolate Pie. Here’s what you’ll need:
- Granulated Sugar: This sweetener balances the rich chocolate and provides the pie’s main sweetness.
- Unsweetened Cocoa Powder: The heart of this recipe, cocoa powder gives the pie its deep chocolate flavor. Opt for high-quality brands for best results.
- All-Purpose Flour: Flour helps to thicken the filling, giving it that perfect custard-like consistency.
- Fine Sea Salt: A pinch of salt enhances the overall flavor, making the chocolate taste even richer.
- Egg Yolks: These rich, golden centers add creaminess and help bind the filling together.
- Whole Milk: The base for your filling, whole milk adds creaminess and richness that make every slice delightful.
- Pure Vanilla Extract: This aromatic addition brings warmth and depth to the flavor profile of your pie.
- Unsalted Butter: Added for richness, butter helps create a smooth and glossy finish in the filling.
- Pre-baked Pie Crust: A flaky crust is essential to hold all that luscious filling. You can use store-bought or homemade, just make sure it’s fully baked before filling.
Remember, if you’re looking for a quick option, many stores have excellent pre-made pie crusts. Feel free to experiment with different types of crust for a unique twist! Exact measurements are listed at the end of the article for easy reference.
How to Make Old-Fashioned Chocolate Pie
Creating your own Old-Fashioned Chocolate Pie is a joy! Follow these simple steps to bring this luscious pie to life. Each step is a new adventure towards chocolate delight!
Step 1: Prepare the Dry Ingredients
Start by grabbing a medium saucepan. In it, whisk together the granulated sugar, unsweetened cocoa powder, all-purpose flour, and fine sea salt. This step is critical; you want a lump-free mixture for a silky filling. Whisk until everything is combined, and those pesky lumps are gone. The aroma of cocoa will lift your spirits as you prep!
Step 2: Mix the Wet Ingredients
In a separate mixing bowl, crack three large egg yolks. Whisk them together with whole milk until the mixture is smooth and creamy. It’s essential to blend these well, so no streaks remain. You want to see a beautiful, golden hue. This creamy blend will add richness to your pie filling!
Step 3: Combine Mixtures
Now for the fun part! Gradually pour the egg-milk blend into the saucepan with your dry ingredients. As you pour, whisk continuously to avoid any unwanted lumps. The goal is a smooth consistency. This beautiful combination is the beginning of your velvety filling. Can you smell that chocolate dreamy flavor forming?
Step 4: Cook Until Thickened
Place the saucepan over medium heat and stir constantly. It’s like a dance—you don’t want it to stick or burn! After about 7 to 10 minutes, the mixture will thicken to a pudding-like consistency, looking gloriously indulgent. Once it reaches that point, remove it from the heat. Your patience will pay off here!
Step 5: Add Butter and Vanilla
Off the heat, add the unsalted butter and pure vanilla extract into your luscious mixture. Stir them in until the butter is melted and everything is well incorporated. The filling will turn glossy and utterly inviting. You’ll want to taste it right now—it’s pure chocolate bliss!
Step 6: Fill the Pie Crust
Pour your warm chocolate filling into the pre-baked pie crust. Use a spatula to smooth the surface, creating a picture-perfect pie. As the filling settles, imagine all the smiles it will bring. This is where all your effort starts to turn into something beautiful and delicious!
Step 7: Chill and Serve
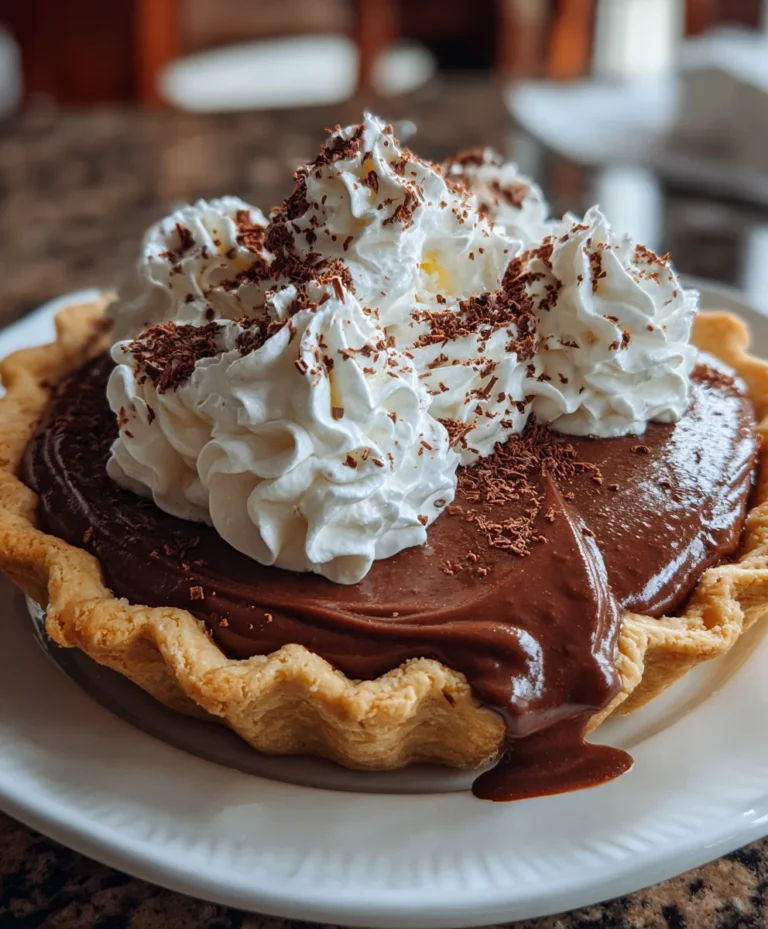
Allow the pie to cool to room temperature, then pop it into the refrigerator for 3 to 4 hours or until fully set. This chilling step is vital for achieving that perfect slice. When you’re ready to serve, consider garnishing with whipped cream or chocolate shavings for an extra special touch. Enjoy the moment when it’s finally time to slice into your masterpiece!
Tips for Success
- Use high-quality cocoa powder for a richer chocolate flavor.
- Make sure your pie crust is fully baked to avoid a soggy bottom.
- Whisk continuously while cooking to prevent burning and lumps.
- Allow the pie to cool completely to ensure clean slices.
- Feel free to make this pie a day ahead; it tastes even better the next day!
Equipment Needed
- Medium saucepan – Any heavy-bottomed pot will do.
- Mixing bowls – A set of different sizes or even just one will work.
- Whisk – A fork can suffice in a pinch!
- Spatula – A rubber or silicone spatula is perfect for smoothing the filling.
- Refrigerator – Essential for chilling your delicious pie before serving.
Variations for Old-Fashioned Chocolate Pie
- Chocolate Mint Delight: Add a few drops of peppermint extract to the filling for a refreshing minty twist that pairs beautifully with chocolate.
- Espresso Infusion: Mix a teaspoon of instant espresso powder into the dry ingredients for a subtle coffee flavor that enhances the chocolate.
- Nutty Crunch: Fold in chopped nuts, like pecans or walnuts, into the filling just before pouring it into the crust for added texture and flavor.
- Dairy-Free Option: Substitute whole milk with almond or coconut milk and use dairy-free butter to create a delicious dairy-free version.
- Dark Chocolate Indulgence: Use dark cocoa powder for a richer taste; this variation will appeal to dark chocolate lovers!
- Fruit Topping: Top your pie with fresh berries or sliced bananas for a sweet and fruity contrast to the rich chocolate.
- Salted Caramel Drizzle: Drizzle homemade or store-bought salted caramel over the pie before serving for a sweet and salty flavor experience.
Serving Suggestions for Old-Fashioned Chocolate Pie
- Pair with a dollop of freshly whipped cream for a light and airy contrast.
- Serve alongside a scoop of vanilla ice cream to create a decadent dessert experience.
- Complement with a rich, dark coffee to balance the sweetness.
- Garnish with chocolate shavings or berries for an elegant presentation.
FAQs about Old-Fashioned Chocolate Pie
Can I use a store-bought crust for my Old-Fashioned Chocolate Pie?
Absolutely! A store-bought crust can save time without sacrificing flavor. Just ensure it’s fully baked before adding the filling for best results.
How do I store leftovers of Old-Fashioned Chocolate Pie?
Store any leftover slices in an airtight container in the refrigerator for up to 3 days. It’s a great treat to enjoy later!
Can I make this pie in advance?
Yes! This pie can be made a day ahead, allowing the flavors to meld beautifully. Just keep it chilled until you’re ready to serve.
What can I use as a substitute for egg yolks?
If you’re looking for an egg-free option, try using a flaxseed meal or chia seed mixture. Combine one tablespoon of either with three tablespoons of water and let it sit to gel before adding it to your filling.
Why is my filling lumpy?
Lumps may happen if the dry ingredients weren’t whisked well, or if the egg-milk blend was added too quickly. Be sure to whisk continuously while combining to avoid this common issue!
Final Thoughts on Old-Fashioned Chocolate Pie
Making an Old-Fashioned Chocolate Pie is like inviting a piece of nostalgia into your kitchen. Every slice is a reminder of love, joy, and the magic of sharing memories with family and friends. The delightful combination of creamy chocolate and a perfectly flaky crust never fails to evoke smiles and warm conversations around the table. Whether it’s a special occasion or a well-deserved treat for yourself, this pie is sure to bring happiness to any gathering. So, roll up your sleeves and create this timeless dessert that celebrates the sweetness of life and shared moments!
PrintOld-Fashioned Chocolate Pie
Old-Fashioned Chocolate Pie is a classic dessert featuring a rich and creamy chocolate filling inside a flaky pie crust, perfect for any occasion.
- Prep Time: 20 minutes
- Cook Time: 10 minutes
- Total Time: 3 hours 30 minutes (including refrigeration time)
- Yield: 8 servings 1x
- Category: Dessert
- Method: Stovetop and refrigeration
- Cuisine: American
- Diet: Vegetarian
Ingredients
- 200 grams granulated sugar
- 30 grams unsweetened cocoa powder
- 32 grams all-purpose flour
- 1 gram fine sea salt
- 3 large egg yolks
- 480 millilitres whole milk
- 5 millilitres pure vanilla extract
- 28 grams unsalted butter
- 1 pre-baked 23-centimetre pie crust
Instructions
- In a medium saucepan, whisk together the granulated sugar, unsweetened cocoa powder, all-purpose flour, and salt until homogenous and lump-free.
- In a separate mixing bowl, whisk the egg yolks and whole milk until fully combined and smooth.
- Gradually pour the egg-milk blend into the saucepan with the dry ingredients, whisking continuously to avoid lumps.
- Place the saucepan over medium heat and cook, stirring constantly, until the mixture thickens to a pudding-like consistency, approximately 7 to 10 minutes.
- Remove the saucepan from the heat. Add unsalted butter and vanilla extract, stirring until the custard is glossy and smooth.
- Pour the warm filling into the pre-baked pie crust. Smooth the surface and allow to cool to room temperature, then refrigerate for 3 to 4 hours or until fully set.
- Once thoroughly chilled, cut into slices and serve cold. Garnish with whipped cream or chocolate shavings if desired.
Notes
- This pie can be made a day in advance and stored in the refrigerator.
- Garnishing is optional but adds a delightful touch to the presentation.
Nutrition
- Serving Size: 1 slice
- Calories: 350
- Sugar: 25 grams
- Sodium: 150 milligrams
- Fat: 15 grams
- Saturated Fat: 9 grams
- Unsaturated Fat: 5 grams
- Trans Fat: 0 grams
- Carbohydrates: 50 grams
- Fiber: 2 grams
- Protein: 5 grams
- Cholesterol: 100 milligrams