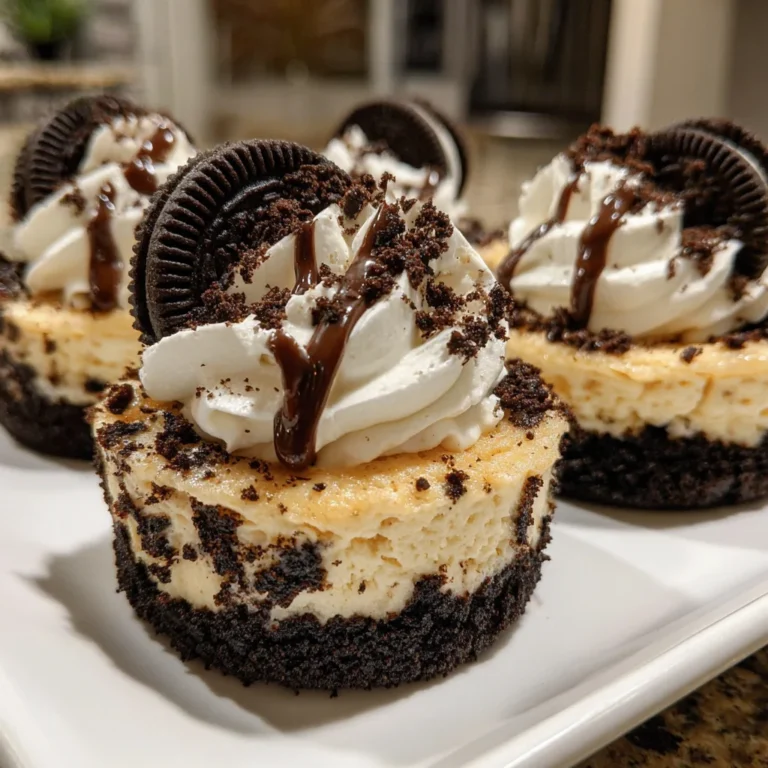
Introduction to Oreo Cheesecake Cookie Cups
I know how life can get as a mom on the go and usually leaves no time for making fancy desserts. So, I am super excited to share my Oreo Cheesecake Cookie Cups with you! Two classic desserts rolled up into one mouthful-sized indulgence. Think Oreo cookie crunch with cheesecake creaminess, all nestled in a little cup of sweetness. You can make this for a get-together or to brighten your day after a really long one; your ‘meh’ feeling will not win out over these gemstones, trust me!
Why You’ll Love This Oreo Cheesecake Cookie Cups
Oreo Cheesecake Cookie Cups are … so easy to make. It takes a little over two hours to make a dessert that rivals goodies from any bakery. The best element: it’s one great time-saver with very little work to do when time is in such abundance. The combination of smooth cheesecake and crispy Oreo is like dancing with every bite. Trust me, your family will love them.
Ingredients for Oreo Cheesecake Cookie Cups
Gather all the ingredients to create your own Oreo Cheesecake Cookie Cups! Each one brings its own magic to this delightful treat.
- Oreo cookies: These iconic treats form the base. Crunchy and chocolatey, they’re a must for that classic Oreo flavor.
- Unsalted butter: This adds richness to the crust, holding everything together for that perfect bite.
- Cream cheese: Softened and creamy, it’s the star of the show, giving the cheesecake its velvety texture.
- Granulated sugar: Sweetens the filling, balancing the flavors without overpowering the rich cream cheese.
- Sour cream: This adds a tangy depth, enhancing the cheesiness while keeping it creamy.
- Whipped cream: For topping, it brings a lightness and an airy touch to each cup.
- Optional mini chocolate chips: For those who crave a little extra sweetness, these little gems can be folded into the filling.
For exact measurements of each ingredient, don’t worry! You can find them at the bottom of the article, perfect for printing. Get ready to create something special!

How to Make Oreo Cheesecake Cookie Cups
Step 1: Preheat and Prepare
First things first, let’s get your oven preheating to 350°F (175°C).
While that’s warming up, grab your muffin tin. Line it with cupcake liners, which will help with easy removal later. Trust me, you’ll thank your future self when it’s time to serve!
Step 2: Make the Crust
Next, let’s make that delicious crust. Start by crushing 20 Oreo cookies into fine crumbs.
You can use a food processor for this or place them in a ziploc bag and crush them with a rolling pin – it’s like therapy!
Once crushed, mix those Oreos with melted unsalted butter. This will hold everything together.
Now, take about one tablespoon of your mixture and press it into the bottom of each cupcake liner to create a firm base. Make sure it’s packed tight; you want it to hold its shape!
Step 3: Prepare the Cheesecake Filling
Now for the star of the show: the cheesecake filling! In a mixing bowl, add 8 oz of softened cream cheese and 1/2 cup of granulated sugar.
Beat them together until it’s fluffy and smooth. This will take just a couple of minutes.
Next, add in 1/4 cup of sour cream and mix until combined. The sour cream adds a lovely tang that contrasts beautifully with the sweetness.
If you’re feeling a bit wild, fold in some mini chocolate chips for an added touch of sweetness!
Step 4: Assemble and Bake
Time to bring it all together! Spoon the cheesecake filling into each cup until it’s nearly full. Don’t worry about it overflowing; these little cups are forgiving!
Now, bake them in your preheated oven for about 15-18 minutes. They should be set but still slightly jiggly in the center. You want them to cool to perfection!
Step 5: Cooling and Topping
Once they’re baked, let these little beauties cool completely in the tin.
After they’ve cooled down, pop them into the refrigerator for at least two hours. This chilling time is crucial for that creamy cheesecake experience.
When you’re ready to serve, top each cup with a generous swirl of whipped cream and sprinkle some crushed Oreos on top for that crunchy finish. Enjoy every bite!
Tips for Success
- Use double-stuffed Oreos for an extra decadent crust.
- Ensure cream cheese is at room temperature for the smoothest filling.
- Don’t overbake! They should be slightly jiggly in the center for a creamy texture.
- Chill the cookie cups overnight for the best flavor development.
- Experiment with different toppings like fresh berries or caramel drizzle for a twist!
Equipment Needed
- Muffin tin: A standard muffin tin works perfectly, but you can use a mini one for smaller cups.
- Cupcake liners: These help with easy removal, but you can grease the muffin tin instead if you’re out.
- Mixing bowls: Any size will do, but a medium bowl is great for mixing the filling.
- Food processor or rolling pin: Either works for crushing the Oreos, making it versatile!
Variations
- Gluten-Free: Swap regular Oreos for gluten-free Oreos to accommodate gluten sensitivities.
- Nutty Bliss: Add chopped nuts, like pecans or walnuts, to the crust for a crunchy twist.
- Fruity Flavor: Incorporate fresh fruit like strawberries or raspberries in the cheesecake filling for a refreshing taste.
- Vegan Option: Use vegan cream cheese and dairy-free whipped topping for a plant-based version.
- Minty Fresh: Add a few drops of peppermint extract to the filling for a mint chocolate vibe!
Serving Suggestions
- Pair your Oreo Cheesecake Cookie Cups with a hot cup of coffee or tea for a cozy dessert experience.
- Serve them alongside fresh berries to add a touch of color and freshness to your table.
- Consider a chocolate sauce drizzle for an indulgent finishing touch on special occasions.
- For a fun presentation, place them on a decorative platter sprinkled with mini Oreos!
FAQs about Oreo Cheesecake Cookie Cups
Can I make these Oreo Cheesecake Cookie Cups ahead of time?
Absolutely! These little delights can be made a day ahead and stored in the refrigerator. Just be sure to add the whipped cream topping right before serving for that fresh look!
How do I store leftover cookie cups?
Store any leftover Oreo Cheesecake Cookie Cups in an airtight container in the fridge. They’ll keep for about 3-4 days, but trust me, they probably won’t last that long!
Can I freeze these cookie cups?
You can freeze them, but it’s best to do so before adding the whipped cream. Place them in a freezer-safe container and they should be good for up to a month. Just thaw in the fridge the night before you plan to serve them.
Can I use other cookies instead of Oreos?
Sure! You can experiment with other cookie bases, like chocolate chip or Nilla wafers. Just remember that different cookies will change the flavor profile a bit, but that’s part of the fun!
What if I don’t have sour cream?
If you’re out of sour cream, don’t fret! You can substitute it with Greek yogurt or cream cheese. Both will add flavor while keeping your filling creamy.
Final Thoughts
Creating these Oreo Cheesecake Cookie Cups was a total breeze for me, and I really hope you find it just as fun to make! That tiny morsel of cheer is the chocolate chip cookie cup filled with the most luscious cheesecake, embodying a warm hug. It’s not just a treat but an indulgence one relishes as a special sweetness at the end of one’s day. So very simple steps and the ingredients that you mostly already have at home make you just a few hours away from a dessert that includes smiling. Get ready for it, and let the yumminess begin!
PrintOreo Cheesecake Cookie Cups
Oreo Cheesecake Cookie Cups are a delightful dessert combining the flavors of Oreo cookies and creamy cheesecake in a convenient cup format.
- Prep Time: 15 minutes
- Cook Time: 18 minutes
- Total Time: 2 hours 33 minutes (including cooling time)
- Yield: 12 cookie cups 1x
- Category: Dessert
- Method: Baking
- Cuisine: American
- Diet: Vegetarian
Ingredients
- 20 Oreo cookies (for crust)
- 5 tbsp unsalted butter (melted)
- 8 oz cream cheese (softened)
- 1/2 cup granulated sugar
- 1/4 cup sour cream
- 1 cup whipped cream (for topping)
- Optional: 1/4 cup mini chocolate chips
Instructions
- Preheat oven to 350°F (175°C).
- Crush 20 Oreos into fine crumbs and mix with melted butter.
- Line a muffin tin with cupcake liners and press about one tablespoon of the Oreo mixture into each liner to form the base.
- In a mixing bowl, beat softened cream cheese and sugar until fluffy.
- Add sour cream and mix until smooth. Optionally fold in mini chocolate chips.
- Spoon cheesecake filling onto each crust until almost full.
- Bake for 15-18 minutes until set but slightly jiggly in the center.
- Let cool completely before refrigerating.
- Once chilled, top with whipped cream and sprinkle with crushed Oreos.
Notes
- For a richer flavor, consider using double-stuffed Oreos for the crust.
- Allow the cheesecake cups to chill for at least 2 hours before serving for best taste.
- These can be made a day ahead and stored in the refrigerator.
Nutrition
- Serving Size: 1 cookie cup
- Calories: 210
- Sugar: 10g
- Sodium: 120mg
- Fat: 12g
- Saturated Fat: 7g
- Unsaturated Fat: 3g
- Trans Fat: 0g
- Carbohydrates: 25g
- Fiber: 1g
- Protein: 3g
- Cholesterol: 30mg