Introduction to Peanut Butter Cup Chocolate Roll
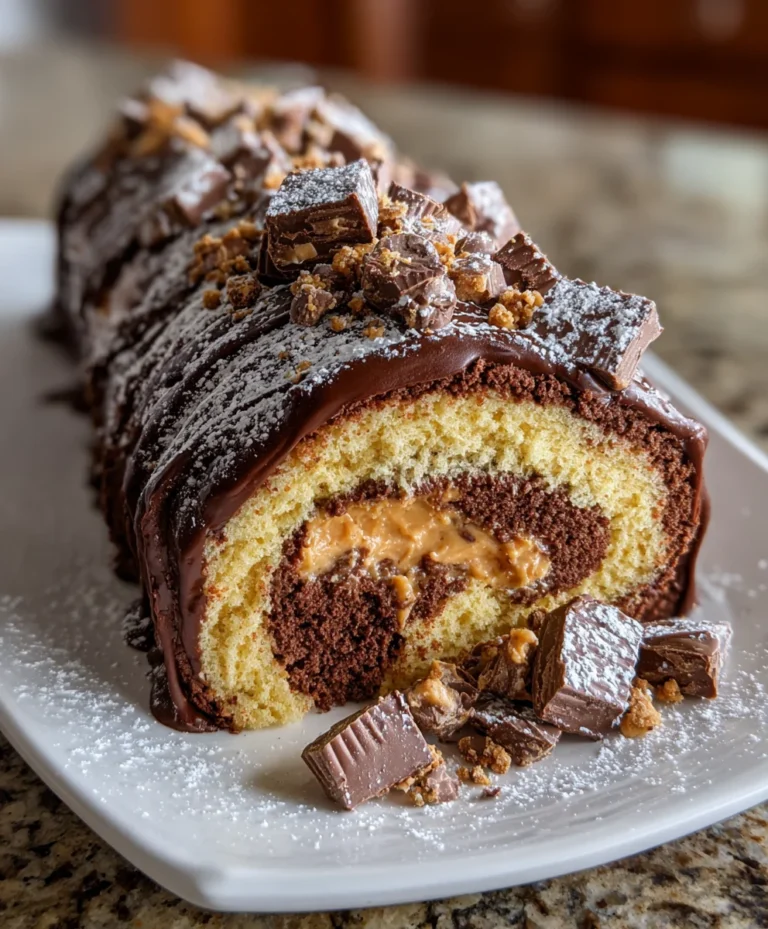
Imagine diving into a dessert that wraps the rich flavors of chocolate and peanut butter into a soft, inviting roll. The Peanut Butter Cup Chocolate Roll is not just any sweet treat; it’s a warm hug for your taste buds! I know how hectic life can be as a busy mom or professional, so this recipe is a lifesaver. It’s quick, satisfying, and a guaranteed crowd-pleaser that will bring smiles around the table. Trust me, the moment you slice into this tempting roll and see that creamy filling, you’ll wonder why it took you so long to try it!
Why You’ll Love This Peanut Butter Cup Chocolate Roll
This Peanut Butter Cup Chocolate Roll checks all the boxes for a perfect dessert. It’s easy to make, which is great for those busy evenings when you crave something sweet but don’t have hours to spare. The rich chocolate sponge paired with creamy peanut butter filling makes each bite utterly delicious. Plus, it’s a fantastic way to impress family and friends—without the stress. You’ll have everyone asking for seconds!
Ingredients for Peanut Butter Cup Chocolate Roll
Gathering the right ingredients sets the stage for a delightful baking experience. Here’s what you’ll need for this indulgent Peanut Butter Cup Chocolate Roll:
- Chocolate Sponge Cake: You’ll need all-purpose flour for structure and cocoa powder to give that deep chocolate flavor. Baking powder helps the cake rise, while a pinch of salt balances the sweetness. Eggs add moisture and richness, and granulated sugar brings sweetness to every bite. Vegetable oil ensures a tender texture, and a splash of vanilla and milk rounds out the flavor.
- Peanut Butter Filling: Creamy peanut butter is the star here, providing that luscious filling. Powdered sugar sweetens it just right, and heavy cream makes it light and spreadable. Vanilla extract adds a nice depth to the overall taste.
- Add-Ins: Chopped peanut butter cups bring delightful bits of chocolate and peanut butter throughout the roll, enhancing each mouthful.
- Optional Chocolate Ganache Topping: If you want extra decadence, a ganache made of heavy cream and semi-sweet chocolate chips creates a glossy finish that is hard to resist.
Exact measurements for these ingredients can be found at the bottom of the article, so feel free to check them out for easy printing!
How to Make Peanut Butter Cup Chocolate Roll
Step 1: Preheat and Prepare
First things first! Preheat your oven to 350°F. While it warms up, grab a jelly roll pan and line it with parchment paper, making sure to leave some overhang. This will help you lift the cake out later. Lightly grease the parchment so the cake won’t stick. It’s crucial to give yourself enough space because this cake will need to be rolled up later. Also, lay a clean kitchen towel flat and dust it generously with powdered sugar. Trust me; this step will save you from sticky situations!
Step 2: Mix the Dry Ingredients
Grab a medium bowl and whisk together the flour, cocoa powder, baking powder, and salt. These are the building blocks of your chocolate sponge cake. Mixing them well ensures an even distribution of flavors and helps avoid any lumps later on. Make sure to whisk until everything is combined and perfectly blended. This dry mixture will be the skeleton that holds your tasty roll together, so give it the attention it deserves!
Step 3: Beat the Eggs and Sugar
Now, let’s bring some magic to life! In a large bowl, beat the eggs and granulated sugar together on high speed. Here’s where the real transformation happens—continue for about 4 to 5 minutes until the mixture becomes thick, pale, and nearly triples in volume. This step is vital as it helps incorporate air into the eggs, making your cake light and fluffy. The more air you beat in, the higher it will rise, resulting in a delightful treat!
Step 4: Combine Wet and Dry Ingredients
Now, it’s time to unite the families! Gently fold the dry ingredients into the egg mixture using a spatula. Be careful not to overmix! The goal is to combine everything until you see no more streaks of flour. Folding ensures that you maintain the airiness from the egg mixture. Think of it like tucking in a cozy blanket! A gentle touch will yield a beautiful batter that’s ready to bake.
Step 5: Bake the Cake
With your batter ready, pour it evenly into the prepared pan, smoothing the top with a spatula. Pop that beauty into your preheated oven and bake for about 10 to 12 minutes. Keep a close eye on it; you’ll know it’s done when the cake springs back lightly when touched. This is the moment when your kitchen starts smelling heavenly! Once baked, you’ll want to act quickly because the texture is best when rolled warm.
Step 6: Roll the Cake
As soon as the cake comes out of the oven, invert it onto the prepared powdered sugar-dusted towel. Carefully peel off the parchment paper. Did you see that? The magic happens now! Starting from the short end, gently roll the cake up with the towel inside. Let it cool completely while rolled. This step is crucial; rolling while it’s warm helps maintain that wonderfully soft texture, giving you the fluffy, delightful rolls we crave!
Step 7: Prepare the Peanut Butter Filling
While the cake cools, let’s whip up that heavenly peanut butter filling! In a bowl, beat the creamy peanut butter and powdered sugar until smooth and well combined. Next, add in the heavy cream and vanilla extract. Keep beating until your mixture becomes light and spreadable. This step is like creating a little piece of heaven. And don’t forget to fold in chopped peanut butter cups for that delightful crunch and surprise in every slice!
Step 8: Final Assembly of the Roll
By now, your cake should be cool enough to handle. Carefully unroll the cake, taking your time to avoid cracking. Spread the luscious peanut butter filling evenly across the entire surface of the cake, leaving a border around the edges. It’s like painting a masterpiece! Now, re-roll the cake tightly without the towel, making sure the seam is on the bottom. This will create a tidy, delicious roll that looks as good as it tastes!
Step 9: Make the Chocolate Ganache
Now for the crowning glory—chocolate ganache! In a small saucepan, heat the heavy cream until it’s just steaming. Remove it from the heat and pour it over the semi-sweet chocolate chips, letting it sit for about 2 minutes. This will help the chocolate melt beautifully. Stir until smooth and glossy. Drizzle or spread this decadent ganache over your rolled masterpiece. Let it set for a bit before slicing, and prepare for the oohs and aahs from your family!
Tips for Success
- Always use room temperature eggs for better volume and texture in your cake.
- Make sure to whisk the dry ingredients well to avoid lumps.
- Don’t skip the powdered sugar on the towel; it prevents sticking!
- Roll the cake while it’s warm; it’s easier to handle and helps retain moisture.
- Chill the roll before serving for cleaner slices and more flavor!
Equipment Needed
- Jelly roll pan (or a rimmed baking sheet for a larger cake)
- Parchment paper (wax paper can be a substitute)
- Mixing bowls (a large and a medium size work best)
- Electric mixer (a whisk can do the job, but it’ll take longer)
- Spatula (a rubber scraper is ideal for folding)
Variations
- Nut Butter Swap: Try using almond or cashew butter in place of peanut butter for a fun twist on flavor.
- Gluten-Free Option: Substitute all-purpose flour with a 1:1 gluten-free baking blend to make it suitable for gluten-sensitive eaters.
- Dairy-Free Delight: Use coconut cream instead of heavy cream and a dairy-free chocolate for the ganache for a vegan-friendly treat.
- Add a Fruity Twist: Incorporate some sliced bananas or fresh strawberries into the filling for a burst of fresh flavor.
- Flavored Ganache: Add a splash of espresso or flavored extract, like mint or orange, to the ganache for a unique flavor profile.
Serving Suggestions
- Pair with a scoop of vanilla ice cream for an indulgent dessert experience.
- Serve with fresh berries on the side to add a burst of color and flavor.
- A hot cup of coffee or cocoa complements the rich chocolate beautifully.
- Garnish with whipped cream and additional chopped peanut butter cups for a stunning presentation!
FAQs about Peanut Butter Cup Chocolate Roll
Can the Peanut Butter Cup Chocolate Roll be made in advance?
Absolutely! This cake can be made a day in advance and stored in the refrigerator. Just make sure to wrap it tightly so it stays fresh and moist. When you’re ready to serve, slice it up and watch the smiles appear!
How should I store the leftovers?
Leftover slices can be stored in an airtight container in the refrigerator for up to three days. Though, I bet they won’t last that long in your house! If you’re lucky to have some left, a quick zap in the microwave for a few seconds brings back the soft goodness.
What can I use instead of heavy cream for the ganache?
If you don’t have heavy cream on hand, you can substitute it with coconut milk or a non-dairy creamer. This will still give you that luscious ganache texture, but with a touch of a different flavor profile.
Can I freeze the Peanut Butter Cup Chocolate Roll?
You sure can! Slice the roll and wrap each piece individually in plastic wrap before placing them in an airtight container. This helps lock in freshness and makes it perfect for a sweet treat later on.
What if I don’t have a jelly roll pan?
No worries! You can use a rimmed baking sheet instead. Just keep an eye on the baking time, as a larger surface area might affect how quickly it cooks. The goal is for it to rise and spring back when touched!
Final Thoughts
The Peanut Butter Cup Chocolate Roll is more than just a dessert; it’s an experience. Each slice brings together the joy of chocolate and the nostalgia of childhood treats. Making this roll doesn’t just fill bellies; it creates moments, laughter, and memories around the table. The blend of creamy peanut butter and rich chocolate is undeniably indulgent, making it perfect for celebrations or just a sweet escape after a long day. So, roll up your sleeves, gather your loved ones, and dive into this delightful recipe. Trust me, the smiles will be worth it!
PrintPeanut Butter Cup Chocolate Roll

A delicious chocolate roll filled with creamy peanut butter and topped with chocolate ganache, perfect for dessert lovers.
- Prep Time: 30 minutes
- Cook Time: 12 minutes
- Total Time: 42 minutes
- Yield: 8 servings 1x
- Category: Dessert
- Method: Baking
- Cuisine: American
- Diet: Vegetarian
Ingredients
- Chocolate Sponge Cake:
- 3/4 cup all-purpose flour
- 1/4 cup unsweetened cocoa powder
- 1 teaspoon baking powder
- 1/4 teaspoon salt
- 4 large eggs, at room temperature
- 3/4 cup granulated sugar
- 2 tablespoons vegetable oil
- 1 teaspoon vanilla extract
- 1/4 cup milk
- Peanut Butter Filling:
- 3/4 cup creamy peanut butter
- 1/2 cup powdered sugar
- 1/2 cup heavy cream
- 1 teaspoon vanilla extract
- Add-Ins:
- 1 cup chopped peanut butter cups
- Optional Chocolate Ganache Topping:
- 1/2 cup heavy cream
- 3/4 cup semi-sweet chocolate chips
Instructions
- Preheat oven to 350°F. Line a jelly roll pan with parchment paper, leaving overhang on the sides. Lightly grease the parchment. Lay a clean kitchen towel flat and dust it generously with powdered sugar; set aside.
- In a medium bowl, whisk together flour, cocoa powder, baking powder, and salt. In a large bowl, beat eggs and granulated sugar on high speed for 4 to 5 minutes until thick, pale, and tripled in volume. Add vegetable oil, vanilla, and milk, mixing gently until just combined.
- Gently fold the dry ingredients into the egg mixture using a spatula, mixing until no streaks remain.
- Pour the batter evenly into the prepared pan, smoothing the top. Bake for 10 to 12 minutes, or until the cake springs back lightly when touched.
- Immediately invert the hot cake onto the prepared sugared towel. Carefully peel off the parchment. Starting from the short end, roll the cake with the towel inside and allow to cool completely while rolled.
- In a bowl, beat peanut butter and powdered sugar until smooth. Add heavy cream and vanilla extract, beating until light and spreadable. Gently fold in chopped peanut butter cups.
- Carefully unroll the cooled cake. Spread the filling evenly across the surface, leaving a border around the edges. Re-roll cake tightly without the towel and place seam-side down on a serving platter.
- Heat heavy cream just until steaming. Pour over chocolate chips and let sit for 2 minutes. Stir until smooth, then drizzle or spread ganache over the cake. Allow to set before slicing.
Notes
- Ensure eggs are at room temperature for best results.
- Dust the towel with powdered sugar to prevent sticking.
- This cake can be made a day in advance and stored in the refrigerator.
Nutrition
- Serving Size: 1 slice
- Calories: 320
- Sugar: 22g
- Sodium: 210mg
- Fat: 18g
- Saturated Fat: 8g
- Unsaturated Fat: 10g
- Trans Fat: 0g
- Carbohydrates: 32g
- Fiber: 2g
- Protein: 6g
- Cholesterol: 85mg