Introduction to Peppermint Snowball Cookies
There’s something special about the holiday season, isn’t there? The twinkling lights, the joyful laughter, and most importantly, the festive treats like Peppermint Snowball Cookies that line our tables. These delightful cookies are more than just a dessert; they’re a little piece of joy that melts in your mouth. If you’re a busy mom or a professional on the go, this recipe is a quick solution for sweetening up family gatherings. Trust me, making these cookies will not only impress your loved ones but will also fill your home with the enchanting aroma of the holidays!
Why You’ll Love This Peppermint Snowball Cookies
These Peppermint Snowball Cookies are a dream come true for anyone who loves delicious treats without spending hours in the kitchen. They’re incredibly easy to make, so you won’t feel overwhelmed. Plus, their melt-in-your-mouth texture and refreshing peppermint burst make them a favorite during the holiday season. Perfect for cookie exchanges or cozy gatherings, these festive bites will leave smiles on everyone’s faces and sweet memories in your heart!
Ingredients for Peppermint Snowball Cookies
Gathering the right ingredients is half the fun of baking these Peppermint Snowball Cookies! Here’s what you’ll need:
- Unsalted butter: This forms the base of your cookies, providing a rich, creamy flavor. Be sure to soften it for easier mixing.
- Powdered sugar: Essential for sweetness and that delightful melt-in-your-mouth texture. Sifting it makes all the difference in smoothness.
- All-purpose flour: The backbone of many baked goods, giving structure. Spoon and level it for accuracy.
- Salt: A pinch of salt balances the sweetness and enhances the cookie’s flavor.
- Peppermint extract: This is where the magic happens! It adds a refreshing minty taste that shouts “holiday spirit.”
- Food coloring: Red or pink food color adds a festive touch. A few drops can go a long way, so add it slowly until you achieve your desired shade.
- Andes peppermint baking chips: These add delightful little pockets of peppermint goodness. You can find them at most grocery stores or online!
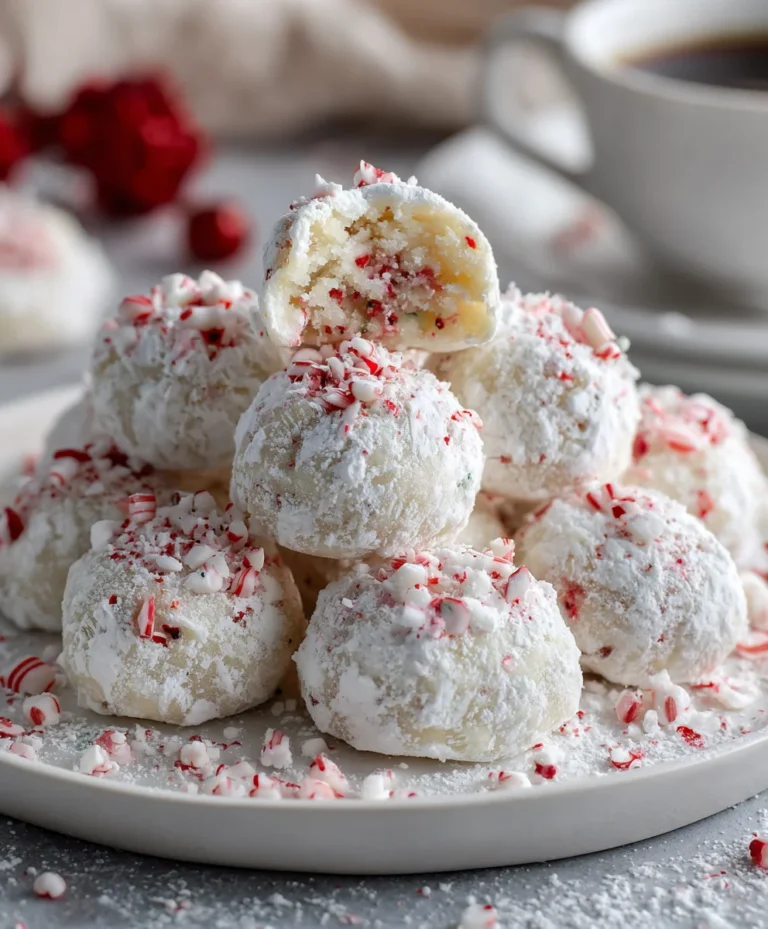
- Additional powdered sugar: To coat the cookies and make them look snowy and enchanting!
Want more details? Exact measurements are listed at the bottom of the article for easy printing. Happy baking!
How to Make Peppermint Snowball Cookies
Making Peppermint Snowball Cookies is a delightful process that not only fills the kitchen with amazing aromas but also creates sweet memories. Let’s break it down step by step!
Step 1: Mix Butter and Sugar
Start by placing your softened unsalted butter and sifted powdered sugar into a mixing bowl. Using an electric mixer, beat them together until the mixture looks light and fluffy, about two minutes. This step is crucial as it adds air into the cookies, making them light and tender.
Step 2: Combine Dry Ingredients
In another bowl, whisk together the all-purpose flour and salt. Once mixed, gradually add this flour mixture to your butter and sugar blend. Use a spatula or wooden spoon to mix gently until just combined. You want to avoid overmixing, which can make the cookies tougher.
Step 3: Add Color and Chips
Now it’s time for a splash of color! Add food coloring a few drops at a time, mixing until you achieve the lovely hue you desire. Then, gently fold in the Andes peppermint baking chips, which will bring bursts of peppermint flavor in every bite!
Step 4: Refrigerate the Dough
Cover your dough and pop it into the refrigerator for at least 30 minutes. Chilling the dough helps the cookies maintain their shape during baking. Plus, this will make it easier to scoop out the dough later. So, enjoy a little break or maybe even a cup of hot cocoa while you wait!
Step 5: Bake the Cookies
Preheat your oven to 375 degrees while you get a baking sheet ready with parchment paper or a silicone baking mat. Scoop out one tablespoon of dough, roll it into a ball, and place it on the baking sheet. Bake for 7 to 8 minutes. The cookies should be very lightly browned on the bottom. Don’t worry if they look a bit soft; they will firm up as they cool!
Step 6: Dust with Powdered Sugar
Once removed from the oven, allow the cookies to cool for about 5 minutes on the baking sheet. Then carefully transfer them to a different sheet sprinkled liberally with powdered sugar. Once slightly cooled, coat each cookie with more sugar by dropping them one by one into a bowl filled with powdered sugar. This final dusting gives them a lovely snowy appearance!
Tips for Success
- Always use room temperature butter for easy mixing.
- Don’t skip sifting the powdered sugar; it creates a smoother texture.
- Refrigerate the dough long enough—this helps keep the shape when baking!
- For an extra minty kick, substitute some of the vanilla extract with additional peppermint extract.
- Feel free to experiment with color; have fun with it!
Equipment Needed
- Mixing Bowl: A large bowl is ideal for mixing, but any bowl works!
- Electric Mixer: While an electric mixer makes it easier, a whisk can do the job too.
- Measuring Cups and Spoons: Accurate measurements are key, but kitchen scales can provide precision too.
- Baking Sheet: Any flat baking tray will work; just line it with parchment paper.
- Spatula: A silicone spatula is best for folding and scraping, but a wooden spoon is fine!
Variations
- Chocolate Peppermint Snowball Cookies: Swap out some flour for cocoa powder to create a chocolate version that still captures the essence of peppermint.
- Gluten-Free Option: Use a one-to-one gluten-free baking blend instead of all-purpose flour for those with dietary restrictions.
- Nutty Delight: Add finely chopped nuts, like walnuts or pecans, for a delightful crunch that complements the cookies’ softness.
- Less Sugar: For a healthier option, you can reduce the amount of powdered sugar in the dough; just be mindful of the texture!
- Vegan Alternative: Substitute butter with coconut oil or vegan butter and use a flax egg instead of eggs for a plant-based treat.
Serving Suggestions for Peppermint Snowball Cookies
- Pair these cookies with a steaming cup of hot cocoa or a rich peppermint tea for the ultimate cozy experience.
- Present them on a festive platter, garnished with crushed candy canes for an extra touch of holiday spirit.
- Consider serving alongside creamy vanilla ice cream for a delightful contrast!
FAQs about Peppermint Snowball Cookies
Can I make Peppermint Snowball Cookies ahead of time?
Absolutely! You can prepare the dough a day ahead and refrigerate it. When you’re ready, just scoop, bake, and powder those adorable treats!
What variations can I try with this recipe?
If you’re feeling adventurous, consider adding a chocolate variation! Substitute some flour with cocoa powder for a delicious twist. Other options include adding nuts or adjusting the peppermint flavor to your liking.
How should I store these cookies?
Store your Peppermint Snowball Cookies in an airtight container at room temperature for up to four days. If you want them to last longer, consider freezing them!
Can I use other types of extract instead of peppermint?
Definitely! While peppermint extract brings that holiday cheer, you can substitute it with vanilla or almond extract for a completely different flavor profile.
Why are my cookies spreading too much?
This can happen if the dough is too warm or if you haven’t refrigerated it long enough. Make sure to chill the dough adequately before baking to keep those cookies from spreading wildly!
Final Thoughts
Making Peppermint Snowball Cookies is like wrapping your family in a warm, sweet hug during the bustling holiday season. With each bite, you get a burst of minty goodness that instantly lifts spirits and spreads cheer. These cookies not only taste divine; they also create moments of joy and togetherness, whether they’re shared during cozy gatherings or given as gifts. As you watch friends and family relish these festive treats, you’ll realize that the simplest recipes often create the sweetest memories. So, gather your loved ones, whip up a batch, and let the magic of holiday baking unfold!
PrintPeppermint Snowball Cookies

Peppermint Snowball Cookies are festive, melt-in-your-mouth treats packed with peppermint flavor, perfect for the holiday season.
- Prep Time: 30 minutes
- Cook Time: 8 minutes
- Total Time: 1 hour 8 minutes
- Yield: 24 cookies 1x
- Category: Dessert
- Method: Baking
- Cuisine: American
- Diet: Vegetarian
Ingredients
- 1 cup unsalted butter, softened
- 2/3 cup powdered sugar, sifted
- 2 1/4 cup all-purpose flour, spooned and leveled
- 1/2 tsp salt
- 1 tsp peppermint extract
- Red or pink food coloring
- 3/4 cup Andes peppermint baking chips
- Additional powdered sugar for coating
Instructions
- Beat butter and powdered sugar together until light and fluffy, about 2 minutes.
- Mix in flour, salt, and extract just until combined.
- Add food color a few drops at a time until desired color is achieved. Stir in peppermint baking chips.
- Refrigerate dough, covered, for at least 30 minutes.
- Preheat oven to 375 degrees. Line a large baking sheet with parchment paper or silicone baking mat.
- Scoop out one tablespoon of dough at a time and form into a ball. Place on prepared sheet.
- Bake for 7 to 8 minutes. You do not want the cookies to get more than very lightly browned on the bottom. Let cool for 5 minutes on the baking sheet.
- Line another large baking sheet with parchment paper and dust liberally with powdered sugar.
- Place slightly cooled cookies on this baking sheet and dust with additional powdered sugar. Let cool completely.
- Fill a small bowl halfway with powdered sugar. Drop cookies one at a time into the bowl and turn until coated in powdered sugar.
- Store in an airtight container for up to 4 days.
Notes
- Make sure to sift the powdered sugar for a smoother texture.
- You can adjust the amount of food coloring based on your preference.
Nutrition
- Serving Size: 1 cookie
- Calories: 120
- Sugar: 5g
- Sodium: 50mg
- Fat: 7g
- Saturated Fat: 4g
- Unsaturated Fat: 2g
- Trans Fat: 0g
- Carbohydrates: 12g
- Fiber: 0g
- Protein: 1g
- Cholesterol: 20mg