
Introduction to Pistachio & Raspberry Cheesecake Domes
Hey there! If you’re searching for a treat that combines elegance and deliciousness, look no further than these stunning Pistachio & Raspberry Cheesecake Domes. Trust me, these little beauties not only taste divine but also add a touch of sophistication to any dessert table. As a busy mom myself, I know how challenging it can be to create something special amidst the chaos of daily life. That’s why this recipe is a game changer—it allows you to impress your loved ones without spending all day in the kitchen. Are you ready to dive into this delightful dessert with me?
Why You’ll Love This Pistachio & Raspberry Cheesecake Domes
These Pistachio & Raspberry Cheesecake Domes are a true delight! You’ll love how easy they are to whip up, especially on those busy weekdays when time is not on your side. The creamy pistachio filling and tangy raspberry center create a flavor explosion that dances on your palate. Plus, their gorgeous presentation will make you feel like a pastry chef, impressing family and friends alike. What’s not to love?
Ingredients for Pistachio & Raspberry Cheesecake Domes
Let’s get you set up with the ingredients for these delightful Pistachio & Raspberry Cheesecake Domes. Each component plays a crucial role in creating that perfect balance of flavors and textures. Here’s what you’ll need:
- Cream cheese: This creamy base provides that rich and smooth texture, making your cheesecake luscious and dreamy.
- Powdered sugar: Adds sweetness to your filling without any grittiness, ensuring a silky smooth result.
- Pistachio paste: This is the star ingredient! Its nutty flavor and vibrant color give the cheesecake its unique identity.
- Vanilla extract: Just a splash adds warmth and depth to the cheesecake, enhancing all the other flavors.
- Heavy cream: Whipped to soft peaks, it lightens the filling while keeping it rich—pure decadence!
- Fresh raspberries: These juicy gems bring a burst of tartness, making every bite a delightful experience.
- Lemon juice: A tiny bit balances the sweetness of the raspberries and brightens the filling.
- Cornstarch: This thickening agent helps stabilize your raspberry center for perfect texture.
- Eggs: They give the filling a slight structure while contributing to the creaminess.
- Sifted flour: Provides stability to the sponge base, ensuring it holds up the domes beautifully.
- Baking powder: Helps the sponge rise, giving it that light, airy quality.
- White chocolate: Used in the mirror glaze, it adds sweetness and a luxurious finish to the domes.
- Food coloring: Green food coloring is optional and can be used if you want to enhance that pistachio hue.
- Crushed pistachios: A delightful garnish, adding an extra nutty bite and a pop of color.
- Fresh raspberries for decoration: These not only look gorgeous but taste divine too!
You can find the exact measurements for each ingredient at the end of the article, which are also available for printing. Happy cooking!

How to Make Pistachio & Raspberry Cheesecake Domes
Make the Raspberry Center
Let’s kick things off with the raspberry center! Start by placing fresh raspberries into a medium saucepan. Add sugar and a splash of lemon juice, then cook over medium heat. Stir occasionally as the mixture begins to soften and break down—this should take about five minutes.
Next, to thicken the raspberry sauce, mix cornstarch with a tablespoon of water to create a slurry. Stir this into your bubbling raspberries and watch as it thickens—the transformation is quite magical!
Once thickened, pour the luscious raspberry mixture into small silicone molds, filling them halfway. For the best results, cover with plastic wrap and pop them into the freezer until solid. These little berry bombs will add a burst of freshness to your cheesecake domes.
Make the Cheesecake Filling
Now, let’s create that dreamy cheesecake filling! Start by beating soft cream cheese in a large bowl until it’s completely smooth. Add in the powdered sugar, pistachio paste, and vanilla extract. Beat until everything harmonizes into a creamy mixture.
In another bowl, whip the cold heavy cream until stiff peaks form. This step is crucial because it lends a lightness to the filling. Now, fold the whipped cream into the pistachio mixture gently. We want to keep that airy texture, so be careful not to deflate it!
Your scrumptious cheesecake filling is now ready! Trust me, the scent alone is enough to make your mouth water. Set it aside, and let’s assemble our domes in the next step.
Assemble the Domes
Time to bring everything together! Grab your silicone dome molds and start spooning some of the cheesecake filling into each mold. Use the back of a spoon to press the filling up the sides, creating a cozy little nook for the frozen raspberry center.
Once the edges are lined with filling, take those frozen raspberry centers from the freezer and place one into the center of each dome. The vibrant red of the raspberry adds a beautiful contrast to the soft green filling.
Now, gently top each dome with more cheesecake filling until it’s level with the mold’s edge. Smooth out the tops using a spatula. Don’t worry if they’re not perfect—this is all about love and homemade charm!
After that, the molds need a little time in the freezer to firm up. Let them chill until they are set and ready to be transformed. Grab a book or simply relax for a bit while you wait!
Make the Sponge Base
With the domes chilling, it’s time to create the sponge base! Preheat your oven to 350°F (175°C). In a large mixing bowl, crack two eggs and add sugar. Beat them together until the mixture turns pale and fluffy—it will look light and creamy.
Now, gently sift the flour and baking powder into the egg mixture. This is a delicate step, so fold it in slowly to maintain volume. You want that lovely lightness.
Spread this batter out thinly on a lined baking tray. Bake it for about 8 to 10 minutes—keep an eye on it! Once it’s golden, let it cool completely.
When it’s cool, cut out rounds that fit perfectly at the bottom of your dome molds. This base will hold all that delightful cheesecake and fruit, making it a sturdy yet tender foundation.
Prepare the Mirror Glaze
Let’s make the show-stopping mirror glaze! Start by heating the heavy cream in a saucepan until it just reaches a simmer. Carefully pour this hot cream over the pieces of white chocolate in a mixing bowl—this helps melt the chocolate evenly.
Stir everything together until smooth and glossy. At this point, add in your pistachio paste to enhance that wonderful flavor. If you want to add a hint of color, now’s the time for a few drops of green food coloring.
Let the glaze cool slightly, but it should still be pourable. We’re aiming for that beautiful, shiny finish when we glaze our domes!
Glaze and Decorate the Domes
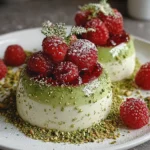
Now comes the grand finale! Carefully unmold your cheesecake domes from the silicone molds. Place them on a wire rack set over a baking sheet to catch any drips.
Using a ladle or a measuring cup, gently pour the mirror glaze over each dome, ensuring they are completely coated. Take your time—this is where the magic happens!
Once glazed, transfer the domes to a clean serving plate. For that extra pop, garnish with crushed pistachios and fresh raspberries. Not only will it look stunning, but it will also taste simply divine!
Chill your beautifully decorated domes until you’re ready to impress everyone with this elegant dessert. Trust me, your hard work will not go unnoticed!
Tips for Success
- Always use room temperature cream cheese for a creamy filling.
- Don’t rush the chilling process; it helps the domes maintain shape.
- For a smoother glaze, make sure the chocolate is fully melted.
- Test your sponge base for doneness by inserting a toothpick—it should come out clean.
- Have fun with garnishes! Fresh mint or edible flowers work beautifully.
Equipment Needed for Pistachio & Raspberry Cheesecake Domes
- Silicone dome molds: These are perfect for easy release. If you don’t have them, try using muffin tins lined with cupcake liners.
- Mixing bowls: Ideally, a set in various sizes for different tasks.
- Whisk: A hand whisk or electric mixer will make beating a breeze.
- Spatula: For folding and smoothing the cheesecake filling perfectly.
- Baking tray: A straight-edged, lined one for baking the sponge base.
Variations of Pistachio & Raspberry Cheesecake Domes
- Nut-Free Option: Substitute pistachio paste with sunflower seed butter for a nut-free version without sacrificing creaminess.
- Swap the Berries: Feel free to switch out raspberries for strawberries or blueberries, depending on your preference.
- Chocolate Version: Add a swirl of melted dark chocolate to the cheesecake filling for a rich and indulgent twist.
- Vanilla Cheesecake: Omit the pistachio paste and replace it with extra vanilla extract for a classic vanilla flavor.
- Vegan Alternative: Use vegan cream cheese and heavy coconut cream to create a deliciously plant-based version.
Serving Suggestions for Pistachio & Raspberry Cheesecake Domes
- Pair with a dollop of freshly whipped cream for added richness.
- Serve alongside a refreshing mint tea or chamomile for a delightful contrast.
- Presentation tip: Arrange on a tiered cake stand to elevate the dessert’s elegance.
- Add a sprinkle of edible gold dust for an extra touch of glam!
- Include a fruit coulis on the plate for a splash of color and flavor.
FAQs about Pistachio & Raspberry Cheesecake Domes
Can I make Pistachio & Raspberry Cheesecake Domes in advance?
Absolutely! In fact, these domes are perfect for making ahead of time. You can prepare the raspberry center and the cheesecake filling days in advance. Just keep them frozen until ready to glaze and serve.
How do I store leftover cheesecake domes?
If there are any leftovers (which I doubt you’ll have!), store them in an airtight container in the fridge for up to three days. You can also freeze them for longer storage. Just be sure to layer them with parchment paper to avoid sticking!
Can I substitute the flavor of the cheesecake?
<pCertainly! If pistachio isn’t your thing, you can switch it out for other nut pastes or even chocolate. The raspberry center will pair nicely with flavors like almond or hazelnut too!
What if I can’t find good pistachio paste?
No worries! You can make your own pistachio paste by blending roasted pistachios with a bit of oil until smooth. Alternatively, just use finely ground pistachios mixed with cream cheese for a delicious flavor.
Is this cheesecake recipe suitable for vegetarians?
<pYes, it is! With vegetarian-friendly ingredients, these Pistachio & Raspberry Cheesecake Domes will satisfy anyone who enjoys this delightful confection.
Final Thoughts
Creating these Pistachio & Raspberry Cheesecake Domes is more than just following a recipe; it’s about the joy of sharing something special with loved ones. When you present these gorgeous treats, you’ll see their eyes light up, and that’s truly priceless. After all, life is about the delicious little moments we create in our kitchens. So, whether it’s a holiday celebration or a simple family dinner, let these domes be a sweet centerpiece. Enjoy the smiles and compliments that come your way, knowing that you made something truly delightful and memorable!
PrintPistachio & Raspberry Cheesecake Domes: Delightful Treats!
Delightful Pistachio & Raspberry Cheesecake Domes, a perfect balance of creamy cheesecake and tart raspberry filling.
- Prep Time: 30 minutes
- Cook Time: 20 minutes
- Total Time: 2 hours (including freezing time)
- Yield: 8 servings 1x
- Category: Dessert
- Method: Baking and Freezing
- Cuisine: Fusion
- Diet: Vegetarian
Ingredients
- 250g cream cheese, softened
- 100g powdered sugar
- 100g pistachio paste
- 1 tsp vanilla extract
- 200ml heavy cream, cold
- 200g fresh raspberries
- 50g sugar
- 1 tsp lemon juice
- 1 tsp cornstarch, dissolved in 1 tbsp water
- 2 eggs
- 50g sugar
- 50g sifted flour
- ½ tsp baking powder
- 200g white chocolate
- 100ml heavy cream
- 2 tbsp pistachio paste
- Green food coloring (optional)
- Crushed pistachios (for decoration)
- Fresh raspberries (for decoration)
Instructions
- Make the raspberry center: In a saucepan, combine raspberries, sugar, and lemon juice. Cook over medium heat until soft. Stir in cornstarch slurry and cook until thickened. Pour into small silicone molds and freeze until solid.
- Make the cheesecake filling: Beat cream cheese, powdered sugar, pistachio paste, and vanilla extract until smooth. In a separate bowl, whip heavy cream until stiff peaks form. Fold into the pistachio mixture gently.
- Assemble domes: Spoon some cheesecake filling into silicone dome molds, pressing it up the sides. Insert a frozen raspberry center into each and top with more cheesecake to fill. Smooth tops and freeze until firm.
- Make the sponge base: Preheat oven to 350°F (175°C). Beat eggs and sugar until pale and fluffy. Gently fold in flour and baking powder. Spread into a thin layer on a lined baking tray. Bake for 8–10 minutes. Cool and cut into rounds that fit the bottom of each dome. Press onto frozen domes and return to freezer.
- Prepare mirror glaze: Heat heavy cream until just simmering. Pour over white chocolate and stir until smooth. Add pistachio paste and green food coloring (if using). Cool until glaze is slightly thick but pourable.
- Glaze and decorate: Unmold domes and place on a wire rack. Pour glaze over each dome to coat. Transfer to serving plate. Garnish with crushed pistachios and fresh raspberries. Chill until ready to serve.
Notes
- Use good-quality pistachio paste for best flavor.
- Raspberry inserts and domes can be made in advance and kept frozen.
- For best results, use silicone molds for easy release.
Nutrition
- Serving Size: 1 dome
- Calories: 320
- Sugar: 25g
- Sodium: 50mg
- Fat: 20g
- Saturated Fat: 10g
- Unsaturated Fat: 8g
- Trans Fat: 0g
- Carbohydrates: 30g
- Fiber: 2g
- Protein: 5g
- Cholesterol: 80mg