
Introduction to Polar Bear Cookies
As a passionate home cook, I know how hectic life can get, especially for busy moms and professionals. That’s why I’m excited to share this delightful recipe for Polar Bear Cookies! These adorable treats are perfect for all ages and bring smiles to any festive occasion. The best part? They’re simple to whip up, making them a great solution for a busy day. With their charming polar bear shape and creamy icing, you’ll impress everyone at your next gathering. So, let’s dive into the world of these delightful cookies that are as fun to make as they are to eat!
Why You’ll Love This Polar Bear Cookies
You’ll adore making Polar Bear Cookies because they combine fun, flavor, and simplicity all in one. First, they come together quickly, perfect for busy weeknights or last-minute festive gatherings. Plus, the whimsical design appeals to both kids and adults alike! Each bite is soft and delicious, with a touch of sweetness that pairs well with coffee or milk. Trust me, these treats will become a family favorite!
Ingredients for Polar Bear Cookies
Gathering the right ingredients is key to crafting your tasty Polar Bear Cookies. Here’s what you’ll need:
- Unsalted Butter: Softened for easy mixing, it provides richness to your cookies.
- Granulated Sugar: This sugar adds sweetness and helps create a tender texture.
- Powdered Sugar: It gives a smooth finish to the cookie dough and balances the sweetness.
- Large Eggs: They provide structure and moisture, keeping the cookies soft and light.
- Vanilla Extract: A classic flavor that enhances the overall taste of your cookies.
- All-Purpose Flour: The heart of your cookie dough, giving it structure and form.
- Baking Powder: This leavening agent helps the cookies rise, creating that fluffy texture.
- Salt: Just a pinch, it enhances the sweetness and rounds out the flavors.
- Almond Extract: A delightful addition that complements the vanilla for a rich taste.
- Mini Chocolate Chips: These little gems will be the eyes of your polar bears, adding a sweet pop.
- Shredded Coconut: Optional, but when added, it gives a light, fluffy texture that mimics fur.
- White Icing: Essential for decorating, this will cover the cookies for a snowy look.
- Black Icing: Use this or an edible marker to add details like noses and mouths.
If you’re interested in the exact quantities, just scroll down to the bottom of the article for a handy printable recipe. Happy baking!
How to Make Polar Bear Cookies
Now that you have all the ingredients ready, let’s get into the fun part! Making Polar Bear Cookies is a joyful experience, and I’ll guide you through each step to ensure your cookies come out perfect every time.
Step 1: Preheat and Prepare
First, preheat your oven to 350°F (175°C). This ensures even baking, which is crucial for our fluffy Polar Bear Cookies. While the oven warms up, line two baking sheets with parchment paper. This will prevent sticking and help with easy cleanup. Trust me, no one enjoys scraping stuck-on dough!
Step 2: Cream the Butter and Sugars
In a large mixing bowl, cream together your softened butter, granulated sugar, and powdered sugar. Use an electric mixer and beat for about 3 to 5 minutes until the mixture is light and fluffy. This step is important as it helps incorporate air into the batter, giving our cookies a delightful texture. You’ll know it’s ready when it looks almost like a soft, sweet cloud!
Step 3: Add Eggs and Extracts
Next, add the eggs, one at a time, making sure to beat well after each addition. This is where the magic starts—adding eggs gives structure and moisture to your cookies. Then, stir in the vanilla and almond extracts. These flavors will not only elevate the taste but will also fill your kitchen with an irresistible aroma!
Step 4: Mix Dry Ingredients
In a separate bowl, whisk together your flour, baking powder, and salt. This helps ensure an even distribution of the leavening agent. Next, gradually add this dry mixture to your wet ingredients. Mix just until combined; we don’t want overmixing to develop too much gluten. A gentle mix will keep our Polar Bear Cookies soft and chewy!
Step 5: Prepare the Dough
If you’re feeling adventurous, gently fold in the shredded coconut now. It adds a lovely texture that mimics fluffy fur! Now, it’s time to portion out your dough. Using a cookie scoop or a tablespoon, drop rounded balls of dough onto your baking sheets. Leave space between each cookie; they will spread while baking!
Step 6: Bake Your Cookies
Pop your trays into the preheated oven and bake for about 10 to 12 minutes. Keep an eye on them! The edges will turn slightly golden, while the centers will look soft and puffy. Don’t worry; they will firm up as they cool. Overbaking can lead to cookies that are crispy instead of cake-like!
Step 7: Cool and Decorate
Once your cookies are baked, remove them from the oven and let them cool on the baking sheets for about 5 minutes. This helps them set before transferring to a wire rack to cool completely. When they’re cooled down, it’s time for the fun part: decorating! Cover each cookie with white icing, and add two mini chocolate chips for the adorable eyes. Use the black icing or an edible marker to create the nose and mouth. It’s like giving each polar bear a little personality!
Tips for Success
- Ensure your butter is truly softened for the best creaming results.
- Don’t skip the parchment paper; it makes cleanup a breeze!
- Check your cookies a minute early to avoid overbaking.
- Feel free to get creative with decorations—sprinkles can add a festive touch!
- Store cookies in an airtight container to keep them fresh and delicious.
Equipment Needed
- Mixing Bowl: A large mixing bowl is essential. If you don’t have one, a deep pot can work too.
- Electric Mixer: Ideal for creaming butter and sugars. A whisk can substitute if you’re up for a workout!
- Baking Sheets: Use two for better batch management. If one’s not available, bake in successive rounds.
- Parchment Paper: For easy cleanup! Aluminum foil can be a substitute.
- Cookie Scoop: It helps to create uniform cookies. A spoon will work in a pinch.
Variations
- Chocolate Chip Polar Bear Cookies: Incorporate chocolate chips into the dough for added deliciousness. This is a great option for chocolate lovers!
- Gluten-Free Version: Replace all-purpose flour with a gluten-free flour blend. Just make sure it includes xanthan gum for better texture.
- Dairy-Free Option: Substitute the butter with coconut oil or a vegan butter alternative. Choose non-dairy milk for the icing if needed.
- Extra Flavoring: Add a teaspoon of cinnamon or nutmeg for a warm spice twist that pairs wonderfully with the sweetness.
- Fruit-Infused Cookies: Mix in dried cranberries or finely chopped nuts for a delightful crunch and a burst of flavor.
Serving Suggestions
- Pair your Polar Bear Cookies with a hot cup of cocoa or a steaming latte for a cozy treat.
- Display them on a festive platter nestled among faux snow for a charming presentation.
- Consider adding fresh fruit skewers as a refreshing side for a well-rounded snack.
- Serve with a scoop of vanilla ice cream for an indulgent dessert experience!
- For holiday gatherings, stack them in a decorative tin for a thoughtful gift idea.
FAQs about Polar Bear Cookies
Curious about Polar Bear Cookies? Here are some frequently asked questions that might help you get started:
Can I freeze Polar Bear Cookies? Yes! They freeze beautifully. Just cool them completely, then layer them with parchment paper in an airtight container. They’ll stay fresh for up to three months.
What can I use instead of almond extract? If almond extract isn’t your thing, feel free to swap it with extra vanilla extract. You can also try hazelnut or even orange extract for a different flavor profile!
Can I make these cookies ahead of time? Absolutely! You can prepare the dough and store it in the fridge for up to two days. Just scoop and bake when you’re ready for a warm treat!
How should I store the cookies? Keep your Polar Bear Cookies in an airtight container at room temperature. They’ll stay delicious for about a week—or longer if you resist eating them all at once!
Can kids help decorate the cookies? Definitely! Decorating is half the fun, and it’s a perfect activity for little hands. Just set up a decorating station with icing, chocolate chips, and any other fun toppings you have.
Final Thoughts
Making Polar Bear Cookies is more than just baking—it’s about creating cherished memories in the kitchen with your loved ones. The delightful shapes and sweet flavors bring laughter and joy to any gathering, sparking creative conversations. Every bite is a reminder of the love and fun shared in the kitchen. Whether it’s a holiday celebration or simply a cozy family night, these cookies are sure to warm hearts and satisfy sweet cravings. So, gather your family, roll up your sleeves, and let the magic of Polar Bear Cookies fill your home with happiness and sweet aromas!
PrintPolar Bear Cookies
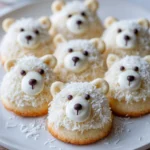
Polar Bear Cookies are delightful treats shaped like polar bears, perfect for all ages and great for any festive occasion.
- Prep Time: 20 minutes
- Cook Time: 12 minutes
- Total Time: 32 minutes
- Yield: 24 cookies 1x
- Category: Dessert
- Method: Baking
- Cuisine: American
- Diet: Vegetarian
Ingredients
- 1 cup unsalted butter, softened
- 1 cup granulated sugar
- 1 cup powdered sugar
- 2 large eggs
- 2 teaspoons vanilla extract
- 4 cups all-purpose flour
- 2 teaspoons baking powder
- 1 teaspoon salt
- 1/2 teaspoon almond extract
- 1/2 cup mini chocolate chips (for eyes)
- 1/2 cup shredded coconut (optional, for fur)
- 1 cup icing (white) for decorating
- 1/2 cup black icing (or edible marker for detailing)
Instructions
- Preheat your oven to 350°F (175°C) and line two baking sheets with parchment paper.
- In a large mixing bowl, cream together the softened butter, granulated sugar, and powdered sugar until the mixture is light and fluffy. This should take about 3-5 minutes using an electric mixer.
- Add the eggs, one at a time, beating well after each addition. Then stir in the vanilla extract and almond extract.
- In a separate bowl, whisk together the all-purpose flour, baking powder, and salt. Gradually add the dry ingredients to the wet ingredients, mixing just until combined. Be careful not to overmix.
- If desired, gently fold in the shredded coconut to give a textured appearance to the cookies.
- Using a cookie scoop or tablespoon, drop rounded balls of dough onto the prepared baking sheets, leaving space between each cookie for spreading.
- Bake in the preheated oven for 10-12 minutes, or until the edges are slightly golden. The centers will look soft; they will firm up as they cool.
- Once baked, remove the cookies from the oven and let them cool on the baking sheets for about 5 minutes before transferring them to a wire rack to cool completely.
- Once cooled, use the white icing to cover the top of each cookie, creating a smooth white surface.
- For the eyes, place two mini chocolate chips on each cookie, and use black icing or an edible marker to create the nose and mouth on each polar bear cookie.
- If desired, you can use extra shredded coconut to sprinkle around the edges of the cookies for a snowy effect.
Notes
- Ensure butter is softened for easy mixing.
- For a festive look, add colored sprinkles around the cookies.
- Store cookies in an airtight container to maintain freshness.
Nutrition
- Serving Size: 1 cookie
- Calories: 250
- Sugar: 15g
- Sodium: 120mg
- Fat: 10g
- Saturated Fat: 6g
- Unsaturated Fat: 4g
- Trans Fat: 0g
- Carbohydrates: 35g
- Fiber: 1g
- Protein: 3g
- Cholesterol: 30mg