Introduction to Pumpkin Oat Power Bars
If you’re like me, life can get downright hectic. Between juggling work, school drop-offs, and the endless dinner prep, finding time to eat healthy often feels like searching for a needle in a haystack. Enter my Pumpkin Oat Power Bars, a deliciously easy solution for busy days! These bars are packed with wholesome ingredients and a delightful autumn flavor that will make you forget you’re eating something good for you. Whether you need a quick breakfast or a snack to keep your energy up, these power bars are here to rescue you, one bite at a time!
Why You’ll Love This Pumpkin Oat Power Bars
One of the best things about my Pumpkin Oat Power Bars is their simplicity. With just a handful of ingredients, you can whip these up in no time, even on the busiest of mornings. They’re not only tasty but also nutritious, providing lasting energy to keep you going. Plus, they’re versatile! You can easily customize them to suit your family’s preferences. Trust me, once you try these bars, you’ll be hooked!
Ingredients for Pumpkin Oat Power Bars
To create these delightful Pumpkin Oat Power Bars, you’ll need a few key ingredients—most of which you likely have in your pantry already!
- Rolled oats: These provide a hearty base, giving the bars texture and fiber for lasting energy.
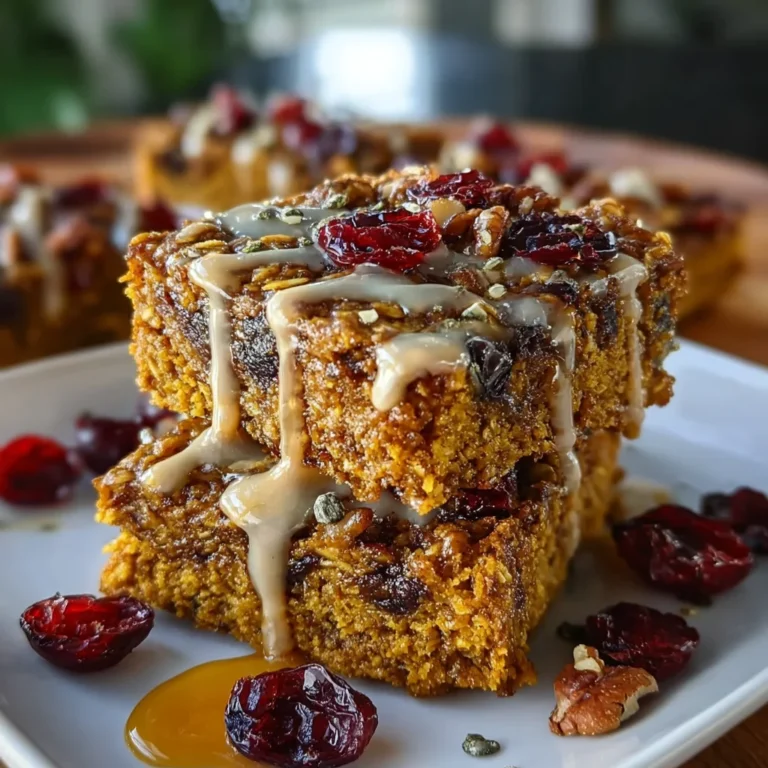
- Canned pumpkin puree: Not to be confused with pie filling, this ingredient adds moisture, flavor, and a boost of nutrients.
- Almond butter (or peanut butter): Creamy and rich, nut butters give a healthy dose of fat and protein. Choose your favorite for flavor!
- Honey or maple syrup: These natural sweeteners add sweetness and richness, helping to bind the bars together.
- Vanilla extract: A splash of this enhances the overall flavor profile, making your bars taste more decadent.
- Ground cinnamon: This aromatic spice not only warms the heart but also aids digestion—a must for fall baking!
- Ground nutmeg: A dash of nutmeg brings a warm and spicy twist, enhancing that cozy fall vibe.
- Salt: Just a pinch elevates all the flavors and balances the sweetness beautifully.
- Chopped nuts (walnuts or pecans): Optional add-ins for a delightful crunch! They offer healthy fats and protein.
- Dried cranberries or chocolate chips: These are fun extras! The cranberries give a fruity touch, while chocolate chips add indulgence.
- Flaxseed meal: For a nutritious boost, this ingredient can be added for extra fiber and omega-3 fatty acids.
For exact quantities, you can refer to the bottom of the article, where I’ve included everything you need to get started on these scrumptious power bars!

How to Make Pumpkin Oat Power Bars
Now that you have your ingredients ready, it’s time to bring your Pumpkin Oat Power Bars to life! This part is where the magic happens. Follow these straightforward steps, and you’ll have a nutritious snack that your whole family will love.
Step 1: Preheat the Oven and Prepare Your Dish
First off, preheat your oven to 350°F (175°C). This step is crucial because it ensures even baking, making your bars perfect every time. While the oven heats up, grab an 8×8-inch baking dish and line it with parchment paper, leaving some paper hanging over the edges. This little trick will make removing the bars so much easier later on!
Step 2: Combine Dry Ingredients
Next, in a large mixing bowl, combine the rolled oats, ground cinnamon, ground nutmeg, salt, and optional flaxseed meal. Stir until everything is well mixed. The oats should feel hearty, and those spices will begin to dance in the air with a warm aroma. Don’t rush this step! The right blend promises deliciousness in every bite.
Step 3: Mix Wet Ingredients
In a separate bowl, mix the canned pumpkin puree, almond butter (or peanut butter), honey or maple syrup, and vanilla extract until smooth and creamy. This mixture should feel like a velvety hug! Be sure to stir well. You want the pumpkin and almond butter to blend seamlessly, resulting in a delightful consistency that adds moisture to the bars.
Step 4: Combine Wet and Dry Mixtures
It’s time for the grand combination! Pour the creamy wet mixture into the dry ingredients. Stir until everything is well combined. The result should be a thick, doughy consistency that holds together nicely. If you’re adding chopped nuts and any dried cranberries or chocolate chips, fold them in gently. Imagine the crunch and flavor they will add!
Step 5: Transfer to Dish and Bake
Now, transfer your mixture into the prepared baking dish. Spread it out evenly and press down firmly to ensure everything holds together during baking. Bake in your preheated oven for 25-30 minutes. Keep an eye out for lightly golden edges, and insert a toothpick into the center to check if it comes out clean. This is your signal that they’re ready!
Step 6: Cool and Cut
Once your bars are out of the oven, allow them to cool in the pan for about 10-15 minutes. The key here is patience! After that, use the parchment paper to lift them out and cool completely on a wire rack. This helps maintain their texture. Once cooled, cut them into squares or bars. Now you can savor the rewarding aroma of your freshly baked Pumpkin Oat Power Bars!
Tips for Success
- Always preheat your oven; it guarantees an even bake.
- Don’t rush the cooling process; it helps bars firm up better.
- Use parchment paper for easy removal and mess-free cutting.
- Customize your nuts and add-ins based on what your family loves.
- Keep an eye on baking time; ovens vary!
- Store in an airtight container to keep them fresh longer.
Equipment Needed for Pumpkin Oat Power Bars
- Mixing bowls: Any large bowls will work, though a glass or stainless steel bowl is great for visibility.
- Baking dish: An 8×8-inch baking dish is ideal, but you can use any similar-sized dish.
- Spatula: A rubber spatula helps scrape every bit of deliciousness from the bowl.
- Whisk or fork: Perfect for mixing wet ingredients until smooth.
- Measuring cups: Essential for portioning your ingredients accurately.
Variations on Pumpkin Oat Power Bars
- Nut-Free Version: Swap almond butter for sunflower seed butter and skip the nuts to make it school-friendly.
- Gluten-Free: Use certified gluten-free oats to cater to gluten sensitivities while still enjoying these delicious bars.
- Add Protein: Mix in a scoop of protein powder or hemp seeds to boost your bars’ protein content, making them an even better post-workout snack.
- Spice it Up: Experiment with adding ginger or allspice for a more robust flavor and warming spice profile.
- Fruity Twist: Incorporate mashed bananas or applesauce in place of some pumpkin for a fruity twist that’s just as delightful.
- Chocolate Lovers: Add cocoa powder or chocolate chips for an indulgent treat; it’s like a dessert and a snack rolled into one!
Serving Suggestions for Pumpkin Oat Power Bars
- Pair your Pumpkin Oat Power Bars with a steaming cup of herbal tea for a cozy afternoon snack.
- Serve them alongside fresh fruit, like apple slices, to add a refreshing crunch.
- For a quick breakfast, spread a little almond butter on top before enjoying.
- Pack them in lunch boxes as a wholesome treat your kids will love!
FAQs about Pumpkin Oat Power Bars
As you embark on your journey to make these Pumpkin Oat Power Bars, you might have a few questions. I’m here to help clarify any doubts you may have!
Can I use fresh pumpkin instead of canned puree?
Absolutely! Just make sure to cook and puree the fresh pumpkin to achieve a similar texture. However, canned pumpkin puree is super convenient and consistently yields great results.
How long do these bars stay fresh?
Stored in an airtight container, your Pumpkin Oat Power Bars will typically stay fresh for about a week. For longer freshness, you can refrigerate them, extending their shelf life for up to two weeks!
Can I freeze these bars?
Yes! Freezing is a fantastic option. Simply wrap each bar individually in plastic wrap and store them in a freezer-safe bag. They can last for up to three months in the freezer.
What if I don’t have almond butter?
No worries! You can easily substitute it with peanut butter, sunbutter, or any other nut or seed butter you prefer. Each option provides its unique flavor and nutrition.
Are these bars suitable for children?
Absolutely! These Pumpkin Oat Power Bars are a healthy snack option for kids, offering essential nutrients while being delicious. Just be mindful of any nut allergies when using nut butter or nuts.
Final Thoughts on Pumpkin Oat Power Bars
Making these Pumpkin Oat Power Bars has been a joyful experience and a delightful journey into the world of healthy snacking. With each bite, you’re rewarded with a burst of flavor and nutrition, embracing the essence of fall in every square. They’re not only easy to whip up but also a fantastic way to bring your family together around wholesome eating. Whether you’re enjoying them on a busy morning or an afternoon pick-me-up, these bars promise to deliver comfort and energy. Trust me, once you make a batch, you won’t want to go back to store-bought snacks!
PrintPumpkin Oat Power Bars: A Healthy Snack Delight!

Pumpkin Oat Power Bars are a healthy and delicious snack, packed with nutrients and perfect for on-the-go energy.
- Prep Time: 10 mins
- Cook Time: 25-30 mins
- Total Time: 45 mins
- Yield: 16 bars 1x
- Category: Snacks
- Method: Baking
- Cuisine: American
- Diet: Vegetarian
Ingredients
- 1 cup rolled oats
- 1 cup canned pumpkin puree (not pumpkin pie filling)
- 1/2 cup almond butter (or peanut butter)
- 1/4 cup honey or maple syrup
- 1/2 tsp vanilla extract
- 1 tsp ground cinnamon
- 1/2 tsp ground nutmeg
- 1/4 tsp salt
- 1/2 cup chopped nuts (walnuts or pecans)
- 1/2 cup dried cranberries or chocolate chips (optional)
- 1/4 cup flaxseed meal (optional for added nutrition)
Instructions
- Preheat your oven to 350°F (175°C) and line an 8×8-inch baking dish with parchment paper, allowing some paper to hang over the sides for easy removal later.
- In a large bowl, combine the rolled oats, cinnamon, nutmeg, salt, and flaxseed meal (if using). Stir until the ingredients are well mixed.
- In a separate bowl, mix the canned pumpkin puree, almond butter, honey (or maple syrup), and vanilla extract until smooth and creamy.
- Pour the wet mixture into the dry ingredients and stir until everything is well combined. The mixture should be thick. If you’re adding nuts and/or dried cranberries or chocolate chips, fold them into the batter at this point.
- Transfer the mixture to the prepared baking dish and spread it out evenly, pressing down firmly to ensure it holds together during baking.
- Bake in the preheated oven for 25-30 minutes, or until the edges are lightly golden and a toothpick inserted into the center comes out clean.
- Allow the bars to cool in the pan for about 10-15 minutes, then lift them out using the parchment paper. Let them cool completely on a wire rack before cutting into squares or bars.
- Store the bars in an airtight container at room temperature for up to a week or refrigerate for longer freshness.
Notes
- Feel free to customize the nuts and add-ins according to your taste preferences.
- Ensure you use canned pumpkin puree and not pumpkin pie filling.
Nutrition
- Serving Size: 1 bar
- Calories: 150
- Sugar: 8g
- Sodium: 100mg
- Fat: 7g
- Saturated Fat: 1g
- Unsaturated Fat: 5g
- Trans Fat: 0g
- Carbohydrates: 20g
- Fiber: 3g
- Protein: 4g
- Cholesterol: 0mg