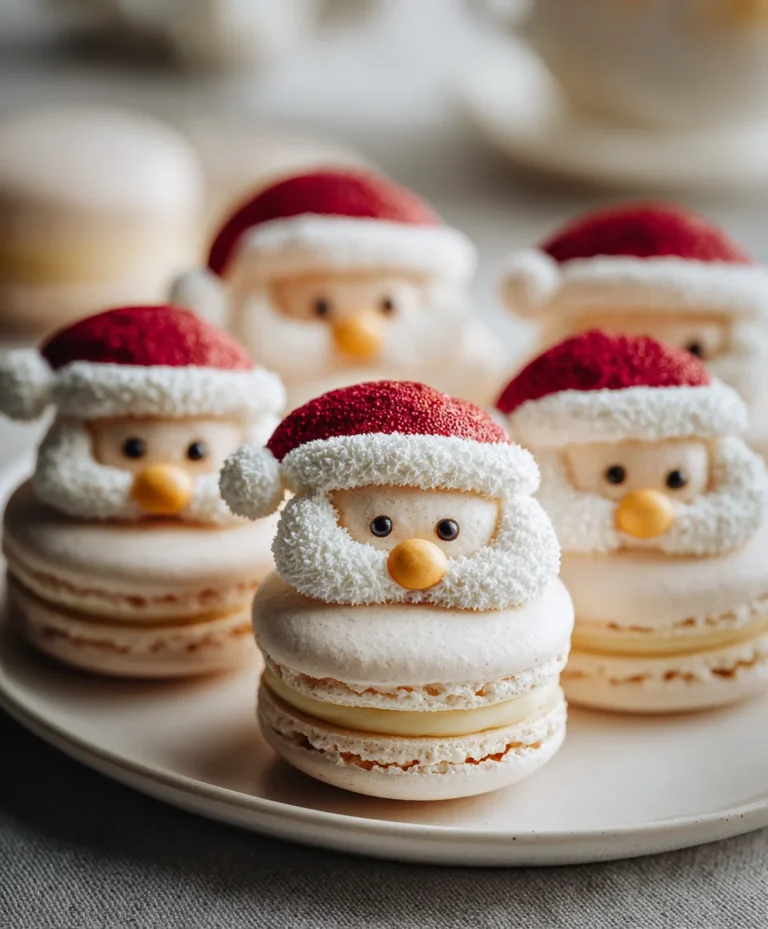
Introduction to Santa Claus Macarons
Ah, the holidays! A time so magical, it beckons smiles from even the busiest of us. When I first dreamed up these Santa Claus Macarons, I envisioned the laughter and joy they would bring at family gatherings. With their whimsical Santa faces, they’re not just desserts; they’re edible memories waiting to happen! These delightful treats are surprisingly simple to create, making them perfect for moms on the go—and anyone who’s eager to impress during festive parties. Let’s dive into this seasonal adventure together and fill our homes with sweetness and cheer!
Why You’ll Love This Santa Claus Macarons
These Santa Claus Macarons are a holiday sensation, bursting with charm and flavor. They’re not just delightful to look at; they taste heavenly, too! The beauty of this recipe lies in its simplicity. In just under an hour, you can whip up these festive treats, making them perfect for busy schedules. Plus, they add a sweet touch to any holiday celebration, bringing smiles to faces young and old!
Ingredients for Santa Claus Macarons
Gathering your ingredients is the first step toward creating these adorable Santa Claus Macarons. Here’s what you’ll need:
- Domino® Golden Sugar: For sweetness that perfectly complements the almond flavor.
- Egg White Powder (optional): This ingredient helps stabilize your meringue, ensuring it holds its shape.
- Egg Whites: The star of the show! Fresh egg whites give your macarons their lovely airy texture.
- Almond Flour: This gives macarons their signature nutty flavor. Be sure to use finely ground almond flour for best results!
- Domino® Powdered Sugar: This contributes to the smooth texture of the meringue and helps sweeten the filling.
- Meringue Powder: Another stabilizer for your icing, providing a glossy finish.
- Water: Needed to combine with meringue powder to create the royal icing.
- Black and Yellow Gel Food Coloring: These colors will help you bring Santa’s iconic look to life. Feel free to adjust for vibrancy!
- All-Purpose Flour: Used in the sugar cookie buttercream for added texture.
- Unsalted Butter: The creaminess of the butter enhances the flavor of your buttercream.
- Vanilla Extract: A must-have for that comforting aroma and sweet taste.
- Almond Extract: Just a pinch adds a delightful depth of flavor to the filling.
- Milk or Heavy Cream: For a dreamy consistency in the buttercream, use your preference.
- Desiccated Coconut: This shredded coconut gives your Santa macaron’s a festive snowy touch!
Remember, if you’re in a hurry, you can use pre-made royal icing, and if you’re feeling adventurous, swap the fillings for your favorite flavors. Exact measurements are available at the end of the article for printing convenience!
How to Make Santa Claus Macarons
Step 1: Preheat the Oven and Prepare Baking Sheets
Preheating your oven is a crucial first step in creating the perfect Santa Claus Macarons. Set it to 300°F (150°C) and let it warm up for at least 60 to 90 minutes. This is particularly important if you’re using a convection oven because consistent heat is key to those lovely macaron feet. While it’s heating, line two baking sheets with parchment paper or a silicone mat. Trust me, this mat is a game-changer for easy release—no more sticking or tearing!
Step 2: Sift the Dry Ingredients
The next step is to sift together your almond flour and powdered sugar. This process breaks up any lumps and ensures a velvety texture for your macarons. I like to do this at least twice—it’s a bit of extra effort, but it pays off with a smoother batter. Sifting creates a light mixture that combines beautifully with the meringue. Set this aside, and get ready to whip up that meringue! The anticipation is part of the fun!
Step 3: Create the Meringue
Now, it’s time to create your meringue, the dreamy heart of your Santa Claus Macarons. In a double boiler, combine the granulated sugar and egg white powder, if you’re using it. Stir these over low heat until the sugar has dissolved completely into the egg whites—this is where the magic truly begins! Once everything is dissolved, transfer your mixture to a stand mixer. Whip at medium-high speed for about 13–15 minutes until you achieve stiff peaks. You want it to be glossy and voluminous—just like whipped cream! This stage is crucial, as it provides the structure and airiness your macarons need.
Step 4: Combine Ingredients
Once your meringue has reached that perfect glossy state, it’s time to gently fold in your dry ingredients. Be careful here—too much mixing will deflate all that lovely air you’ve created. Fold until you achieve a smooth, glossy batter that flows like lava. When this step is complete, add in a few drops of red gel food coloring. This is where the holiday fun comes in! Don’t shy away from adding more for a vivid Santa red; the color should be vibrant and festive, after all!
Step 5: Pipe the Macaron Shells
Now that your batter is ready, grab a piping bag fitted with a round tip. Carefully fill the bag with your vibrant mixture and start piping small circles onto the prepared baking sheets. Aim for equal sizes; this ensures your macarons cook evenly. The key is to keep the piping steady and apply even pressure. Once piped, let the macarons rest for about 30 minutes. This crucial time allows the shells to form a skin, which will help them rise beautifully while baking!
Step 6: Bake the Macarons
It’s time to bake these beauties! Slide your trays into the preheated oven and let them bake for 15-20 minutes. Keep an eye on them, as oven temperatures can vary. The macarons are done when they have formed their characteristic feet and their tops are firm. If you end up with any cracks, don’t fret! They’ll still taste delicious! Once baked, remove them from the oven and let them cool completely on the baking sheets before handling. Patience is key here!
Step 7: Make the Royal Icing
Now, let’s whip up some royal icing that will make your Santa Claus Macarons shine! Combine powdered sugar, meringue powder, and water in a stand mixer. Whisk until you reach a smooth consistency—this should take only a few minutes. Divide your icing into two bowls. Color one bowl black for Santa’s belt and the other yellow for the buckle. Use a piping bag fitted with a thin tip to pipe a black line across the middle of the macaron shells, followed by a little yellow square for that sparkling buckle!
Step 8: Prepare the Sugar Cookie Buttercream
For that creamy filling that everyone will rave about, let’s make the sugar cookie buttercream! Start by creaming together the unsalted butter with the Domino® Golden Sugar and Domino® Powdered Sugar. The sweet aroma will get your taste buds dancing! Add in the heat-treated flour, vanilla, and almond extract. Finally, mix in milk until you achieve a dreamy consistency. This buttercream will pull the flavors together beautifully, making them irresistibly delightful!
Step 9: Assemble the Macarons
Finally, we’re at the grand finale! Take one of your cooled macaron shells and pipe a generous dollop of that scrumptious sugar cookie buttercream onto the center. Carefully place another macaron shell on top, creating a cute little sandwich. To finish, roll the edges of the assembled macaron in shredded coconut for that snowy effect—so festive! There you have it, your very own Santa Claus Macarons! Serve them up, and watch the smiles light up the room!
Tips for Success
- Ensure all your tools are completely dry before starting; even a drop of moisture can ruin your meringue.
- Be gentle when folding in the dry ingredients—this keeps your macarons light and airy.
- Macarons benefit from resting time before baking; it helps create that essential skin.
- Don’t rush the baking process; check for feet and firm tops for the best results.
- Store your macarons in the fridge to keep them fresh and flavorful!
Equipment Needed
- Stand Mixer: A hand mixer works too, but a stand mixer makes whipping meringue a breeze.
- Piping Bags: Reusable silicone bags or disposable bags will do the trick for piping.
- Silicone Baking Mat: Parchment paper is fine, but a silicone mat ensures easy release.
- Sifter: A fine-mesh sieve is great for sifting—avoid lumps in your dry ingredients!
- Double Boiler: You can improvise with a heatproof bowl set over a pot of simmering water.
Variations on Santa Claus Macarons
If you’re feeling adventurous or want to cater to various tastes, there are countless ways to personalize your Santa Claus Macarons. Here are some delightful variations to consider:
- Chocolate Ganache Filling: Swap the sugar cookie buttercream for rich chocolate ganache for a decadent twist.
- Mint Chocolate Macarons: Incorporate a drop of peppermint extract in your buttercream for a refreshing holiday flavor. Pair it with a dark chocolate shell!
- Almond Joy Macarons: Add shredded coconut and chopped toasted almonds to your filling for a flavor reminiscent of the beloved candy bar.
- Spiced Gingerbread Macarons: Spice things up with a hint of ginger, nutmeg, and cinnamon in your macaron batter and filling for a festive gingerbread flavor!
- Nut-Free Option: Replace almond flour with a fine oat flour or sunflower seed flour, maintaining the same loveable form and flavor.
- Gluten-Free Cookie Butter Filling: Use a gluten-free cookie butter spread in place of the buttercream for a creamy, spiced alternative.
Feel free to mix and match! These variations ensure that everyone at your holiday gathering finds something they love.
Serving Suggestions for Santa Claus Macarons
- Hot Chocolate: Serve these festive macarons alongside a warm cup of rich hot chocolate for a cozy treat.
- Milk or Eggnog: Pair with cold milk or holiday eggnog for a classic flavor combination.
- Festive Platters: Create a beautiful presentation by arranging macarons on a decorative platter with evergreens and ornaments.
- Enjoy with Coffee: A steaming cup of coffee or espresso balances the sweetness of the macarons.
- Gift Packaging: Dress them up in cute boxes as delightful homemade gifts for teachers or friends!
FAQs about Santa Claus Macarons
Can I make Santa Claus Macarons ahead of time?
Absolutely! You can prepare the macaron shells a day in advance and store them in an airtight container in the refrigerator. They taste even better when allowed to sit, as the filling melds beautifully with the shells!
What should I do if my macarons crack while baking?
Cracks can happen for a few reasons, such as overmixing the batter or baking at a temperature that’s too high. If they crack, don’t worry! They’ll still be delicious. Next time, try reducing the oven temperature slightly or ensuring that your batter isn’t overmixed.
How long can I store Santa Claus Macarons?
These delightful treats can last in the fridge for about a week. Just make sure they’re stored in an airtight container. If you want to keep them longer, consider freezing them; they can stay fresh for up to a month in the freezer!
Can I use different food colors for my Santa hats?
Of course! While traditional red and white are classic, feel free to experiment with other colors. Just remember—color can impact the batter’s consistency, so a little goes a long way!
Will my Santa Claus Macarons be chewy or crispy?
The perfect macaron should have a crispy shell that gives way to a soft, chewy interior. If you follow the steps closely, you’ll achieve that delightful contrast! Enjoy the chewy goodness that brings a smile with every bite.
Final Thoughts on Santa Claus Macarons
Making Santa Claus Macarons is more than just a baking adventure; it’s about creating magical moments with loved ones. Each bite is like a sprinkle of holiday cheer, blending flavors and memories into a delightful experience. Picture the joy on your family’s faces as they savor these festive treats, each resembling Santa himself. I love to watch the younger ones giggle at the whimsical designs, while the adults relish the rich flavors. Sharing these macarons is a heartfelt way to embrace the spirit of the season, leaving everyone feeling warm and connected over sweet delights!
PrintSanta Claus Macarons
Delightful holiday-themed macarons resembling Santa Claus, perfect for festive celebrations.
- Prep Time: 30 minutes
- Cook Time: 20 minutes
- Total Time: 50 minutes
- Yield: 12–15 macarons 1x
- Category: Dessert
- Method: Baking
- Cuisine: French
- Diet: Vegetarian
Ingredients
- 100 grams Domino® Golden Sugar
- 4 grams egg white powder (optional)
- 100 grams egg whites
- 105 grams almond flour
- 1 1/2 cups Domino® Powdered Sugar
- 1 tbsp meringue powder
- 4 tbsp water
- 2 drops black gel food coloring
- 1 drop yellow gel food coloring
- 1/2 cup all-purpose flour
- 1/2 cup unsalted butter
- 1/4 cup Domino® Golden Sugar
- 1 1/4 cup Domino® Powdered Sugar
- 1 tsp vanilla extract
- 1/8 tsp almond extract
- 1/2 tbsp milk or heavy cream
- 1/4 cup desiccated coconut (shredded)
Instructions
- Preheat your oven to 300°F (150°C) for 60 to 90 minutes, especially if using a convection oven. Line two baking sheets with parchment paper or a silicone mat.
- Sift together the powdered sugar and almond flour, set aside. In a double boiler, whisk together the granulated sugar and egg white powder (if using), then add the egg whites and heat until sugar is dissolved.
- Transfer the mixture to a stand mixer and whip on medium-high speed until stiff peaks form, about 13-15 minutes.
- Once the meringue has formed stiff peaks, gently fold in the sifted almond flour and powdered sugar mixture. Add red gel food coloring and continue folding until the batter is smooth and glossy.
- Transfer the batter to a piping bag and pipe small circles onto the baking sheets. Let the macaron shells rest for 30 minutes to form a skin before baking.
- Bake each tray for 15-20 minutes, checking for the characteristic macaron feet and firm tops. Let the macaron shells cool completely.
- Make the royal icing by mixing powdered sugar, meringue powder, and water in a stand mixer. Divide the icing into two bowls and color one black and the other yellow. Pipe a black line across the middle of the macaron shells to create Santa’s belt, then pipe a yellow square for the buckle.
- To make the sugar cookie buttercream, cream together butter, sugars, and vanilla. Add the heat-treated flour, almond extract, and milk, mixing until smooth.
- Once the macaron shells are fully cooled, pipe the sugar cookie buttercream onto one shell and top with a decorated shell. Roll the sides of the macaron in shredded coconut.
Notes
- Ensure that all your equipment is completely dry to avoid ruining the meringue.
- You can add more gel food coloring if you want a deeper red color.
- Store macarons in the refrigerator to maintain their texture and flavor.
Nutrition
- Serving Size: 1 macaron
- Calories: 120
- Sugar: 15g
- Sodium: 50mg
- Fat: 5g
- Saturated Fat: 3g
- Unsaturated Fat: 2g
- Trans Fat: 0g
- Carbohydrates: 18g
- Fiber: 1g
- Protein: 2g
- Cholesterol: 20mg