Introduction to Strawberry Cheesecake Truffle Balls Recipe
There’s something truly magical about dessert, isn’t there? Especially when it’s as delightful as my Strawberry Cheesecake Truffle Balls Recipe. Whether you’re a busy mom juggling work and home life or simply a professional looking for an easy sweet fix, these truffle balls are your answer. They’re creamy, dreamy, and packed with strawberry goodness, perfect for spice up a dull day or bring cheer to a gathering. So, grab your apron, and let’s dive into creating these luscious little bites of happiness together!
Why You’ll Love This Strawberry Cheesecake Truffle Balls Recipe
This Strawberry Cheesecake Truffle Balls Recipe is a lifesaver for those hectic days when time is scarce but indulgence is necessary. They’re incredibly easy to whip up, requiring minimal prep and no baking skills at all. Plus, the delightful combination of creamy cheesecake and sweet strawberries offers a taste explosion that will take you straight to dessert paradise. Trust me, your friends and family won’t be able to resist these little gems!
Ingredients for Strawberry Cheesecake Truffle Balls Recipe
Gathering the right ingredients is the first step toward creating these scrumptious treats! Here’s what you’ll need:
- Cream cheese: This creamy base gives our truffles that signature cheesecake texture and flavor.
- Crushed graham crackers: The perfect nod to traditional cheesecake crust, adding a delightful crunch.
- Finely chopped freeze-dried strawberries: Bursting with fruity flavor, these little gems bring the strawberry essence to life.
- Powdered sugar: For that touch of sweetness, powdered sugar mixes seamlessly into the filling.
- Vanilla extract: A splash of vanilla rounds out the flavor and enhances all the deliciousness.
- White chocolate or white candy melts: This will be our velvety coat that makes these truffles even more irresistible.
- Crushed freeze-dried strawberries for garnish: An optional but delightful touch that adds a pop of color and extra strawberry flair.
For those who aren’t fans of white chocolate, consider dark chocolate as a substitution for an elegant twist. You’ll find the exact measurements at the bottom of the article, ready for easy printing!
How to Make Strawberry Cheesecake Truffle Balls Recipe
Step 1: Prepare the Filling
First, it’s time to create that creamy filling that makes these truffles shine! In a medium mixing bowl, beat the softened cream cheese until it’s smooth and velvety. I like to use an electric mixer for this step—it saves time and gives me that fluffy texture we crave.
Once the cream cheese is all mixed up, add in the powdered sugar and vanilla extract. Beat everything together until it’s thoroughly combined, and you achieve a rich, creamy mixture. The aroma of vanilla will waft through your kitchen, making it hard to resist tasting! This is your cheesecake base, bursting with flavor and ready for the next delicious addition.
Step 2: Mix in the Crunch
Now, we’re going to bring in the crunch! Gently fold in the crushed graham crackers and finely chopped freeze-dried strawberries. The graham crackers provide that nostalgic cheesecake crust texture, while the freeze-dried strawberries pack a fruity punch. Each bite is an explosion of flavor.
This is where the magic starts to happen! You’ll notice that the mixture thickens while still staying creamy. Make sure everything’s well combined; you don’t want any clumps of graham crackers or strawberries hiding in there. After all, every truffle should be as delightful as the next!
Step 3: Chill the Mixture
Chilling is crucial for this recipe! Once your mixture is ready, pop it into the refrigerator for at least 30 minutes or even up to an hour. This step allows the ingredients to firm up, making them easier to roll into balls. Trust me, resisting that lovely, creamy filling will be tough, but it’s worth the wait!
Step 4: Shape the Truffles
Once your mixture has chilled and firmed up, it’s time to shape these beauties! Using a small scoop or even your hands, take a spoonful of the mixture and roll it into a ball about one inch in diameter. Place the rolled truffles on a parchment-lined baking sheet. It’s fun to get your hands involved in this step, and the kids can help out too!
Make sure they’re evenly spaced on the sheet, as they’ll need a little room to breathe. The sight of these little balls comes together feels oh-so-satisfying!
Step 5: Freeze for Firmness
Next up, we’re going to freeze those truffle balls! Place the baking sheet in the freezer for about 15 to 20 minutes. Why freeze? This helps them hold their shape while we dip them in chocolate later. Trust me, this little step makes a world of difference!
Step 6: Melt the Chocolate
While your truffles are chilling, it’s time to melt the white chocolate or candy melts. Use a microwave-safe bowl, and heat it in 30-second intervals, stirring between each round. This ensures you don’t burn the chocolate. Oh, the smell of melting chocolate is sheer bliss!
Keep the chocolate smooth and warm, as this will make dipping so much easier. If it’s too thick, add a drop of vegetable oil to thin it out. Let’s make these truffles shine!
Step 7: Coat the Truffles
Here comes the fun part—coating the truffles! Dip each chilled truffle ball into the melted chocolate, letting the excess drip off. I like to use a fork for this; it helps me control the dipping and ensures a perfectly coated treat.
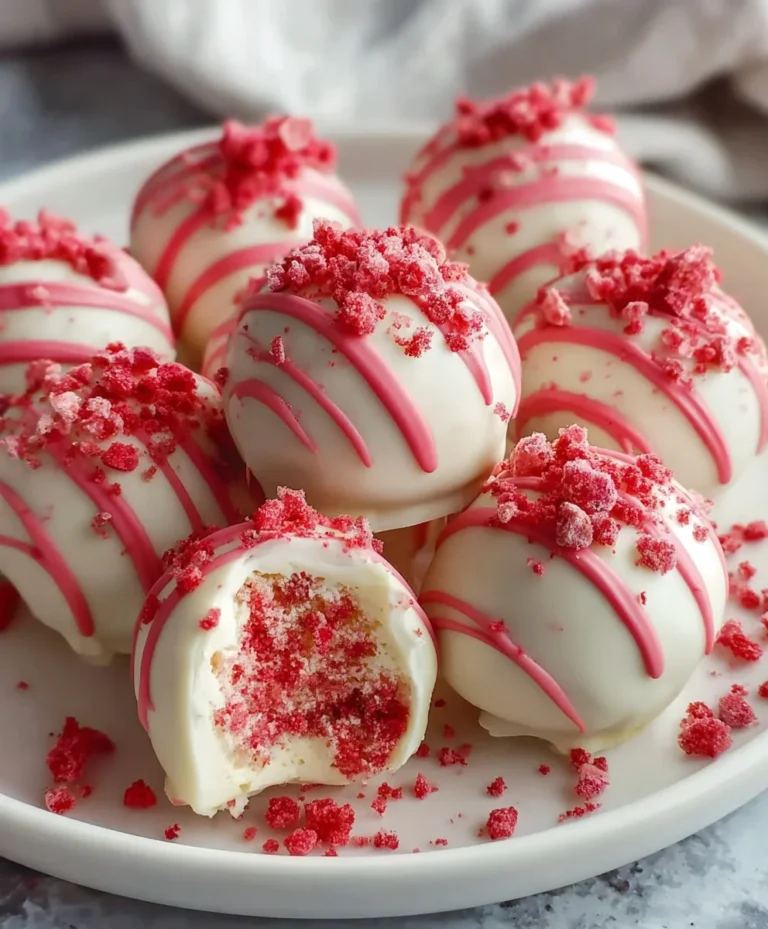
Once coated, place the truffles back on the parchment-lined baking sheet. For that extra touch, sprinkle the tops with crushed freeze-dried strawberries while the chocolate is still wet. They’ll not only look fabulous but also add a burst of strawberry flavor!
Step 8: Let Them Set
Finally, it’s time to let your truffles set! Allow the chocolate to harden at room temperature for about 30 minutes, or pop them in the refrigerator to speed up the process. I know waiting can be tough, but the end result is so worth it! Once set, you can admire your beautiful creation, ready to be devoured.
Tips for Success
- Use softened cream cheese for easy blending; it makes a world of difference.
- Ensure your mixing bowl is dry for the chocolate to adhere better.
- Try various toppings like crushed nuts or sprinkles for a fun twist.
- Get the kids involved! Rolling the truffles is a perfect way to bond.
- Store leftovers in an airtight container, but trust me, they won’t last long!
Equipment Needed
- Mixing bowl: A medium-sized bowl works well; a large one is fine too.
- Electric mixer: If you don’t have one, a whisk and some elbow grease will do!
- Baking sheet: Any flat surface will work; just line it with parchment paper.
- Scoop or spoon: Use a small ice cream scoop or tablespoon for shaping.
- Microwave-safe bowl: For melting chocolate; a double boiler is a great alternative.
Variations of Strawberry Cheesecake Truffle Balls Recipe
- Chocolate Lover’s Twist: Substitute half of the white chocolate with dark chocolate for a richer taste.
- Nutty Delight: Add crushed almonds or walnuts to the graham cracker mixture for added crunch and flavor.
- Gluten-Free Option: Use gluten-free graham cracker crumbs to make these truffles suitable for gluten-sensitive diets.
- Vegan Version: Replace cream cheese with a vegan cream cheese alternative and use dairy-free chocolate.
- Fruit Fusion: Swap out freeze-dried strawberries with other freeze-dried fruits like raspberries or blueberries for different flavor profiles.
Serving Suggestions for Strawberry Cheesecake Truffle Balls Recipe
- Serve with a side of fresh strawberries for a beautiful contrast on the plate.
- Pair with a scoop of vanilla ice cream for extra indulgence.
- Drizzle with chocolate sauce for a decadent touch.
- Display on a tiered serving platter to impress your guests.
- Accompany with a glass of sparkling lemonade or iced tea for a refreshing lift.
FAQs about Strawberry Cheesecake Truffle Balls Recipe
Can I make these truffles ahead of time?
Absolutely! These Strawberry Cheesecake Truffle Balls are perfect for making ahead. You can prepare them a day or two in advance and store them in the refrigerator. Just make sure they’re in an airtight container to keep them fresh!
How should I store these truffles?
To keep your truffles tasting their best, store them in an airtight container in the refrigerator. They’ll stay fresh for up to five days, but trust me, they’ll probably be gone long before that!
Can I freeze Strawberry Cheesecake Truffle Balls?
Yes, you can freeze these delightful treats! Simply place them in a single layer on a baking sheet, freeze until firm, and then transfer them to an airtight container. They can stay in the freezer for up to two months; just thaw them in the fridge when you’re ready to enjoy them!
What if I can’t find freeze-dried strawberries?
No worries! If you can’t find freeze-dried strawberries, you can use fresh strawberries instead. Just chop them finely and use them in the mixture. Keep in mind, though, that the texture will be slightly different, but they’ll still taste delicious!
Can these truffles be made gluten-free?
Yes! To adapt this Strawberry Cheesecake Truffle Balls Recipe for gluten-free diets, simply use gluten-free graham cracker crumbs. They’ll still bring that classic cheesecake taste, with no sacrifices on flavor!
Final Thoughts
Creating these Strawberry Cheesecake Truffle Balls is more than just whipping up a dessert; it’s about bringing joy to your kitchen and those you love. Whether you’re celebrating a special occasion or just treating yourself after a long day, these little bites of bliss deliver smiles all around. Plus, the process of making them together with family can turn an ordinary day into something memorable. So, roll up your sleeves, and enjoy the sweet moments this truffle balls recipe will bring to your life. Trust me, they won’t just be a dessert; they’ll be a cherished memory!
PrintStrawberry Cheesecake Truffle Balls Recipe

Delicious and creamy strawberry cheesecake truffle balls coated in white chocolate, offering a delightful treat for any occasion.
- Prep Time: 25 minutes
- Cook Time: 5 minutes
- Total Time: 1 hour 30 minutes
- Yield: 24 truffle balls 1x
- Category: Dessert
- Method: No-Bake
- Cuisine: American
- Diet: Vegetarian
Ingredients
- 8 ounces cream cheese, softened
- 1 cup crushed graham crackers
- 1/2 cup finely chopped freeze-dried strawberries
- 1/4 cup powdered sugar
- 1/2 teaspoon vanilla extract
- 8 ounces white chocolate or white candy melts
- 2 tablespoons crushed freeze-dried strawberries for garnish (optional)
Instructions
- In a medium mixing bowl, beat the softened cream cheese, powdered sugar, and vanilla extract until smooth and creamy.
- Stir in the crushed graham crackers and finely chopped freeze-dried strawberries until fully combined.
- Refrigerate the mixture for 30–60 minutes or until firm enough to roll.
- Once chilled, scoop and roll the mixture into 1-inch balls and place them on a parchment-lined baking sheet.
- Freeze the truffle balls for 15–20 minutes to firm up.
- Meanwhile, melt the white chocolate or candy melts in a microwave-safe bowl in 30-second intervals, stirring until smooth.
- Dip each truffle ball into the melted chocolate, allowing excess to drip off, then place back on the parchment.
- Immediately sprinkle with crushed freeze-dried strawberries if using.
- Let the chocolate set completely at room temperature or refrigerate to speed up the process.
Notes
- Store truffles in an airtight container in the refrigerator for up to 5 days.
- For an extra burst of strawberry flavor, add a few drops of natural strawberry extract to the filling.
Nutrition
- Serving Size: 1 truffle
- Calories: 120
- Sugar: 8g
- Sodium: 50mg
- Fat: 7g
- Saturated Fat: 4g
- Unsaturated Fat: 2g
- Trans Fat: 0g
- Carbohydrates: 13g
- Fiber: 1g
- Protein: 1g
- Cholesterol: 20mg