
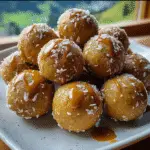
Introduction to Peanut Butter Balls
Are you ever in need of a quick and satisfying treat? Let me introduce you to the world of peanut butter balls! These fudgy delights are not just delicious; they’re your secret weapon for busy days. With minimal effort and just a handful of ingredients, you can whip up a batch that will impress your loved ones. I remember the first time I made these; my kids couldn’t get enough! If you’re juggling work, family, or life’s twists and turns, these peanut butter balls are a go-to solution that brings a little joy into your hectic schedule.
Why You’ll Love This Peanut Butter Balls
What’s not to love about peanut butter balls? They’re incredibly easy to make, requiring just a handful of ingredients and minimal prep time. In mere minutes, you create a fudgy treat that’s both satisfying and nutritious. Perfect for those late-night cravings or as a delightful snack for your kiddos after school. Plus, they’re no-bake, so you won’t find yourself stuck in the kitchen for hours. Simple, quick, and utterly delicious—what’s not to adore?
Ingredients for Peanut Butter Balls
Now, let’s talk about the magic components that make these peanut butter balls irresistibly delicious. Here’s what you’ll need:
- Peanut butter: The star of the show! Creamy or chunky, it gives that rich flavor.
- Maple syrup: A natural sweetener that adds just the right amount of sweetness. Honey works too if you prefer!
- Coconut flour: This helps bind everything together while adding a subtle tropical twist. Can’t find it? Just use almond flour instead!
Feel free to get creative! You can sprinkle in some mini chocolate chips for extra sweetness or toss in some chia seeds for a healthy boost. If you’re not a fan of coconut flour, almond flour or even ground oats can work in a pinch. For those with nut allergies, sunflower seed butter makes a great substitute for peanut butter. Remember, the best snacks are those that fit your taste and dietary needs!
For the exact amounts of these simple ingredients, look at the bottom of the article where you’ll find them ready for printing!

How to Make Peanut Butter Balls
Step 1: Prepare Your Baking Sheet
Start by lining a baking sheet with parchment paper. This simple step makes cleanup a breeze and prevents your peanut butter balls from sticking. Trust me, this little trick saves you from a messy situation later on!
Step 2: Combine Ingredients
In a large bowl, you’ll want to mix your peanut butter, maple syrup, and coconut flour together. Grab a sturdy spoon or spatula and give it a good stir. The mixture may seem a bit thick at first. If it feels too dense, add water a few drops at a time. You’ll want it to be workable but firm. Just think of it as crafting a delightful texture!
Step 3: Roll into Balls
Now, it’s time to get your hands a little messy! Using your palms, roll the mixture into small balls. You can also use a cookie scoop for uniform sizes if you prefer. Each ball should be about an inch in diameter. Having fun with this step is key, so let the kids join in if you like!
Step 4: Chill in the Fridge
Once you’ve rolled all your peanut butter balls, place them on the prepared baking sheet. Slide the sheet into your fridge for at least 30 minutes. This helps them firm up and makes them even more enjoyable to eat. As they chill, you can kick back and relax, knowing a delicious treat awaits you!
Tips for Success
- Use natural peanut butter for a healthier option. Look for one with just nuts and salt!
- Keep the coconut flour handy. It absorbs moisture quickly, so add water gradually to get the right consistency.
- Get creative with add-ins like dried fruit or nuts to customize your peanut butter balls.
- For extra sweetness, drizzle melted chocolate on top before chilling.
- Store leftovers in an airtight container in the fridge for up to a week!
Equipment Needed
- Baking sheet: A standard baking sheet works best. You can use a plate if that’s all you have!
- Parchment paper: Prevents sticking. Wax paper is a suitable alternative.
- Large mixing bowl: Any size works, just make sure it’s sturdy enough for mixing.
- Spoon or spatula: Essential for combining the ingredients. A fork can also do the trick!
- Cookie scoop (optional): For perfectly round peanut butter balls. Use your hands if you prefer!
Variations on Peanut Butter Balls
- Chocolate Lovers: Mix in cocoa powder for a decadent chocolate flavor. You can also dip them in melted chocolate!
- Nutty Friends: Swap peanut butter for almond butter or cashew butter for a different nutty twist. Each brings a unique flavor!
- Protein Boost: Add a scoop of your favorite protein powder to turn these into a post-workout snack.
- Fruit Fusion: Stir in dried fruits like cranberries or raisins for a hint of sweetness and chewiness.
- Different Flours: Use ground oats instead of coconut flour for a heartier texture and flavor.
- Spiced Delight: Add a dash of cinnamon or nutmeg for a warm, spiced flavor that’s perfect for fall.
Serving Suggestions for Peanut Butter Balls
- Pair peanut butter balls with a glass of almond milk for a nutritious snack.
- Serve them alongside fresh fruit like apple slices or banana. They complement so well!
- Arrange on a platter and drizzle with melted chocolate for a beautiful presentation.
- Great as a sweet treat at parties or after school!
FAQs about Peanut Butter Balls
Can I use crunchy peanut butter instead of creamy? Absolutely! Crunchy peanut butter adds a fun texture to your peanut butter balls. Dive into the delightful crunch with every bite!
How should I store peanut butter balls? Keep your peanut butter balls in an airtight container in the fridge. They’ll stay fresh for up to a week, though I’d be surprised if they last that long!
Can I freeze peanut butter balls? Yes, you can! Place them in a single layer on a baking sheet and freeze until firm. Then, transfer them to a freezer-safe bag for up to three months.
What can I substitute for coconut flour? No coconut flour? No problem! Try almond flour or ground oats instead. Each alternative imparts its own flavor and texture!
Are these peanut butter balls healthy? They certainly can be! Packed with protein and healthy fats from peanut butter, they also offer a sweet fix with less sugar than traditional desserts. Enjoy them guilt-free!
Final Thoughts
Making peanut butter balls is like crafting little morsels of joy. They bring comfort and happiness in every fudgy bite. Whether you enjoy them as a quick snack after school or a sweet pick-me-up after a long day, they never fail to deliver smiles all around. I love that they’re versatile—just one batch can be transformed to suit all tastes! Remember, cooking is not just about food; it’s about creating moments and memories. So gather your loved ones, roll those balls, and let the delightful aroma fill your kitchen. Happy snacking!
PrintPeanut Butter Balls
Delicious and fudgy peanut butter balls made with simple ingredients.
- Prep Time: 15 minutes
- Cook Time: 0 minutes
- Total Time: 45 minutes
- Yield: 20 balls 1x
- Category: Dessert
- Method: No-Bake
- Cuisine: American
- Diet: Vegetarian
Ingredients
- 2 cups peanut butter
- ½ cup maple syrup
- ¾ cup coconut flour
Instructions
- Line a baking sheet with parchment paper.
- In a large bowl, combine peanut butter, maple syrup, and coconut flour; mix well. Add water, a few drops at a time, if the mixture is too thick.
- Roll the mixture into small balls using your hands or a cookie scoop.
- Place the balls on the prepared baking sheet.
- Refrigerate for at least 30 minutes to firm up.
Notes
- Enjoy these soft, fudgy peanut butter treats!
Nutrition
- Serving Size: 1 ball
- Calories: 140
- Sugar: 4g
- Sodium: 5mg
- Fat: 9g
- Saturated Fat: 2g
- Unsaturated Fat: 7g
- Trans Fat: 0g
- Carbohydrates: 11g
- Fiber: 2g
- Protein: 5g
- Cholesterol: 0mg