
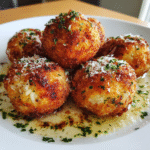
Introduction to Authentic Baked Arancini
As a passionate home cook, I’m always on the lookout for dishes that not only satisfy my cravings but also bring a smile to my family’s faces. That’s why I love making Authentic Baked Arancini. These delightful, crispy rice balls have a gooey mozzarella center that melts in your mouth!
Perfect for busy moms like us, they’re an easy solution when you want something delicious but don’t have hours to spend in the kitchen. Plus, they’re a fun way to impress your loved ones without breaking a sweat!
Why You’ll Love This Authentic Baked Arancini
One of the best things about Authentic Baked Arancini is how simple it is to whip up. With just a few ingredients, you can create a mouthwatering dish that feels fancy but is incredibly approachable.
They’re also quick to prepare, making them ideal for busy evenings or surprise guests. Plus, who can resist that crispy exterior paired with a gooey mozzarella center? Trust me, these will become a family favorite in no time!
Ingredients for Authentic Baked Arancini
Let’s gather our ingredients for these delightful Authentic Baked Arancini! Each one plays a vital role in crafting the perfect bite. Here’s what you’ll need:
- Arborio Rice: This short-grain rice is creamy when cooked, making it the star of our dish. Think of it as its unique charm that gives arancini their texture.
- Chicken Broth: Using broth instead of plain water infuses the rice with rich flavor. For a vegetarian option, feel free to use vegetable broth!
- Parmesan Cheese: This grated cheese adds a punch of savory goodness and a bit of nutty flavor that’s essential for enhancing our rice mixture.
- Chopped Parsley: Fresh parsley brings brightness to our dish, not only in taste but also in appearance. It’s like a sprinkle of color on your canvas!
- Salt and Black Pepper: Simple seasonings are crucial for bringing all the flavors to life. Taste as you go to make sure it’s just right!
- Mozzarella Cheese: The gooey center of our arancini! Cut into small cubes, it melts beautifully, creating that dreamy surprise inside.
- Bread Crumbs: These are what give our arancini the crispy, golden crust we crave. Italian-style breadcrumbs will work magic here!
- Eggs: Whisked eggs help the breadcrumbs adhere to the rice balls, creating a perfect crispy outer layer.
- Olive Oil: A light brushing of olive oil before baking ensures a beautiful golden brown finish. Plus, who doesn’t love the flavor of olive oil?
Don’t worry, I’ve detailed exact quantities at the bottom of the article for easy reference when you’re ready to start cooking!

How to Make Authentic Baked Arancini
Ready to create mouthwatering Authentic Baked Arancini? Let’s dive into the steps together! Each stage is simple and rewarding, making it easy to whip up these tasty treats. Follow along with these easy instructions, and you’ll be amazed at what you can achieve!
Step 1: Prepare the Rice Mixture
First, let’s cook the Arborio rice. Combine it with chicken broth in a medium saucepan. Bring it all to a boil, and then reduce the heat to a gentle simmer. Stir occasionally, ensuring it cooks evenly. We’re aiming for that perfect al dente texture. About 20 minutes should do the trick! Once it’s ready, transfer the rice to a large bowl and set it aside to cool. Cooling is key here; it’ll help the rice hold together while we form our arancini balls.
Step 2: Mix in Cheese and Seasoning
With your rice now cool, it’s mixing time! Add in the grated Parmesan cheese, chopped parsley, and your salt and pepper. Give it a good stir until everything is well combined. The aroma that fills your kitchen is just divine! This mixture is where the magic starts. It’s what makes your Authentic Baked Arancini exciting and full of flavor.
Step 3: Form the Arancini Balls
Now comes the fun part—shaping our arancini! Scoop approximately 2 tablespoons of the rice mixture into your hand. It should feel warm and a bit sticky. Next, take a cube of mozzarella and nestle it right in the center of the rice. Now, carefully encase the cheese by molding the rice around it, forming a compact ball. Make sure to repeat this step until you’ve used up all the rice mixture and mozzarella. It’ll be like a treasure hunt—delicious mozzarella treasure at that!
Step 4: Bread the Arancini
Let’s get those rice balls ready for the oven! In a shallow bowl, whisk the eggs until they’re frothy. Dip each rice ball into the egg, ensuring it’s evenly coated. Then, roll it in breadcrumbs until it’s fully covered. This will give us that irresistible crispy outer layer! Arrange the breaded balls on a parchment-lined baking sheet, preparing them for their toasty bath in the oven.
Step 5: Bake the Arancini
As you preheat your oven to 375°F (190°C), brush each rice ball with a bit of olive oil. This is crucial for achieving that lovely golden color. Pop your baking sheet into the oven and let them bake for 20 to 25 minutes. You’ll want to keep an eye on them until they’re golden brown and deliciously crisp. Trust me, when your family catches a whiff of them baking, there will be no holding back!
Tips for Success
- Let the rice cool completely before shaping the balls. This helps them hold their shape!
- If you’re short on time, use leftover risotto for a quicker alternative.
- Feel free to experiment with different cheeses for exciting flavor combinations.
- Make them ahead of time! You can freeze uncooked arancini for a quick meal later.
- Serve with marinara sauce on the side for extra flavor—that’s a game changer!
Equipment Needed
- Medium Saucepan: For cooking the rice. A larger pot works if you don’t have this size.
- Large Bowl: For mixing the rice and ingredients. Any mixing bowl will do!
- Shallow Bowl: For whisking eggs. A plate can work in a pinch.
- Parchment Paper: To line your baking sheet. Foil can be a good substitute.
- Baking Sheet: For the arancini to bake on. Any flat metal tray will work.
Variations on Authentic Baked Arancini
- Vegetable Arancini: Add finely chopped veggies like spinach, mushrooms, or bell peppers to the rice mixture for an extra health boost.
- Spicy Arancini: Mix in some diced jalapeños or a sprinkle of red pepper flakes to give your arancini a kick!
- Herbed Arancini: Experiment with various herbs like basil or thyme to add different flavor profiles that will surprise your taste buds.
- Cheesy Variations: Swap out mozzarella for other melting cheeses like fontina or gouda for a different twist on the classic gooey center.
- Gluten-Free Arancini: Use gluten-free breadcrumbs to make this dish suitable for those with dietary restrictions without sacrificing taste.
- Vegan Arancini: Substitute the eggs with a flaxseed mixture and use nutritional yeast in place of cheese for a vegan-friendly alternative.
Serving Suggestions for Authentic Baked Arancini
- Serve arancini alongside a warm marinara sauce for a classic Italian touch.
- Pair with a crisp green salad drizzled with balsamic vinaigrette for a refreshing balance.
- A glass of chilled white wine or sparkling water enhances the flavors delightfully.
- Dress them up on a platter with fresh herbs for a beautiful presentation at gatherings.
FAQs about Authentic Baked Arancini
Got questions about making Authentic Baked Arancini? Don’t worry; I’ve got you covered! Here are some common queries that fellow home cooks often have.
Can I make arancini in advance?
Absolutely! You can prepare the arancini balls ahead of time and freeze them uncooked. When you’re ready, bake them directly from the freezer. Just add a few extra minutes to the baking time to ensure they’re heated through.
What if I don’t have Arborio rice?
If you can’t find Arborio rice, you can substitute it with another short-grain rice, like Carnaroli or even sushi rice. Keep in mind that different rice types might yield slightly different textures.
How do I store leftover arancini?
Leftover Authentic Baked Arancini can be stored in an airtight container in the refrigerator for up to three days. To reheat, pop them in the oven until they’re warm and crispy again.
Can I make these arancini gluten-free?
Yes! Just use gluten-free breadcrumbs in place of regular breadcrumbs. This way, everyone can enjoy these crispy treats without worry!
What sauce is best for dipping?
A classic marinara sauce is a favorite for dipping! You can also try a creamy garlic aioli or even a spicy arrabbiata sauce for some extra flavor. The options are endless!
Final Thoughts
Making Authentic Baked Arancini is truly a labor of love. The moment you take that first bite and experience the crispy exterior giving way to the gooey mozzarella, it’s pure bliss! It’s more than just a dish; it’s about gathering family and friends and creating memories over good food. Whether it’s a busy weeknight or a special occasion, these delightful rice balls will shine on your table. So roll up your sleeves and let the aroma of homemade arancini fill your home. I promise, it will be a culinary adventure you won’t want to miss!
PrintAuthentic Baked Arancini
A delicious and easy recipe for baked arancini, featuring a crispy exterior and a gooey mozzarella center.
- Prep Time: 30 minutes
- Cook Time: 25 minutes
- Total Time: 55 minutes
- Yield: 4 servings 1x
- Category: Appetizer
- Method: Baking
- Cuisine: Italian
- Diet: Vegetarian
Ingredients
- 2 cups Arborio rice
- 4 cups chicken broth
- 1/2 cup grated Parmesan cheese
- 1/4 cup chopped parsley
- Salt to taste
- Freshly ground black pepper to taste
- 1 cup mozzarella cheese, cut into small cubes
- 2 cups bread crumbs
- 2 large eggs
- Olive oil for brushing
Instructions
- Combine Arborio rice and chicken broth in a medium saucepan. Bring to a boil, then reduce heat to a simmer. Cook, stirring occasionally, until the rice is al dente and liquid is absorbed, about 20 minutes. Transfer to a large bowl and allow to cool.
- Add grated Parmesan cheese, chopped parsley, salt, and black pepper to the cooled rice. Mix thoroughly until evenly combined.
- Scoop approximately 2 tablespoons of rice mixture into your hand. Place a mozzarella cube in the center and encase it with the rice, forming a compact ball. Repeat until all rice mixture and mozzarella cubes are used.
- Whisk eggs in a shallow bowl. Dip each rice ball in the beaten egg, then roll to coat evenly with bread crumbs. Place on a parchment-lined baking sheet.
- Preheat oven to 375°F (190°C). Lightly brush each rice ball with olive oil. Bake for 20 to 25 minutes or until golden brown and crisp.
Notes
- Ensure the rice is cooled before forming the balls to maintain shape.
- Experiment with different cheeses for the filling.
- Serve with marinara sauce for dipping.
Nutrition
- Serving Size: 1 ball
- Calories: 150
- Sugar: 1g
- Sodium: 200mg
- Fat: 5g
- Saturated Fat: 2g
- Unsaturated Fat: 3g
- Trans Fat: 0g
- Carbohydrates: 20g
- Fiber: 1g
- Protein: 6g
- Cholesterol: 45mg