
Introduction to Cherry Pistachio Cheesecake Bars
There’s something magical about baking that brings warmth into our busy lives, don’t you think? I remember one evening when I stumbled upon a recipe for Cherry Pistachio Cheesecake Bars, and it felt like a sweet salvation from my chaotic week. These bars are not just delicious; their creamy filling paired with a crunchy crust makes them irresistible. If you’re juggling work, kids, or just life in general, this easy recipe is the perfect treat to bring a little joy to your day. Trust me, your kitchen will smell heavenly, and your loved ones will thank you!
Why You’ll Love This Cherry Pistachio Cheesecake Bars
These Cherry Pistachio Cheesecake Bars are a heavenly blend of flavors that will transport you to dessert paradise. They’re quick to make, taking only about 20 minutes of your time before they go into the oven. The combination of tart cherries and crunchy pistachios creates a delightful symphony in every bite. Plus, they’re ideal for gatherings or dessert cravings, ensuring everyone leaves with a smile. What’s not to love?
Ingredients for Cherry Pistachio Cheesecake Bars
Gathering your ingredients is like preparing for a delightful adventure in the kitchen! For these Cherry Pistachio Cheesecake Bars, you’ll need:
- Graham cracker crumbs: These create a crunchy base for your bars, providing that delightful texture contrast.
- Unsalted butter: Melted butter adds richness and binds the crust together. It’s the glue that holds the deliciousness!
- Granulated sugar: A touch of sweetness balances the tartness of the cherries, enhancing the flavor beautifully.
- Cream cheese: This creamy star gives your cheesecake its rich and decadent filling, making it oh-so-smooth!
- Large eggs: Eggs help set the filling while adding a hint of fluffiness that you’ll adore.
- Vanilla extract: A splash of vanilla rounds out the flavors and infuses warmth into the bars.
- Fresh cherries: Pitted and chopped, these gems bring a burst of tartness that perfectly complements the creaminess!
- Pistachios: Crunchy and nutty, pistachios add a delightful twist and a pop of color to your bars.
- Optional: Whipped cream: Top your bars with whipped cream for an extra layer of creaminess and charm.
- Extra cherries and pistachios for garnish: Because a beautiful presentation makes everything taste better, right?
And if you need some flexibility, don’t worry! If graham crackers aren’t available, crushed Oreo cookies can add a fun chocolatey twist. You can swap cream cheese with Greek yogurt if you’re looking for a lighter option. Plus, frozen cherries work well if fresh ones are hard to find.
For exact measurements and more detailed instructions, check the end of the article, where you can easily print this recipe. Happy cooking!

How to Make Cherry Pistachio Cheesecake Bars
Let’s dive into the joyful adventure of creating these Cherry Pistachio Cheesecake Bars. Each step will take you closer to that creamy, crunchy bliss you’re dreaming of. Trust me, your kitchen is about to become the happiest place on Earth!
Step 1: Preheat the Oven
The first step is to preheat your oven to 325°F (160°C). Preheating is crucial because it helps your cheesecake bars bake evenly. While your oven is warming up, gather the rest of your ingredients. It’s like getting your cozy oven ready for a warm hug of sweetness!
Step 2: Prepare the Crust
Now, let’s get to the crust! In a mixing bowl, combine graham cracker crumbs, melted butter, and granulated sugar. Stir them together until everything is nicely blended. The mixture should be crumbly yet sticky. Press this tasty blend into the bottom of a greased 9×9 inch baking pan. Make sure it’s evenly packed – think of it as creating a solid treasure chest for your cheesecake!
Step 3: Make the Cheesecake Filling
In another bowl, beat softened cream cheese and sugar until the mixture is smooth and creamy, almost like a fluffy cloud. Add the eggs one at a time, ensuring you mix well after each addition. Stir in the vanilla extract, and let that delightful aroma whisk you away. This filling is where the magic begins!
Step 4: Fold in Cherries and Pistachios
Gently fold in the chopped fresh cherries and pistachios into your cream cheese mixture. Picture the vibrant colors of the cherries and the fun crunch of pistachios dancing together in your filling! This step not only enhances the flavor but also adds delightful pops of color to your bars.
Step 5: Bake the Cheesecake Bars
Pour the creamy filling over your prepared crust and spread it out evenly. Now, it’s time for a little baking magic! Place the pan in the preheated oven and bake for 25-30 minutes. You’ll know they’re ready when the edges are set, but the center has a slight jiggle – that’s the sign of a perfect cheesecake!
Step 6: Cool and Chill
Once baked, let your cheesecake bars cool to room temperature. Patience is key! After they cool, pop them into the refrigerator for at least two hours. This chilling time allows the flavors to meld beautifully and sets the filling just right – like waiting for a surprise party to unfold!
Step 7: Serve
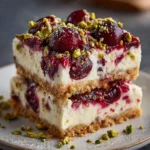
Finally, it’s showtime! Cut your chilled bars into squares and serve. Here’s a fun touch: garnish with whipped cream, extra cherries, and pistachios. They’ll look like little masterpieces on your plate. Enjoy every bite, and watch as smiles spread around the room!
Tips for Success
- Make sure your cream cheese is softened; this prevents lumps in your filling.
- Use a glass or ceramic baking dish for even heating and easier serving.
- Don’t rush the chilling process; it’s crucial for nice, neat slices.
- For extra flavor, toast the pistachios lightly before adding them to the mixture.
- Try experimenting with a splash of almond extract for a twist!
Equipment Needed
- Mixing bowls: A set of various sizes will help you combine ingredients easily.
- Electric mixer: Great for achieving a smooth cream cheese filling; a whisk works too but takes longer.
- 9×9 inch baking pan: Essential for the bars; you can also use a slightly larger pan.
- Rubber spatula: Perfect for folding in ingredients and scraping down the sides of bowls.
Variations
- Chocolate Delight: Swap out half of the graham cracker crumbs for crushed chocolate cookies. This adds a rich chocolate flavor that pairs beautifully with the cherries.
- Nut-Free Option: Omit the pistachios and replace them with sunflower seeds for crunch without the nuts. It’s a great way to accommodate allergies!
- Dairy-Free Twist: Use dairy-free cream cheese and a plant-based butter substitute. This keeps the creamy goodness while catering to dairy sensitivities.
- Fruit Festival: Mix in other fruits like diced peaches or blueberries along with the cherries for a mixed fruit experience that’s bursting with flavor!
- Frozen Variety: For a fun summer treat, freeze the cheesecake bars instead of chilling them. They make a refreshing dessert on a hot day!
Serving Suggestions
- Fresh Whipped Cream: Serve these bars with a dollop of whipped cream for an elegant touch and extra creaminess.
- Fruit Garnish: Top with additional fresh cherries and pistachios for a colorful presentation that invites everyone to dig in!
- Pair with Tea: Enjoy with a cup of chamomile or green tea for a calming afternoon treat.
- Ice Cream Side: A scoop of vanilla ice cream on the side can take these bars to the next level of dessert bliss!
FAQs about Cherry Pistachio Cheesecake Bars
Can I use frozen cherries instead of fresh?
Absolutely! Frozen cherries work perfectly in these Cherry Pistachio Cheesecake Bars. Just make sure to thaw and drain them well to avoid excess moisture in your bars.
How do I store leftover cheesecake bars?
Store any leftovers in an airtight container in the refrigerator for up to a week. They’ll stay deliciously creamy and perfect for a quick treat any time!
Can I make these bars in advance?
Yes! In fact, making them a day ahead enhances their flavor. Just chill them well before serving, and they’ll be just as delightful.
What’s the best way to cut the bars for neat slices?
Use a sharp knife and wipe it clean between cuts for neat slices. This helps maintain the beautiful layers of your cheesecake bars.
Can I customize the topping?
Definitely! Feel free to top your cheesecake bars with chocolate drizzle, caramel sauce, or even mixed berries. Get creative and make it your own!
Final Thoughts
These Cherry Pistachio Cheesecake Bars are more than just a recipe; they’re a sweet escape from the daily grind. Each bite delivers a delightful mix of flavors and textures that can spark joy even on the busiest of days. I love how they can turn a simple gathering into a memorable celebration. Watching my family’s faces light up when tasting these bars reminds me why sharing food is a universal language of love. So, gather your loved ones, bake these delicious bars, and create your own joyful memories in the kitchen. Happy baking, my friends!
PrintCherry Pistachio Cheesecake Bars: A Delightful Treat!
Delicious Cherry Pistachio Cheesecake Bars with a creamy filling and a crunchy crust.
- Prep Time: 20 minutes
- Cook Time: 35 minutes
- Total Time: 2 hours 55 minutes (including chilling time)
- Yield: 16 bars 1x
- Category: Dessert
- Method: Baking
- Cuisine: American
- Diet: Vegetarian
Ingredients
- 1 ½ cups graham cracker crumbs
- ½ cup unsalted butter, melted
- ¼ cup granulated sugar
- 16 oz cream cheese, softened
- ½ cup granulated sugar
- 2 large eggs
- 1 teaspoon vanilla extract
- 1 cup fresh cherries, pitted and chopped
- ½ cup pistachios, chopped
- Optional: Whipped cream
- Extra cherries and pistachios for garnish
Instructions
- Preheat the Oven: Preheat to 325°F (160°C).
- Prepare the Crust: Mix graham cracker crumbs, melted butter, and sugar. Press into a greased 9×9 inch baking pan. Bake for 10 minutes.
- Make the Cheesecake Filling: Beat cream cheese and sugar until smooth. Add eggs one at a time, mixing well. Stir in vanilla.
- Fold in Cherries and Pistachios: Gently mix in chopped cherries and pistachios.
- Bake the Cheesecake Bars: Pour filling over the cooled crust and bake for 25-30 minutes.
- Cool and Chill: Let cool to room temperature, then refrigerate for at least 2 hours before cutting into bars.
- Serve: Cut into squares and garnish with whipped cream, cherries, and pistachios.
Notes
- Substitution for graham crackers: Use crushed Oreo cookies for a chocolatey twist.
- Substitution for cream cheese: Substitute with Greek yogurt for a lighter option.
- Substitution for cherries: Frozen cherries can be used if fresh ones are unavailable.
Nutrition
- Serving Size: 1 bar
- Calories: 250
- Sugar: 15g
- Sodium: 200mg
- Fat: 15g
- Saturated Fat: 8g
- Unsaturated Fat: 5g
- Trans Fat: 0g
- Carbohydrates: 25g
- Fiber: 1g
- Protein: 4g
- Cholesterol: 50mg