
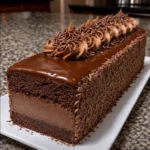
Introduction to Chocolate Fudge Dream Cake
As a busy mom and passionate home cook, I know how precious time can be in the kitchen. That’s why I’m thrilled to share my go-to dessert: Chocolate Fudge Dream Cake. This rich and creamy cake is perfect for those days when you need a quick solution or when you’re hoping to impress loved ones without spending hours baking. With just a handful of simple ingredients and minimal prep, this no-bake cake will have you enjoying delicious chocolate indulgence in no time. Let’s dive into this dreamy recipe that’s sure to satisfy every chocolate lover’s cravings!
Why You’ll Love This Chocolate Fudge Dream Cake
This Chocolate Fudge Dream Cake is a lifesaver for anyone with a packed schedule. It combines speed and simplicity, allowing you to whip up a delectable dessert in mere minutes. The rich, velvety chocolate flavor will have your taste buds dancing with joy. Plus, you can serve it to guests or family without needing to fuss in the kitchen. It’s the ultimate treat for chocolate lovers, and I’m certain you’ll adore every bite!
Ingredients for Chocolate Fudge Dream Cake
Gathering your ingredients for the Chocolate Fudge Dream Cake is part of the fun! Here’s what you’ll need:
- Chocolate chips: These little morsels bring that rich chocolate flavor. I love using semi-sweet for balance, but feel free to experiment with dark or milk chocolate.
- Sweetened condensed milk: This creamy delight adds that luscious texture and sweetness. It blends beautifully, making everything so easy!
- Butter: A touch of butter enhances the richness of the cake, giving it a lovely silky finish.
- Vanilla extract: Just a teaspoon infuses warmth, elevating the overall flavor. It’s amazing how a simple ingredient like this can make such a difference.
- Powdered sugar: This adds sweetness with a smooth texture. It’s perfect for our no-bake recipe, as it dissolves easily into the mixture.
- Optional toppings: Consider adding nuts or colorful sprinkles for a little extra crunch and flair! Go for chopped walnuts or pecans for an upscale twist or keep it simple with some sprinkles if you’re feeling festive.
If you’re looking for the specific quantities of each ingredient, don’t worry! You can find them neatly listed at the bottom of this article, along with a printable version for your convenience. Let’s get ready to create some chocolate magic!
How to Make Chocolate Fudge Dream Cake
Creating your very own Chocolate Fudge Dream Cake is a breeze, and I’m here to guide you through each step! Let’s get those chocolate cravings satisfied!
Step 1: Combine Ingredients
Start by placing your chocolate chips, sweetened condensed milk, and butter into a saucepan over medium heat. As the heat gently melts these ingredients, stir them together continuously. You’ll witness magic as the mixture transforms into a rich, creamy blend. Trust me, it’s worth the wait to see it go from solid to smooth!
Step 2: Add Flavor
Once everything looks melted and silky, remove the saucepan from the heat. The next step is to add that delightful splash of vanilla extract. Stir it well, allowing the warmth to enhance the flavor. This little step makes a world of difference!
Step 3: Mix in Sweetness
Now, it’s time to sweeten things up! Gradually stir in the powdered sugar until it’s all mixed in beautifully. You want a nice, smooth texture. If the mixture feels too thick, don’t fret! Just add a tiny splash of hot water to loosen it up.
Step 4: Prepare the Dish
It’s time to pour your sumptuous mixture into a greased 8×8 inch baking dish. Make sure to spread it evenly for a beautiful finish. I often use parchment paper for easy lifting later. Just keep it simple, and you’ll have a hassle-free clean-up!
Step 5: Optional Toppings
If you’re feeling creative, this is the moment to sprinkle some joy on top! Consider adding chopped nuts for a delightful crunch or colorful sprinkles for that festive vibe. Let your imagination run wild! It’s all customizable.
Step 6: Chill
Now comes the hardest part: waiting! Cover your baking dish and place it in the refrigerator for at least 1 hour. This chilling time allows your Chocolate Fudge Dream Cake to set just perfectly. Patience will pay off!
Step 7: Serve
After the hour is up, it’s showtime! Remove your cake from the fridge and cut it into delightful squares. Serve these delicious bites to family and friends, or enjoy a piece all to yourself. I won’t tell if you keep it a secret!
Tips for Success
- Be patient when melting chocolate; stir gently to avoid burning.
- Use a rubber spatula to scrape down the sides of the pan for even mixing.
- Let your cake chill thoroughly; this ensures perfect squares when cutting.
- Feel free to customize toppings according to your family’s favorite flavors.
- Store leftovers in an airtight container to keep them fresh for days!
Equipment Needed
- Medium saucepan: Any pot will do, but a non-stick one makes for easy cleaning.
- Spatula or wooden spoon: Use a spatula for smooth mixing; a spoon works too!
- Greased baking dish: An 8×8 inch dish is ideal, but use any similar size.
- Whisk (optional): Handy for thorough mixing, but not necessary!
Variations
- Nutty Delight: Add a mix of your favorite chopped nuts like pecans or almonds for a crunchy texture.
- Minty Fresh: Incorporate peppermint extract instead of vanilla for a refreshing twist, perfect for the holidays!
- Healthier Alternative: Swap in dark chocolate chips and reduce the sugar for a richer, less sweet treat.
- Vegan Version: Use dairy-free chocolate chips and coconut cream in place of sweetened condensed milk.
- Fruity Flavors: Fold in some dried fruits, like cranberries or raisins, for a chewy surprise!
Serving Suggestions for Chocolate Fudge Dream Cake
- Pair with a scoop of vanilla ice cream for a classic dessert combo.
- Serve alongside fresh berries, like strawberries or raspberries, to add a fruity touch.
- A drizzle of chocolate or caramel sauce makes for a stunning presentation.
- Enjoy with a cup of coffee or a glass of milk for a delightful treat.
- Garnish with mint leaves for a pop of color and freshness!
FAQs about Chocolate Fudge Dream Cake
As I share my love for this Chocolate Fudge Dream Cake, I often get asked a few questions. Here are some of the most common ones, just in case they’re on your mind too!
Can I make this cake ahead of time? Yes, you can! This cake keeps well in the refrigerator for up to five days. It’s a perfect make-ahead dessert for busy weeks!
What if I don’t have sweetened condensed milk? If you’re in a pinch, you can make your own by combining evaporated milk with sugar. Just cook them together until thickened, and you’ll have a great alternative!
Can I freeze Chocolate Fudge Dream Cake? Absolutely! Once set, wrap it tightly in plastic wrap and foil before storing in the freezer. Just let it thaw in the fridge when you’re ready to indulge!
What are some good toppings for this cake? The sky’s the limit! You can go classic with whipped cream and chocolate shavings, or mix it up with caramel drizzle or fresh fruit. Have fun with it!
Is this recipe suitable for gluten-free diets? Yes! By using gluten-free chocolate chips and ensuring all other ingredients are gluten-free, you can create a delicious gluten-free version for your loved ones.
Final Thoughts
Making the Chocolate Fudge Dream Cake is more than just baking; it’s about creating joyful moments in the kitchen. This easy recipe lets you express love through delicious treats, perfect for any occasion. With just a few ingredients, you’ll whip up a dessert that delights everyone. Whether it’s a family gathering or a quiet evening treat, this cake brings smiles and satisfaction. So, gather your ingredients, embrace the simplicity, and enjoy the sweet rewards of your chocolate endeavor. Each bite is a reminder that even with a busy life, there’s always time for a little indulgence!
PrintChocolate Fudge Dream Cake
A rich and creamy chocolate fudge cake that’s easy to prepare and perfect for chocolate lovers.
- Prep Time: 15 minutes
- Cook Time: 5 minutes
- Total Time: 1 hour 20 minutes
- Yield: 16 servings 1x
- Category: Dessert
- Method: No-Bake
- Cuisine: American
- Diet: Vegetarian
Ingredients
- 1 cup chocolate chips
- 1 can (14 oz) sweetened condensed milk
- 1/4 cup butter
- 1 teaspoon vanilla extract
- 1 cup powdered sugar
- Optional: nuts or sprinkles for topping
Instructions
- Combine chocolate chips, sweetened condensed milk, and butter in a saucepan over medium heat. Stir until melted and smooth.
- Remove from heat and mix in vanilla extract.
- Gradually stir in powdered sugar until well combined.
- Pour the mixture into a greased 8×8 inch baking dish.
- Optionally, add nuts or sprinkles on top.
- Refrigerate for at least 1 hour until set.
- Cut into squares and serve.
Notes
- Make sure to grease the baking dish well to avoid sticking.
- For a nut-free version, skip the optional nuts.
- This cake can be stored in the refrigerator for several days.
Nutrition
- Serving Size: 1 square
- Calories: 150
- Sugar: 20g
- Sodium: 100mg
- Fat: 6g
- Saturated Fat: 4g
- Unsaturated Fat: 1g
- Trans Fat: 0g
- Carbohydrates: 22g
- Fiber: 1g
- Protein: 2g
- Cholesterol: 15mg