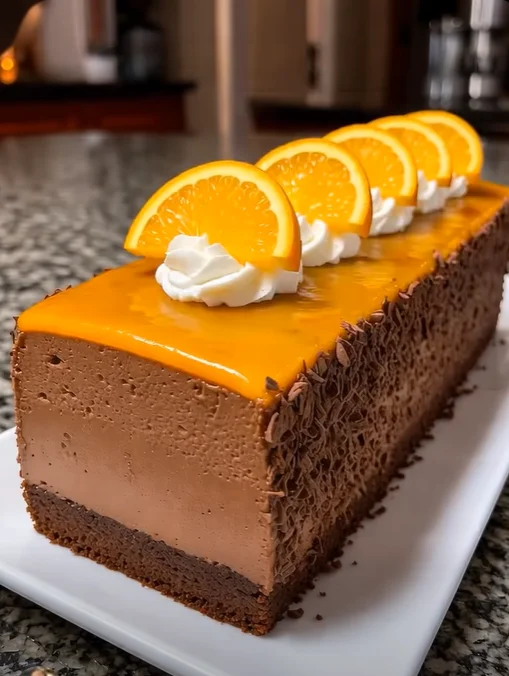
Introduction to Chocolate Orange Mousse Cake
Is there a more delightful way to indulge than with a rich Chocolate Orange Mousse Cake? I certainly think not! This decadent dessert beautifully marries the deep, bittersweet flavors of dark chocolate with the zingy freshness of oranges. Perfect for busy moms and professionals like you, it’s a quick solution after a hectic day. Whether it’s a gathering with loved ones or a simple treat for yourself, this cake promises to impress. I love how effortlessly it comes together, making it a cherished recipe in my kitchen. Let’s dive into this sweet adventure!
Why You’ll Love This Chocolate Orange Mousse Cake
This Chocolate Orange Mousse Cake is a dream come true for busy lives. It comes together in just 15 minutes, so you can whip it up even on the most hectic days. With its divine taste, it’s sure to be a show-stopper at any gathering. Plus, the blend of rich chocolate and citrus will make your taste buds dance. You won’t just be serving dessert; you’ll be serving smiles!
Ingredients for Chocolate Orange Mousse Cake
Making this indulgent Chocolate Orange Mousse Cake is all about using the right ingredients to create a sensational dessert. Here’s what you’ll need:
- Dark chocolate: Opt for high-quality dark chocolate. It’s the heart of this dessert, lending a rich flavor and velvety texture. Your taste buds will thank you!
- Oranges: Fresh oranges bring a zesty kick to the mousse. You’ll use both the zest for a burst of aroma and the juice for that refreshing sweetness.
- Heavy cream: This is what makes our mousse creamy and dreamy! Whipping it to soft peaks adds that luscious mouthfeel. Don’t skimp on quality for the best results.
- Sugar: Just a touch of sugar helps balance the bitterness of the dark chocolate. You can use granulated sugar or even coconut sugar for a twist.
- Vanilla extract: A teaspoon of vanilla extract enhances the overall flavor, tying it all together beautifully. Choose pure vanilla for the richest taste.
- Salt: Just a pinch helps to contrast the sweetness and deepen the chocolate flavor. It’s the secret ingredient that makes everything pop!
For anyone with dietary restrictions, feel free to swap regular sugar with a sugar substitute or experiment with dairy-free chocolate and cream.
Just remember, the exact measurements for these ingredients are listed at the bottom of the article for your convenience. Happy baking!
How to Make Chocolate Orange Mousse Cake
Making this Chocolate Orange Mousse Cake is a delightful journey! Follow these simple steps to create a beautiful dessert that everyone will love. Grab your ingredients and let’s get started!
Step 1: Melt the Chocolate
Melt the dark chocolate carefully to achieve a smooth and silky consistency. You can do this in two ways:
- Microwave: Place the chocolate in a heatproof bowl and microwave on medium power for 30 seconds. Stir, then heat in 15-second intervals until fully melted.
- Double boiler: Fill a pot with simmering water and set a bowl on top. Make sure the bowl doesn’t touch the water. Stir the chocolate until it’s melted and glossy.
Let the melted chocolate cool slightly before moving to the next step. This prevents the whipped cream from melting later.
Step 2: Prepare the Whipped Cream
While the chocolate cools, let’s whip that cream! Start with a chilled bowl and beaters for best results.
- Pour the heavy cream into the bowl, add sugar, salt, and vanilla extract.
- Begin whipping on low speed, gradually increasing to medium until soft peaks form. This means when you lift the beaters, the cream holds its shape but still has a soft texture.
Avoid over-whipping, as it can turn grainy. We want creamy and fluffy here!
Step 3: Combine Chocolate and Orange
Now, let’s bring those flavors together! Take your melted chocolate and mix in the freshly grated orange zest and juice.
- Stir gently to fully combine. The warm chocolate will absorb the fruity aroma, creating a vibrant mix.
- Make sure the orange juice doesn’t splash—it can surprise you!
This combination is where the magic happens. The chocolate and orange duet is simply divine!
Step 4: Fold in Whipped Cream
It’s time to create that airy mousse texture! Take your whipped cream and the chocolate-orange mixture.
- Using a spatula, add about a third of the whipped cream to the chocolate mixture. Gently fold it in to lighten the mix without deflating the cream.
- Once combined, add the remaining whipped cream and fold until no streaks remain. Remember, gentle is the key here!
This step results in a luscious mousse that feels light yet indulgent.
Step 5: Set and Chill
Your mousse is almost ready! Pour the mixture into a prepared cake tin or serving glasses.
- Spread the top evenly with a spatula for a beautiful presentation.
- Refrigerate for at least 15 minutes, though longer is better for the best texture—aim for 30 minutes to an hour.
Patience pays off here. The longer you chill, the more it sets and develops flavors!
And voilà! You have your Chocolate Orange Mousse Cake ready to impress. It’s a treat that promises pure bliss!
Tips for Success
- Always use high-quality dark chocolate for the best taste.
- Chill your mixing bowl and beaters before whipping cream; it makes a world of difference.
- Don’t rush the folding process; go slow to keep that airy texture.
- For added flavor, consider a splash of orange liqueur in the chocolate mixture.
- Use a sharp knife to cut clean slices for presentation.
Equipment Needed for Chocolate Orange Mousse Cake
- Microwave or double boiler: For melting chocolate. If you don’t have a double boiler, a heatproof bowl over a pot of simmering water works perfectly.
- Mixing bowls: Use at least two—a large one for the cream and a smaller one for the chocolate mixture.
- Electric mixer or whisk: An electric mixer saves time, but a whisk gives you some muscle exercise!
- Spatula: Great for folding in the cream and scraping the sides. Silicone is my favorite for flexibility.
- High-quality cake tin or serving glasses: Any shape works—get creative!
Variations of Chocolate Orange Mousse Cake
- Substitute flavors: Experiment with lemon or lime instead of orange for a different zing. Each citrus brings a unique twist!
- Dairy-free option: Use coconut cream and dairy-free chocolate for a vegan delight that everyone can enjoy.
- Gluten-free version: This recipe is naturally gluten-free, so you can indulge worry-free! Just ensure your chocolate is gluten-free.
- Nutty addition: Fold in crushed almonds or hazelnuts for a delightful crunch that complements the mousse’s smoothness.
- Decadent layer: Create layers by adding a thin layer of orange jam between mousse layers for an eye-catching dessert.
Serving Suggestions for Chocolate Orange Mousse Cake
- Pair with a scoop: Serve alongside a refreshing scoop of vanilla or orange sorbet for a delightful contrast.
- Garnish: Top with whipped cream and a sprinkling of orange zest or chocolate shavings for an elegant touch.
- Drink pairing: Enjoy with a glass of dessert wine or a cappuccino to elevate your experience.
FAQs about Chocolate Orange Mousse Cake
Curious about this delightful dessert? Here are some common questions I get when it comes to making a Chocolate Orange Mousse Cake.
Can I make this Chocolate Orange Mousse Cake ahead of time?
Absolutely! This dessert is perfect for preparing a day ahead. Just make sure to keep it covered in the fridge. The flavors meld beautifully overnight!
What can I do if I don’t have dark chocolate?
No worries! You can use semi-sweet chocolate or even milk chocolate, though it will change the flavor and sweetness. Just adjust the sugar accordingly to find your perfect balance.
Can I use bottled orange juice instead of fresh?
I highly recommend using fresh juice and zest for the best flavor. Bottled juice can lack the vibrant taste that fresh oranges bring to this Chocolate Orange Mousse Cake.
Is it possible to make this cake gluten-free?
<pYes! This recipe is naturally gluten-free since it doesn’t use any flour. Just ensure your chocolate is marked gluten-free to be safe for those with allergies!
How long can I store the leftovers?
Any leftovers can be stored in the fridge for up to three days. Just make sure it’s well covered. Though, let’s be honest, it’s hard to have leftovers with this deliciousness!
Final Thoughts
Creating a Chocolate Orange Mousse Cake is more than just following a recipe; it’s about embracing the joy of cooking and sharing that joy with loved ones. Each bite of this luscious cake is a celebration of rich chocolate and vibrant orange, a delightful dance that lights up both the palate and the heart. It’s perfect for any occasion, whether you’re hosting a weekend dinner or indulging in a quiet evening at home. I hope you find as much satisfaction in making and savoring this dessert as I do. Happy baking, my fellow kitchen adventurers!
PrintChocolate Orange Mousse Cake

A rich and creamy dessert that combines the bittersweet flavors of dark chocolate with the zesty freshness of oranges.
- Prep Time: 15 minutes
- Cook Time: 0 minutes
- Total Time: 15 minutes (plus chilling time)
- Yield: Serves 6
- Category: Dessert
- Method: Refrigeration
- Cuisine: Fusion
- Diet: Vegetarian
Ingredients
- 100g dark chocolate
- 2 medium oranges (zest and juice)
- 250ml heavy cream
- 3 tablespoons sugar
- 1 teaspoon vanilla extract
- 1 pinch of salt
Instructions
- Melt the chocolate in a microwave or over a double boiler and let it cool slightly.
- Whip the heavy cream with sugar, vanilla extract, and salt until soft peaks form.
- Add the orange zest and juice to the melted chocolate, mixing well.
- Gently fold the whipped cream into the chocolate mixture until fully combined.
- Pour the mixture into a cake tin and refrigerate for at least 15 minutes to set.
- Serve chilled and enjoy your delicious cake!
Notes
- Use high-quality dark chocolate for the best flavor.
- Chilling the cream and bowl before whipping can enhance the whip volume.
Nutrition
- Serving Size: 1 slice
- Calories: 300
- Sugar: 12g
- Sodium: 60mg
- Fat: 22g
- Saturated Fat: 14g
- Unsaturated Fat: 6g
- Trans Fat: 0g
- Carbohydrates: 30g
- Fiber: 2g
- Protein: 4g
- Cholesterol: 60mg