Introduction to Create Your Own Heavenly Light Cloud Cake
As a busy mom, I know how important it is to whip up something delightful without spending hours in the kitchen. That’s why I absolutely adore my recipe for Create Your Own Heavenly Light Cloud Cake. It’s like a fluffy dream on your plate! Perfect for birthdays, celebrations, or just a sweet treat at the end of the day, this cake is sure to impress family and friends. Plus, it’s simple enough that even your little ones can lend a helping hand. Gather your ingredients, and let’s make some heavenly memories!
Why You’ll Love This Create Your Own Heavenly Light Cloud Cake
This cake is not just a dessert; it’s an experience! You’ll appreciate how easy it is to prepare—a quick 50 minutes from start to finish. The taste? Oh, it’s light and fluffy, with a delightful whipped cream topping that dances on your taste buds. Whether it’s for a family gathering or a cozy weeknight treat, this cake brings joy to any occasion. Trust me; it’s a crowd-pleaser!
Ingredients for Create Your Own Heavenly Light Cloud Cake
Gathering the right ingredients is key to making your Create Your Own Heavenly Light Cloud Cake an absolute hit! Here’s what you’ll need:
- All-purpose flour: This is the foundation of your cake, giving it that light, fluffy texture.
- Granulated sugar: Adds sweetness and helps achieve that perfect crust. Can substitute with coconut sugar for a healthier option.
- Unsalted butter: Keeps the cake moist and adds a rich flavor. Let it soften at room temperature for best results.
- Large eggs: These act as a binder, giving the cake structure. There’s nothing like farm-fresh eggs for that rich golden color!
- Milk: Adds moisture and a little richness. You can replace it with almond or oat milk for a dairy-free version!
- Vanilla extract: Your secret ingredient for that lovely aroma. Pure vanilla is best, but imitation works in a pinch.
- Baking powder: This leavening agent ensures your cake rises beautifully, bringing that light cloud feel.
- Salt: A pinch enhances all the flavors—trust me, don’t skip it!
- Heavy cream: Essential for making whipped topping. Use coconut cream for a vegan twist.
- Powdered sugar: This sweetness will help stabilize your whipped cream and keep it from collapsing.
- Fresh berries: Strawberries, blueberries, or raspberries add color and a burst of freshness on top. Go wild with whatever you love!
- Mint leaves: For garnish and a refreshing touch—just imagine those bright greens against the white cake!
Remember, the exact measurements are at the bottom of the article and available for printing. Happy baking!

How to Make Create Your Own Heavenly Light Cloud Cake
Creating your own heavenly light cloud cake is an adventure filled with fun and flavor. Let’s embark on this baking journey together! Below, I’ll guide you through each step to ensure your cake turns out fluffy and delightful.
Step 1: Beat the Butter and Sugar
Start by grabbing a large mixing bowl. In it, combine softened butter and granulated sugar.
With an electric mixer, beat these together for about 3-5 minutes until the mixture is light and fluffy. This step is crucial; it creates that lovely texture we’re aiming for!
Step 2: Add the Eggs and Vanilla
Now, crack the eggs into a separate bowl, giving them a gentle whisk to break them up. Then, add them one at a time to the buttery mix.
Beating after each addition ensures everything blends smoothly. Don’t forget to include the vanilla extract, adding a hint of warmth and sweetness to your batter.
Step 3: Mix Dry Ingredients
In another bowl, whisk together your dry ingredients—flour, baking powder, and salt. This helps distribute everything evenly.
Then, gradually add this mix to the wet batter. Alternate it with the milk to keep the mixture from becoming too thick.
Step 4: Combine Batter and Pour
Once everything is combined, you’ll have a lovely batter that’s smooth and creamy. It should be quite thick yet easy to pour.
Prepare your greased and floured 9-inch cake pan—pour in the batter gently, making sure it spreads evenly.
Step 5: Bake
Pop the cake into a preheated oven at 350°F (175°C). Bake for about 30 minutes. A toothpick inserted into the center should come out clean when it’s done.
After baking, let the cake cool in the pan for 10 minutes before transferring it to a wire rack. Patience is key here!
Step 6: Prepare the Whipped Cream
While the cake cools, let’s whip up some heavenly cream! In a chilled mixing bowl, add the heavy cream, powdered sugar, and vanilla extract.
Beat until soft peaks form—this will create the perfect topping that is light as a feather!
Step 7: Frost and Garnish
Once your cake is completely cooled, it’s time to frost. Smooth the whipped cream generously over the top. Feel free to get creative!
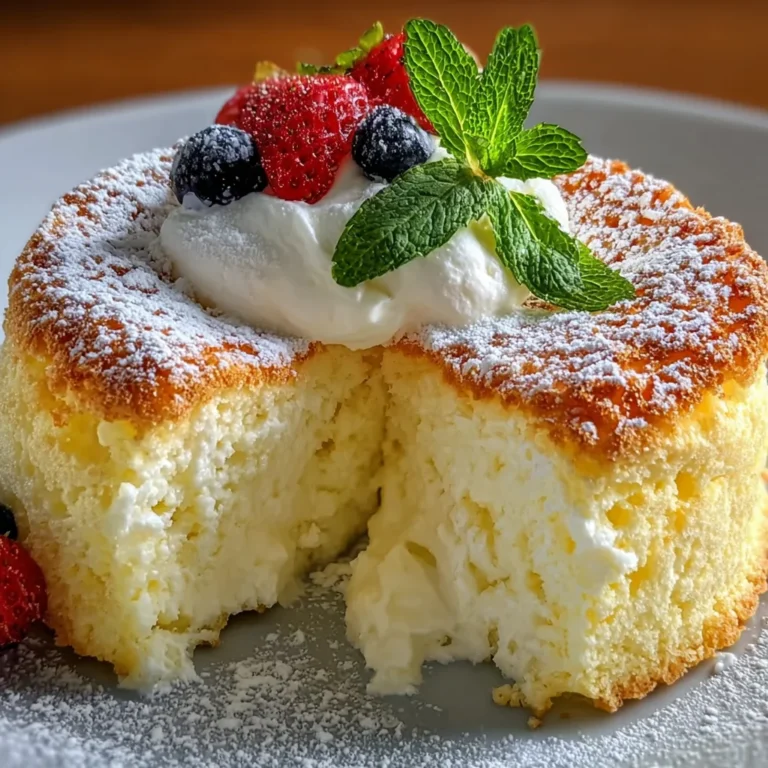
Top it with fresh berries and a sprinkle of mint leaves for a beautiful presentation. Now, slice, serve, and enjoy the praises from your family and friends!
Tips for Success
- Make sure all ingredients are at room temperature; it helps them mix better.
- For a fluffier cake, don’t overmix the batter once you combine the wet and dry ingredients.
- Use a toothpick to check for doneness—if it comes out clean, your cake is ready!
- Chill your mixing bowl for whipped cream; it ensures better peaks.
- Decorate the cake just before serving to keep it fresh and beautiful!
Tips for Success
- Ensure all ingredients are at room temperature for smoother mixing.
- For a fluffier layer, be careful not to overmix after combining wet and dry ingredients.
- Check if the cake is done by inserting a toothpick; it should come out clean.
- Chill your mixing bowl for whipped cream; it helps achieve better peaks!
- Decorate right before serving, keeping it fresh and enticing!
Equipment Needed for Create Your Own Heavenly Light Cloud Cake
- Mixing Bowls: A large bowl for the batter and a medium bowl for whipping cream. Any sturdy bowl will do!
- Electric Mixer: A hand mixer is ideal, but a whisk works if you’re feeling strong!
- Cake Pan: A 9-inch round pan is perfect, but any similar size will work.
- Measuring Cups and Spoons: Essential for accuracy. Use a kitchen scale for a pro touch!
- Wire Rack: A cooling rack helps the cake cool evenly. A plate can work in a pinch!
Variations on Create Your Own Heavenly Light Cloud Cake
- Citrus Twist: Add lemon or orange zest to the batter for a refreshing citrus flavor.
- Chocolate Delight: Mix in 1/2 cup of cocoa powder for a rich chocolate version. Top with chocolate shavings!
- Berry Medley: Use a mix of fresh berries in the batter and on top for a colorful explosion.
- Nutty Addition: Fold in chopped nuts like walnuts or almonds for a delightful crunch.
- Dairy-Free Option: Substitute almond or coconut milk and use coconut cream for the whipped topping.
Serving Suggestions for Create Your Own Heavenly Light Cloud Cake
- Pair slices of cake with a cup of tea or coffee for a cozy afternoon treat.
- Serve alongside a scoop of vanilla ice cream for an indulgent dessert experience.
- Presentation matters! Use a beautiful cake stand and fresh mint leaves for a pop of color.
- For added flair, drizzle with a berry coulis or chocolate sauce.
- Enjoy with a light salad or fresh fruit bowl to balance the sweetness.
FAQs about Create Your Own Heavenly Light Cloud Cake
Can I bake this cake ahead of time? Absolutely! You can bake the cake a day in advance. Just store it wrapped in plastic wrap at room temperature, and frost it just before serving.
What can I substitute for heavy cream? If you’re looking for a lighter option, you can use coconut cream or whipped coconut milk. Both provide a delightful whipped topping!
How can I make this cake gluten-free? You can use a gluten-free all-purpose flour blend as a one-to-one substitute. Just double-check the other ingredients to ensure they’re gluten-free.
Can I use frozen berries instead of fresh? Yes, you can! Just make sure to thaw and drain them before topping your cake, so it doesn’t get too soggy.
Can I add flavorings to the whipped cream? Absolutely! A dash of almond extract or some cocoa powder can elevate your whipped cream to a new level. Get creative!
Final Thoughts on Create Your Own Heavenly Light Cloud Cake
Creating your own heavenly light cloud cake is more than just a cooking task; it’s a joyful experience! From the moment you beat the butter and sugar to the final garnish of fresh berries, this cake brings warmth to any celebration or cozy evening. Each bite offers a soft, sweet explosion that can lift anyone’s spirits, turning an ordinary day into a special occasion. Whether it’s for family gatherings or a sweet treat for yourself, this cake is sure to leave lasting memories. So, roll up your sleeves and let the magic begin!
PrintCreate Your Own Heavenly Light Cloud Cake and Indulge!
A light and fluffy cake topped with a delicious whipped cream, perfect for any occasion.
- Prep Time: 20 minutes
- Cook Time: 30 minutes
- Total Time: 50 minutes
- Yield: 8 servings 1x
- Category: Dessert
- Method: Baking
- Cuisine: American
- Diet: Vegetarian
Ingredients
- 1 cup all-purpose flour
- 1 cup granulated sugar
- 1/2 cup unsalted butter (softened)
- 4 large eggs
- 1/2 cup milk
- 1 teaspoon vanilla extract
- 1 teaspoon baking powder
- 1/4 teaspoon salt
- 1 cup heavy cream
- 2 tablespoons powdered sugar
- 1 teaspoon vanilla extract
- Fresh berries (strawberries, blueberries, raspberries)
- Mint leaves
Instructions
- In a large mixing bowl, beat softened butter and granulated sugar until light and fluffy (3-5 minutes).
- Add eggs one at a time, mixing well after each addition. Stir in vanilla extract.
- In another bowl, whisk together flour, baking powder, and salt. Gradually add to the wet mixture, alternating with milk.
- Grease and flour a 9-inch round cake pan.
- Pour the batter into the prepared pan and bake for 30 minutes, or until a toothpick comes out clean.
- Let the cake cool in the pan for 10 minutes, then transfer to a wire rack to cool completely.
- In a chilled bowl, beat heavy cream with powdered sugar and vanilla extract until soft peaks form.
- Frost the cooled cake with whipped topping and garnish with fresh berries and mint leaves. Slice and enjoy!
Notes
- Ensure all ingredients are at room temperature for better mixing.
- For a richer flavor, you can add lemon or orange zest to the batter.
Nutrition
- Serving Size: 1 slice
- Calories: 250
- Sugar: 20g
- Sodium: 150mg
- Fat: 15g
- Saturated Fat: 9g
- Unsaturated Fat: 5g
- Trans Fat: 0g
- Carbohydrates: 30g
- Fiber: 1g
- Protein: 3g
- Cholesterol: 80mg