
Introduction to Easter Dirt Cake
Spring has a way of making everything blossom, including our appetites for delightful treats! As a mom juggling countless tasks, I often seek recipes that not only satisfy my sweet tooth but also bring joy to my family. Enter the Easter Dirt Cake! This fun and layered dessert is a quick solution for busy days and perfect for spring celebrations. With its creamy filling and vibrant toppings, it’s bound to impress your loved ones. Trust me, this delightful dessert will have everyone asking for seconds while you bask in the joy of making lasting memories.
Why You’ll Love This Easter Dirt Cake
This Easter Dirt Cake is the ultimate blend of ease and taste. Its no-bake method means you can quickly whip it up, freeing your time for more spring festivities. The rich chocolatey layers combined with a creamy filling make it irresistibly delicious. Plus, it brings a playful twist to dessert that kids and adults alike adore. Get ready to enjoy a sweet treat that’s as fun to make as it is to eat!
Ingredients for Easter Dirt Cake
To create this mouthwatering Easter Dirt Cake, you’ll need a variety of ingredients that come together in perfect harmony. Here’s what you’ll need:
- Chocolate Sandwich Cookies: The foundation of our dessert, these cookies add a rich chocolate flavor and create a delightful crunch.
- Unsalted Butter: Softened butter helps to bring richness to the cream cheese filling, making it luscious and creamy.
- Cream Cheese: This gives the filling its smooth texture and tangy flavor that balances out the sweetness.
- Powdered Sugar: For sweetness, powdered sugar dissolves easily into the filling, ensuring a perfectly silky mixture.
- Instant Vanilla Pudding Mix: This thickens the filling while adding a delightful vanilla flavor that complements the chocolate.
- Cold Milk: Essential for activating the pudding mix, cold milk helps achieve that thick and creamy consistency.
- Whipped Topping: Thawed whipped topping, like Cool Whip, adds lightness and fluffy texture to the cream mixture.
- Pastel Easter Candy Eggs: These vibrant candies not only look cute but also add a fun, crunchy element to the cake.
- Mini Marshmallows: These sweet fluffy bits bring additional texture and a burst of sweetness.
- Pastel Sprinkles: Perfect for adding a festive pop of color and finishing touch to your dessert.
- Extra Crushed Cookies: A topping made from crushed cookies to finish your cake with that iconic dirt look.
- Gummy Worms (optional): For added fun, these are a whimsical touch that kids will absolutely love!
For exact quantities, you can refer to the bottom of this article where they are available for printing. With these ingredients at your fingertips, you’re set to create a dessert that’s not just beautiful, but oh-so-delicious!
How to Make Easter Dirt Cake
Making this delightful Easter Dirt Cake is an adventure in itself. The process is simple, and each step leads you closer to a springtime treat that everyone will love. Let’s dive into the details!
Step 1: Prepare the Cookie Crust
First, grab your chocolate sandwich cookies! Place them in a food processor and pulse until you get mostly fine crumbs. Leave a few larger pieces for that delightful texture. If you don’t have a food processor, a rolling pin works well too. Just place the cookies in a sealed bag and give them a good whack!
Step 2: Mix Cream Cheese Filling
In a large mixing bowl, beat softened butter and cream cheese together using an electric mixer. You want it nice and smooth. Once combined, gradually add in powdered sugar. Mix until everything is fluffy and well blended, creating that deliciously creamy filling.
Step 3: Prepare the Pudding Mixture
In a separate bowl, whisk together instant vanilla pudding mix and cold milk. Keep whisking until it thickens. This will take about two to three minutes. Don’t rush this step; it’s essential for that perfect creamy layer that will elevate your Easter Dirt Cake!
Step 4: Combine Mixtures
Now, it’s time to combine the two mixtures! Gently fold the thick pudding into your creamy cream cheese mixture until smooth. Then, add in the thawed whipped topping. Fold that in as well, making sure it’s light and airy. Avoid over-mixing; we want a beautiful fluffy filling!
Step 5: Layer the Cake
Grab a clear 9×13-inch glass dish to showcase those layers! Start by adding a layer of crushed cookies at the bottom. Next, spread half of your cream mixture over the top. Repeat this layering process until you finish with a layer of cookie crumbs on top. Isn’t it looking fabulous already?
Step 6: Decorate
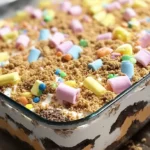
Now comes the fun part – decoration! Top your cake with pastel candy eggs, mini marshmallows, and a sprinkle of colorful sprinkles. Add extra cookie crumbs for that dirt look, and for a whimsical touch, toss in gummy worms if you like. It’s all about having fun with this dessert!
Step 7: Chill the Cake
Finally, cover your delightful creation and place it in the fridge for at least two hours. This chilling time is crucial. It allows the layers to meld together, enhancing that creamy texture. Trust me, patience will pay off when you take that first delicious bite!
Tips for Success
- Always use softened cream cheese for easy mixing and a smooth texture.
- Consider chilling your mixing bowls and beaters for a fluffier cream cheese filling.
- Layer your cake in a clear dish to show off those beautiful layers.
- If you’re adding gummy worms, place them just before serving for a fresher look.
- Prepare the Easter Dirt Cake a day ahead for even better flavor and convenience!
Equipment Needed
- Food Processor: Perfect for crushing cookies; a rolling pin and sealed bag work too.
- Mixing Bowls: Use large bowls for mixing the cream cheese and pudding mixtures.
- Electric Mixer: Helps achieve a smooth and fluffy filling; a whisk is a good alternative.
- 9×13-inch Glass Dish: Ideal for showcasing layers; any clear dish will work.
- Spatula: Essential for folding in mixtures and serving up the delicious cake!
Variations of Easter Dirt Cake
- Gluten-Free Version: Use gluten-free chocolate sandwich cookies to keep this dessert safe for those with gluten sensitivities.
- Chocolate Pudding Twist: Swap out the vanilla pudding mix for chocolate pudding for an extra chocolatey experience!
- Fruit Additions: Mix in fresh berries like strawberries or raspberries for a fruity surprise in your layers.
- Nutty Flavor: Add crushed nuts, like walnuts or pecans, between the layers for a delightful crunch.
- Dairy-Free Option: Substitute the cream cheese with a dairy-free cream cheese and use coconut whipped cream to create a luscious filling.
Serving Suggestions for Easter Dirt Cake
- Pair your Easter Dirt Cake with a refreshing fruit salad for a light contrast.
- Serve alongside a dollop of whipped cream for extra indulgence.
- Complement it with sweet iced tea or a fruity lemonade to balance the dessert’s richness.
- Present in clear cups for individual servings, perfect for gatherings.
- Add fresh spring flowers on the table for a beautiful springtime feel!
FAQs about Easter Dirt Cake
Can I make Easter Dirt Cake ahead of time?
Absolutely! In fact, making it a day in advance allows the layers to set and enhances the flavors. Just store it in the fridge until you’re ready to serve.
How long does Easter Dirt Cake last in the fridge?
This tempting dessert can last up to four days when stored in an airtight container in the refrigerator. It’s perfect for enjoying throughout the week!
Can I customize the toppings on my Easter Dirt Cake?
Yes, the topping possibilities are endless! Use your favorite candies, fruits, or even nuts to put a personal spin on this fun dessert. Get creative!
Can I use different pudding flavors for the filling?
Definitely! While vanilla is classic, chocolate or even butterscotch pudding can offer unique flavor profiles that are just as delicious.
Is Easter Dirt Cake suitable for kids?
If you’re looking for a fun dessert for the little ones, this one is a hit! With its playful presentation and sweet flavors, it’s sure to be a favorite for kids and adults alike.
Final Thoughts
Making this Easter Dirt Cake is more than just following a recipe; it’s about creating joyful memories with your loved ones. Each layer reflects the playful spirit of spring, bringing smiles at every gathering. This no-bake dessert is not just delicious—it’s a canvas for your creativity and a reminder that the simplest treats often bring the most happiness. So, gather your family, get everyone involved, and enjoy the delightful process. After all, life is sweet, and with this Easter Dirt Cake, you’ll be serving up smiles one layered slice at a time!
PrintEaster Dirt Cake: A Fun Recipe for Spring Treats!
Easter Dirt Cake is a fun and delicious layered dessert perfect for spring celebrations, featuring a creamy filling and vibrant toppings.
- Prep Time: 30 minutes
- Cook Time: 0 minutes
- Total Time: 2 hours 30 minutes
- Yield: 12 servings 1x
- Category: Dessert
- Method: Layering and Refrigeration
- Cuisine: American
- Diet: Vegetarian
Ingredients
- 1 (14.3 oz) package chocolate sandwich cookies, crushed
- ½ cup unsalted butter, softened
- 8 oz cream cheese, softened
- 1 cup powdered sugar
- 2 (3.4 oz) boxes instant vanilla pudding mix
- 3 cups cold milk
- 1 (8 oz) whipped topping (such as Cool Whip), thawed
- 1 cup pastel Easter candy eggs
- 1 cup mini marshmallows
- ½ cup pastel sprinkles
- Extra crushed cookies for topping
- Gummy worms (optional)
Instructions
- Place the chocolate sandwich cookies in a food processor and pulse until mostly fine crumbs form. Leave a few slightly larger pieces for texture. Set aside.
- In a large mixing bowl, beat the softened butter and cream cheese together until smooth. Add powdered sugar and mix until fluffy.
- In a separate bowl, whisk together the instant vanilla pudding mix and cold milk until thickened. Let it sit for 2-3 minutes.
- Gently fold the pudding into the cream cheese mixture until smooth, then fold in the thawed whipped topping.
- In a clear 9×13-inch glass dish, layer crushed cookies, followed by the cream mixture, and repeat layers, finishing with cookie crumbs on top.
- Decorate with pastel candy eggs, mini marshmallows, sprinkles, and extra cookie crumbs. Add gummy worms if desired.
- Refrigerate for at least 2 hours before serving.
Notes
- Using a food processor makes crushing the cookies easier, but a rolling pin works too.
- Allowing the cake to chill is essential for the best texture.
- This dessert can be made a day in advance for convenience.
Nutrition
- Serving Size: 1 slice
- Calories: 300
- Sugar: 20g
- Sodium: 200mg
- Fat: 15g
- Saturated Fat: 8g
- Unsaturated Fat: 7g
- Trans Fat: 0g
- Carbohydrates: 40g
- Fiber: 1g
- Protein: 3g
- Cholesterol: 30mg