
Introduction to Halloween Oreo Cake Bars
Are you looking for a fun and festive treat that will wow your family this Halloween? Look no further than these delightful Halloween Oreo Cake Bars! As a busy mom, I know how important it is to whip up something quick yet impressive.
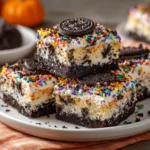
These irresistible bars combine moist cake with the classic crunch of Oreos, making them a perfect addition to any spooky celebration. With minimal prep and a burst of flavor, they’re an easy solution for your next gathering. Get ready to bring smiles to your loved ones’ faces with this simple, yet delectable dessert!
Why You’ll Love This Halloween Oreo Cake Bars
These Halloween Oreo Cake Bars are the ultimate dessert for busy lifestyles! They require just a handful of ingredients and minimal prep time. Whether you’re hosting a Halloween party, or just craving something sweet, these bars deliver vibrant flavor and satisfying texture in every bite. Plus, they’ll make your kitchen smell heavenly! Who can resist the delightful combination of cake and Oreos during the festive season?
Ingredients for Halloween Oreo Cake Bars
To make these festive Halloween Oreo Cake Bars, you’ll need a few essential ingredients. Each one contributes uniquely to the deliciousness of this treat. Here’s what you’ll need:
- French Vanilla Cake Mix: This serves as the base of your cake bars. Its sweet, creamy flavor is perfect for a delightful dessert.
- Whole Milk: Adds moisture and richness, enhancing the cake’s texture and flavor. You can substitute with almond milk if needed!
- Vegetable Oil: This ingredient keeps the cake bars moist and tender. It’s a must for that delightful softness.
- Large Eggs: They bind the mixture together and add a fluffiness to the cake. For a vegan option, flaxseed eggs work well!
- Halloween Sprinkles: Not just for decoration, they add a playful touch and a bit of crunch to the cake. Feel free to use as many as you like to suit your festive spirit!
- Halloween Oreo Cookies: The star of this recipe! Their chocolatey crunch perfectly complements the vanilla cake. You can use the classic Oreos if Halloween-themed ones aren’t available.
For exact quantities, check the end of the article where you can find a detailed ingredient list for printing. Let your creativity run wild with this recipe; it’s all about making it enjoyable!

How to Make Halloween Oreo Cake Bars
Making these Halloween Oreo Cake Bars is a breeze! Follow my simple steps to ensure delicious results every time. Let’s get started!
Preheat Your Oven and Prepare the Pan
First things first, preheat your oven to 350°F. A properly heated oven is crucial for even baking.
While it warms up, grab a 9×13″ baking dish and line it with parchment paper. This little trick prevents the bars from sticking and makes cleanup a snap.
Mix Together Your Ingredients
In a large mixing bowl, combine the cake mix, whole milk, vegetable oil, and eggs. You don’t need to break a sweat here; just use an electric mixer to blend everything until it’s fully incorporated.
Your batter should be thick and creamy, like a sweet cloud of goodness ready to rise!
Add the Halloween Spirit with Sprinkles
Now, it’s time to add some festive flair! Gently fold in half of your Halloween sprinkles into the batter.
These tiny bursts of color not only enhance the look but add a subtle crunch. Your bars will be dancing in joy with every bite!
Create the Cookie Layers
Let’s get to the fun part—layering!
Sprinkle half of the coarsely chopped Oreos into the bottom of your prepared baking dish. This creates a delicious contrast with the fluffy cake. Layering is key to achieving the creamy and crunchy textures that make these bars irresistible.
Pour and Spread the Batter
Carefully spoon the batter over the Oreos. It might be thick, but that’s just how we like it!
To ensure even baking, spray an offset spatula with nonstick spray.
Gently smooth the batter out until it fills the pan. This little trick helps spread without making a mess!
Top and Bake
Now, let’s add the finishing touches! Sprinkle the remaining Halloween sprinkles over the batter.
Then, scatter the rest of the chopped Oreos on top. Press them gently into the batter—this ensures they stick while baking.
Bake for about 20-25 minutes. You’ll know they’re done when a toothpick inserted into the center comes out clean. Keep your eyes peeled; the smell will make it tempting to dive in early!
Cool and Cut
Once they’re baked to perfection, let the bars cool completely in the pan.
This step is super important for clean cuts later on! Once cooled, slice them into squares of joy. You can already feel the excitement in the air as you prepare to serve these delightful treats!
Tips for Success
- Always preheat your oven for even baking.
- Measure your ingredients accurately for the best texture.
- Let the cake bars cool completely before cutting.
- Use nonstick spray on utensils to avoid sticking.
- Feel free to experiment with sprinkles or cookie layers!
- Store leftovers in an airtight container to keep them fresh.
Equipment Needed for Halloween Oreo Cake Bars
- 9×13″ Baking Dish: A glass or metal pan works great!
- Parchment Paper: For easy removal, but aluminum foil could work in a pinch.
- Electric Mixer: A hand mixer is handy; a whisk will do too!
- Offset Spatula: For spreading batter, or use a regular spatula.
Variations of Halloween Oreo Cake Bars
- Chocolate Cake Mix: Switch the French vanilla cake mix for a chocolate one for an extra chocolaty treat.
- Gluten-Free Option: Use a gluten-free cake mix to cater to gluten-sensitive friends and family!
- Nutty Crunch: Add chopped nuts, like pecans or walnuts, for an extra texture contrast.
- Candy Corn Surprise: Toss in some candy corn along with the sprinkles for seasonal sweetness.
- Dairy-Free Alternative: Substitute the whole milk with coconut or almond milk and use a dairy-free cake mix.
- Limit the Sugar: Consider using sugar-free cake mix and Oreos for a lighter option without sacrificing flavor.
Serving Suggestions for Halloween Oreo Cake Bars
- Pair these scrumptious bars with a scoop of vanilla ice cream for a delightful contrast.
- Serve them alongside pumpkin spice lattes for a cozy fall treat.
- For presentation, arrange bars on a festive platter adorned with Halloween-themed decorations.
- Drizzle with chocolate or caramel sauce for an added touch of indulgence.
FAQs about Halloween Oreo Cake Bars
As you prepare to whip up these delightful Halloween Oreo Cake Bars, you might have a few questions. I’m here to help clear things up!
Can I use different flavors of cake mix?
Absolutely! While this recipe shines with French vanilla, you can easily swap it for chocolate or even funfetti cake mix. Be adventurous with your flavors!
How should I store leftover bars?
Store your Halloween Oreo Cake Bars in an airtight container at room temperature for up to three days. If you want them to last longer, pop them into the fridge for about a week!
Can I make these bars gluten-free?
Yes! By using a gluten-free cake mix, you can easily make these sweet treats gluten-free without losing any deliciousness.
Can I add frosting on top?
Of course! A drizzle of chocolate or cream cheese frosting will elevate these bars even further. They’re already so tasty, but a little extra sweetness might just make them irresistible!
What’s the best way to cut these bars for serving?
Make sure the bars are completely cool before cutting! Use a sharp knife to get clean cuts, and wipe the blade between cuts to keep your edges nice.
Final Thoughts
Creating these Halloween Oreo Cake Bars has been a delightful journey filled with joy and excitement! The simple process, combined with the festive flavors, makes them a go-to recipe for any busy household. Not only do these bars put a smile on faces, but they also warm hearts as you gather around to enjoy them. They’re a sweet reminder that even in our busy lives, we can carve out moments of happiness with family and friends. So, dust off that apron, gather your loved ones, and let the magic of these treats fill your home this Halloween!
PrintHalloween Oreo Cake Bars
A delightful Halloween-inspired dessert with layers of cake and Oreos, perfect for festive celebrations.
- Prep Time: 15 minutes
- Cook Time: 25 minutes
- Total Time: 40 minutes
- Yield: 12 servings 1x
- Category: Dessert
- Method: Baking
- Cuisine: American
- Diet: Vegetarian
Ingredients
- 2 boxes French Vanilla Cake Mix
- 1/2 cup Whole Milk
- 1/2 cup Vegetable Oil
- 2 Large Eggs
- 1 cup Halloween Sprinkles, divided
- 1 package (1 lb. 4 oz) Halloween Oreo cookies, coarsely chopped, divided
Instructions
- Preheat oven to 350F. Line a 9×13″ baking dish with parchment paper.
- In a large mixing bowl, combine cake mixes, milk, oil, and eggs. Use an electric mixer to beat until fully incorporated. The batter will be thick.
- Add 1/2 cup of sprinkles to the batter, mixing to combine.
- Sprinkle half of the chopped Oreos into the bottom of the prepared baking dish.
- Carefully spoon the batter over the chopped Oreos. Spray an offset spatula with nonstick spray and gently smooth the batter out until it fills the pan.
- Sprinkle remaining Halloween sprinkles over the batter.
- Add remaining chopped Oreos to the top of the batter, and use your fingers or spatula to press the cookies gently into the batter.
- Bake for 20-25 minutes, or until a toothpick inserted in the center comes out clean.
- Allow bars to cool completely before cutting and serving.
Notes
- Make sure to let the bars cool completely for clean cuts.
- Feel free to adjust the amount of Halloween sprinkles to your liking.
Nutrition
- Serving Size: 1 bar
- Calories: 220
- Sugar: 18g
- Sodium: 200mg
- Fat: 10g
- Saturated Fat: 1.5g
- Unsaturated Fat: 8.5g
- Trans Fat: 0g
- Carbohydrates: 30g
- Fiber: 1g
- Protein: 2g
- Cholesterol: 30mg