Introduction to Lemon Pizza
Picture this: a colorful pizza that’s not just a feast for the eyes but also a delightful surprise for your taste buds. Enter Lemon Pizza, my secret weapon for those chaotic weeknights when time is short, but I still crave something special. This vibrant dish brings together the crispy, comforting essence of pizza with a zesty twist that makes my family perk up at the dinner table. It’s a breath of fresh air, perfect for busy moms like us who want to impress our loved ones without stressing in the kitchen. Let’s slice into this culinary adventure!
Why You’ll Love This Lemon Pizza
What’s not to adore about Lemon Pizza? It comes together quickly, making it a lifesaver on those hectic nights. The zesty lemon brine brings a refreshing contrast to the gooey cheese, adding an unexpected pop of flavor. Plus, who can resist a dish that feels fancy but is simple enough to whip up in just thirty minutes? It’s a delicious way to get the family excited about dinner while keeping my sanity intact!

Ingredients for Lemon Pizza
Gathering your ingredients for Lemon Pizza is half the fun! You’ll need a vibrant mix of basics and fresh flavors to create this culinary masterpiece.
- Easy pizza dough: You can use homemade or grab some store-bought dough for the ultimate convenience.
- Extra virgin olive oil: This adds a rich flavor and helps the crust crisp up beautifully.
- Water: A simple addition that helps in dough prep.
- Fresh parsley: Chopped parsley adds freshness and a pop of color to your pizza.
- Garlic: Freshly grated garlic infuses the dish with an aromatic zing.
- Lemon zest: This delightful addition packs a citrus punch, brightening every bite.
- Lemon juice: Both for the brine and to finish the pizza, enhancing that lemony flavor.
- Fine salt: Just a touch to elevate the flavors of your ingredients.
- Black pepper: Freshly cracked adds a warm kick to the dish.
- Fresh mozzarella: Essential for that melty, gooey goodness, providing a creamy contrast.
- Grated parmesan cheese: Adds a salty, nutty flavor that finishes off the pizza perfectly.
- Chili flakes: Optional, if you want to add a hint of heat for excitement.
Don’t forget, exact measurements for all these ingredients are ready for you at the bottom of the article for easy printing. Happy cooking!
How to Make Lemon Pizza
Creating your own Lemon Pizza might sound like an expert’s task, but trust me, it’s a quick and rewarding journey! Let’s roll up our sleeves and dive into this colorful culinary adventure that’s bursting with flavor.
Step 1: Prepare Your Dough
Whether you’re using homemade or store-bought dough, make sure it’s at room temperature. If it’s cold, your pizza won’t puff up as nicely. Preheat your oven to a high temperature, ideally around 475°F. This helps ensure a crispy crust. I find that giving the dough a little love by kneading it just makes it happy!
Step 2: Get Your Cheese Ready
If you’re opting for fresh mozzarella, cut it into slices about half an inch thick. If it’s packed in water, give it a little pat-down with a paper towel to avoid a soggy pizza. Nobody wants that! The mozzarella adds that delicious creaminess we all crave on a pizza.
Step 3: Shape the Dough
Now comes the fun part! Place your dough onto a sheet of parchment paper. Start pressing it from the center outwards with your fingers, shaping it into a rectangular pizza about 9 by 13 inches. Don’t worry if it’s not perfectly uniform; a little rustic charm adds to the appeal! Transfer it gently to a pizza peel or the back of an upside-down baking sheet.
Step 4: Make the Zesty Brine
In a glass jar, combine olive oil, water, chopped parsley, grated garlic, lemon zest, lemon juice, salt, and pepper. This zesty brine is the star of your pizza! Give it a good shake until all the ingredients meld together. You’ll love how the fresh aromas fill your kitchen!
Step 5: Add Toppings and Bake
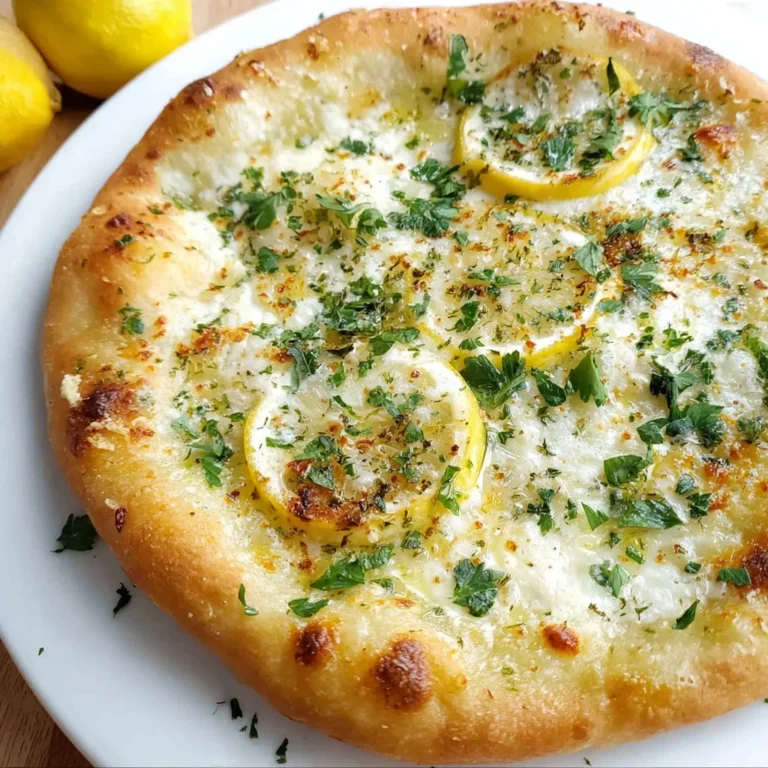
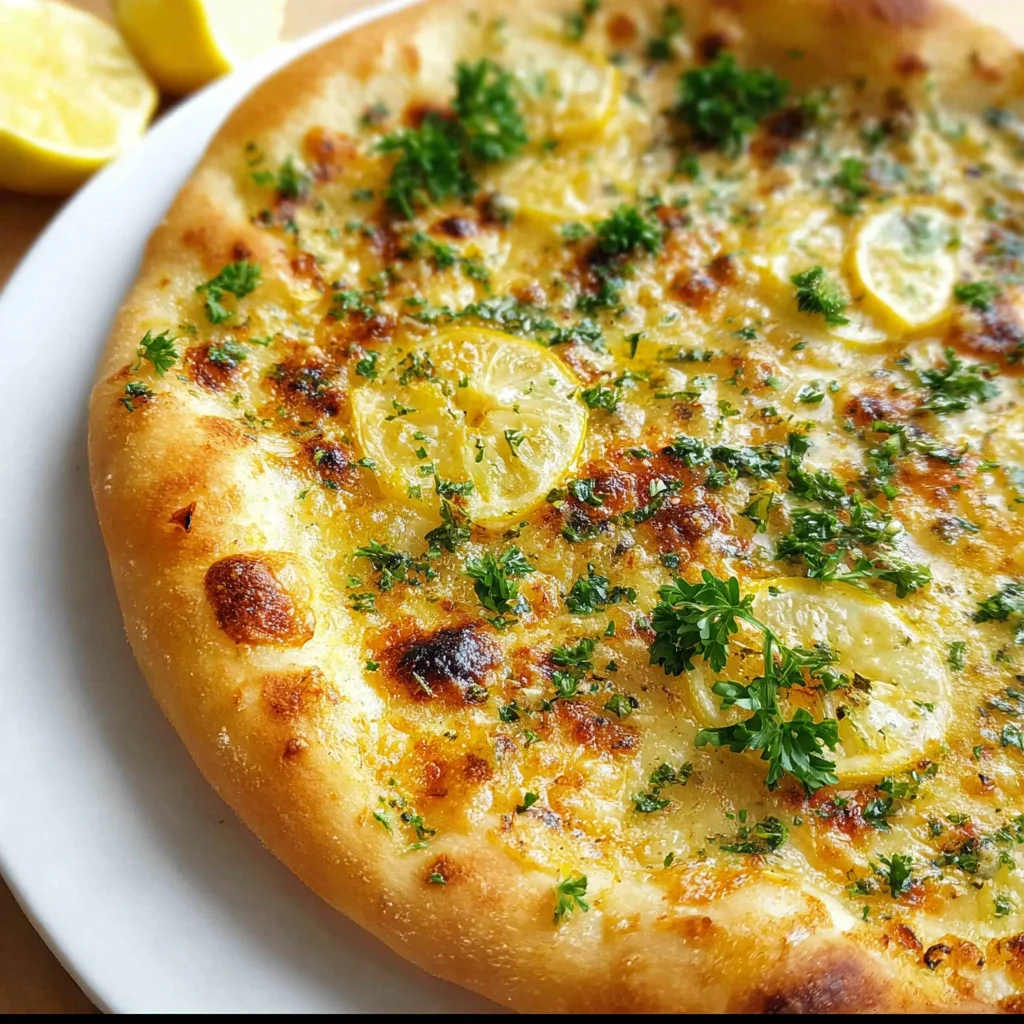
With your dough stretched and ready, create a few dimples by gently pressing your fingers into the surface. Drizzle that fabulous brine all over the pizza, letting it fill those dimples. Scatter the mozzarella pieces evenly across the top. Carefully slide your pizza onto the preheated pizza stone or your baking sheet. Bake until the cheese is bubbly and the crust is golden, typically about 8 to 10 minutes.
Step 6: Finish and Serve
Your Lemon Pizza is almost complete! Once out of the oven, drizzle a little extra lemon juice on top. Sprinkle with grated parmesan and fresh parsley. Feel free to add a dash of black pepper or chili flakes if you’re feeling daring! Slice it up and serve immediately. Trust me; it’ll disappear fast!
Tips for Success
- Use a pizza stone for an extra crispy crust. Preheat it to get that perfect bake.
- Don’t rush the dough! Let it rest at room temperature for about 30 minutes before shaping.
- For extra flavor, let the brine sit for a few minutes to allow the garlic and lemon to infuse.
- Experiment with different cheeses like goat cheese for a unique twist on your Lemon Pizza.
Equipment Needed for Lemon Pizza
- Pizza Stone: Ideal for crispy crust; a baking sheet turned upside down works too.
- Pizza Peel: Helps transfer pizza easily; you can use the back of a rimmed baking sheet.
- Glass Jar: Perfect for mixing your brine; any covered container will do.
- Parchment Paper: Prevents sticking; aluminum foil is a practical alternative.
- Knife and Cutting Board: For slicing cheese and pizza; any cutting surface will suffice.
Variations of Lemon Pizza
- Herbed Lemon Pizza: Add fresh herbs like thyme or basil to the brine for an aromatic twist.
- Veggie Delight: Top with grilled zucchini, bell peppers, or cherry tomatoes for added color and nutrients.
- Protein-Packed: Include grilled chicken or shrimp for a heartier meal that satisfies.
- Gluten-Free Option: Use a gluten-free pizza crust to accommodate dietary needs without sacrificing flavor.
- Spicy Lemon Pizza: Add sliced jalapeños or a drizzle of spicy oil for a fiery kick that complements the lemon.
- Cheesy Lemon Pizza: Mix in a variety of cheeses like ricotta or feta for a creamy, decadent topping.
Serving Suggestions for Lemon Pizza
- Side Salad: Pair with a light arugula or mixed greens salad dressed in a lemon vinaigrette.
- Refreshing Beverage: Enjoy with a cool glass of sparkling water or a crisp white wine like Sauvignon Blanc.
- Presentation: Slice and serve on a wooden board, garnished with lemon wedges for a fresh look.
- Dipping Sauce: Offer a side of garlic aioli for a flavorful complement to each slice.
FAQs about Lemon Pizza
Can I use store-bought pizza dough for Lemon Pizza?
Absolutely! Store-bought dough is a great time-saver. Just follow the shaping instructions and you’ll be ready to bake.
What if I don’t have fresh mozzarella?
No worries! You can use shredded firm mozzarella instead. It’ll still give you that lovely melty texture we all love.
How do I store leftover Lemon Pizza?
Wrap it tightly and keep it in the fridge for up to one day, or freeze it for up to three months. Simply reheat in the oven to keep it crispy!
Can I add other toppings to my Lemon Pizza?
Definitely! Feel free to experiment with toppings like grilled veggies, meats, or even different cheeses. The zesty lemon flavor works well with many combinations!
Is Lemon Pizza suitable for vegetarian diets?
Yes, Lemon Pizza is vegetarian! Just be sure that your cheese options are suited for your dietary preferences. Enjoy the fresh, citrusy delight!
Final Thoughts
When life gets hectic, Lemon Pizza is my vibrant escape into culinary joy. With its bright flavors and quick prep, it reminds me that cooking can be about delight, not just duty. Every slice delivers a burst of zesty goodness, instantly lifting spirits around the table. This pizza isn’t just a dish; it’s a memory-maker, bringing laughter and satisfaction to every gathering. So, whether it’s a simple weeknight dinner or a special occasion, let this delightful recipe bring a little sunshine into your kitchen. Trust me, it’s a delightful twist on tradition that everyone will love!
PrintLemon Pizza: Discover This Refreshing Twist on Tradition!

A refreshing twist on classic pizza featuring a zesty lemon brine and topped with mozzarella and parmesan.
- Prep Time: 20 minutes
- Cook Time: 10 minutes
- Total Time: 30 minutes
- Yield: 2 servings 1x
- Category: Main Course
- Method: Baking
- Cuisine: Italian
- Diet: Vegetarian
Ingredients
- 1 ball Easy pizza dough (or store-bought dough)
- 2 tablespoons extra virgin olive oil
- 1 tablespoon water
- 1 tablespoon fresh parsley, chopped
- 1 small garlic clove, grated
- 1 teaspoon lemon zest
- 1 teaspoon lemon juice
- ¼ teaspoon fine salt
- ¼ teaspoon black pepper
- 5 oz (150 grams) fresh mozzarella (or ½ to ⅓ cup shredded firm mozzarella)
- 1 tablespoon lemon juice (for finishing)
- 2 tablespoons grated parmesan cheese
- 1 tablespoon fresh parsley (for finishing)
- Freshly ground black pepper, to taste
Instructions
- Follow the easy no-knead pizza recipe through step 5, including shaping the pizza and preheating the oven.
- Prepare the cheese: If using fresh mozzarella cheese in water, cut it into ½ inch thick pieces. If it’s very watery, you may want to dab the mozzarella with a paper towel to remove excess moisture.
- Shape the dough: when the dough is ready, place the dough on a parchment paper sheet and starting from the center, gently press it out with your fingers until you get approximately a 9×13 inch pizza. Then gently place the dough onto a pizza peel or onto the back of a rimmed baking sheet.
- Make the brine: Add the ingredients to a glass jar with a lid. Shake until well emulsified.
- Add the topping: Once the dough is stretched out, make a few dimples with your fingers, scatter the brine evenly over the dough, trying to fill the dimples with it. Add the mozzarella cheese.
- Bake the pizza: use the pizza peel to carefully transfer the pizza onto the preheated pizza stone. Bake the pizza until the cheese and crust are nicely browned. Each oven is different; keep an eye on it (e.g. in a forced fan oven it will take about 8-10 minutes).
- Serve: Top your freshly baked pizza with the fresh lemon juice, then sprinkle the parmesan cheese and the parsley. Finish with more black pepper or a touch of chili flakes if you like. Slice and serve immediately.
Notes
- Each oven usually has a rimmed baking sheet that you can invert and place on the lowest shelf of your oven before you preheat it. When the baking sheet is right-side up, taking the pizza in and out of the oven will be easier, and the preheated baking sheet will make a nice and crisp pizza crust. To bake your pizza, place pizza and parchment paper on a pizza peel on the back of a baking sheet. When it’s time to bake, slide the pizza onto the hot, inverted baking sheet and bake until golden and crispy.
- Cover leftover pizza tightly and store in the refrigerator for up to 1 day or freeze for up to 3 months. Thaw and reheat in the oven until nice and crispy.
Nutrition
- Serving Size: 1 slice
- Calories: 250
- Sugar: 1g
- Sodium: 400mg
- Fat: 12g
- Saturated Fat: 4g
- Unsaturated Fat: 6g
- Trans Fat: 0g
- Carbohydrates: 30g
- Fiber: 2g
- Protein: 10g
- Cholesterol: 15mg