Introduction to Little Debbie Christmas Tree Cheesecake
Ah, the holiday season! A time filled with joy, laughter, and of course, delicious treats that bring back childhood memories. One treat that always made my heart flutter was the Little Debbie Christmas Tree Cakes. Imagine turning that whimsy into a mouthwatering dessert! That’s exactly what this Little Debbie Christmas Tree Cheesecake does. It’s creamy, festive, and oh-so-delightful, making it perfect for gatherings with family and friends. If you’re a busy mom or professional like me, you’ll appreciate how easy this cheesecake is to whip up, allowing you more time to enjoy the sweet moments of the season.
Why You’ll Love This Little Debbie Christmas Tree Cheesecake
This Little Debbie Christmas Tree Cheesecake is a holiday miracle that brings together nostalgia and indulgence in one fabulous bite. It’s simple enough that even a busy mom can tackle it after a long day. Plus, the flavors will wow your family and friends, making you the star of the dessert table. Each slice is creamy, rich, and reminiscent of those delightful little cakes we all adore. Trust me; this is a festive treat you don’t want to miss!
Ingredients for Little Debbie Christmas Tree Cheesecake
Gathering your ingredients is the first joyful step in creating this delightful cheesecake. You’ll need graham cracker crumbs for a buttery, crunchy base that contrasts beautifully with the creamy filling. Melted butter will hold it all together like a warm hug on a cold day.
For the heart of the cheesecake, cream cheese is crucial—it gives that rich, smooth texture we all love. Granulated sugar adds sweetness, while all-purpose flour helps stabilize the filling. Antique vanilla extract is a must for that warm, comforting aroma. Heavy whipping cream lifts everything to a luscious level, and the eggs bind it into perfection.
To bring in the holiday spirit, we’ll fold in Little Debbie Christmas Tree Cakes, those iconic treats that instantly ignite nostalgia. A ganache made from white chocolate and more heavy cream wraps the cheesecake in a silky layer. Lastly, don’t forget sprinkles and frosting to make it look festive! Check the bottom of the article for exact quantities to whip this masterpiece up in your own kitchen.
How to Make Little Debbie Christmas Tree Cheesecake
Step 1: Prepare the crust
First things first, let’s get that crust ready! Preheat your oven to 325°F (163°C). In a medium bowl, mix your graham cracker crumbs with melted butter. This combination should be just like wet sand. Press this mixture firmly into the bottom of a 9-inch springform pan.
Make sure it’s even and compact, as this crust will hold all the magic together. Use a flat-bottomed measuring cup if you have one; it’s a simple tool that helps create a smooth surface. Once it’s ready, pop it in the fridge while we prepare the filling. This step ensures the crust firms up nicely!
Step 2: Make the cheesecake filling
Now, let’s dive into the creamy goodness! In a large mixing bowl, beat the softened cream cheese until it’s nice and smooth. You’ll want no lumps here, as those can ruin your silky texture later. Add in the granulated sugar and flour. Mix until they’re well combined and fluffy.
Next, stir in the vanilla extract. Can you smell that warmth? Add the heavy whipping cream too, which will make everything luxuriously creamy. Now, it’s time for the eggs! Crack them in one at a time, beating after each addition until everything is just combined. Overmixing can lead to cracks in the cheesecake, so be gentle!
Step 3: Fold in the Little Debbie Christmas Tree Cakes
Here comes the fun part! Grab five of those nostalgic Little Debbie Christmas Tree Cakes and chop them into small pieces. Gently fold them into your cheesecake filling. This is where the magic really happens, adding that sweet, festive flavor to our dessert. Remember to keep the mixing light; we don’t want to deflate all that air we just whipped in!
Step 4: Bake the cheesecake
Pour your delightful filling over the chilled crust in the springform pan. Spread it evenly and smooth the top with a spatula. Now, it’s ready for the oven! Bake for about 50-60 minutes. You’ll know it’s done when the edges are set but the center has a slight jiggle.
Once that timer goes off, turn off the oven and crack the door open. Let the cheesecake cool in the oven for one hour. This step helps prevent those dreaded cracks. Afterward, remove it from the oven and set it on a wire rack to cool completely at room temperature.
Step 5: Cool and refrigerate
After cooling, pop that cheesecake in the fridge for at least four hours, or even overnight if you can wait! Chilling it allows the flavors to meld beautifully. Trust me, the longer it sits, the better it gets. Just make sure to keep it covered so it doesn’t absorb any fridge smells.
Step 6: Prepare the ganache
While your cheesecake is chilling, let’s whip up a rich ganache! In a small saucepan, heat 1/3 cup of heavy whipping cream until it’s just simmering. Pour this hot cream over a cup of white chocolate in a heatproof bowl. Let it sit for two minutes to soften the chocolate, then stir until it’s smooth and glossy. It will look divine!
Step 7: Decorate the cheesecake
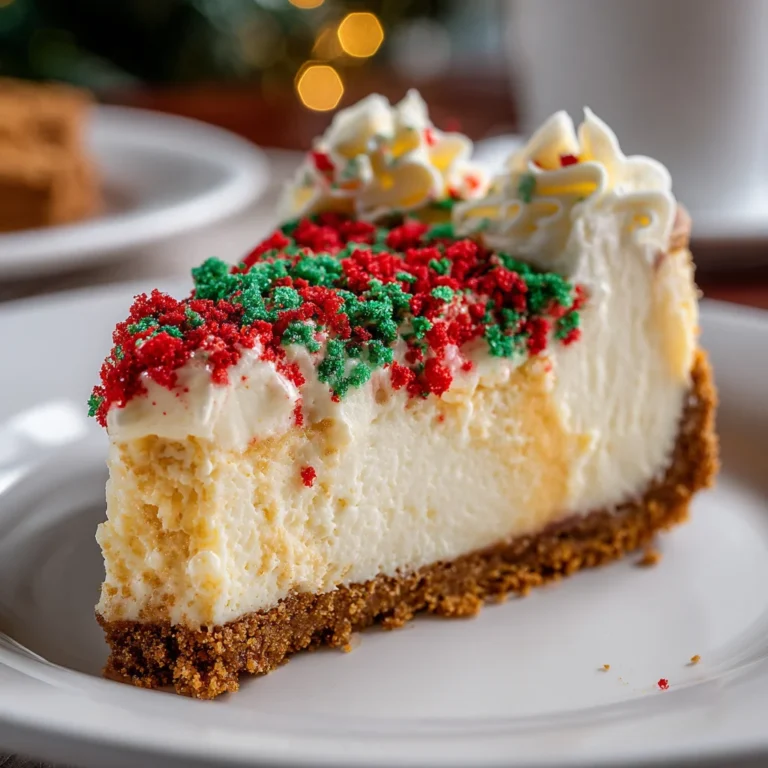
Now for the grand finale! Once your cheesecake is completely chilled, pour the ganache over the top, spreading it evenly. It should cascade down the sides like a delicious waterfall. To make it festive, sprinkle green sprinkles on top and add dollops of red buttercream frosting, mimicking Christmas tree ornaments.
For an extra touch, you can garnish with the remaining two Little Debbie Christmas Tree Cakes atop the cheesecake. It’s a sight that will have everyone reaching for a slice! And just like that, you’ve created a holiday masterpiece!
Tips for Success
- Always use room temperature cream cheese to avoid lumps and ensure a smooth filling.
- Chill the cake overnight for the best flavor and texture; patience pays off!
- Use a water bath while baking to maintain moisture and prevent cracks.
- Keep the oven door closed during cooling to avoid temperature shock.
- Garnish just before serving for that fresh, vibrant look.
Equipment Needed
- 9-inch springform pan (a regular cake pan can work, but be careful when removing the cheesecake)
- Mixing bowls (opt for a large bowl and a smaller one for measuring)
- Hand mixer or stand mixer (whisking by hand is possible, but takes longer)
- Spatula (a rubber or silicone spatula works best for smooth spreading)
- Measuring cups and spoons (accurate measuring is key to success!)
Variations
- For a chocolate twist, use chocolate graham cracker crumbs for the crust.
- Swap in flavored extracts, like almond or peppermint, to add a unique touch.
- Make it gluten-free by using gluten-free graham crackers and flour.
- Add a fruit layer with berry compote on top before the ganache for a fresh burst of flavor.
- Try an eggless version using silken tofu for a vegan-friendly cheesecake.
Serving Suggestions
- Pair with a cup of hot cocoa or spiced apple cider for a cozy treat.
- Serve with a dollop of whipped cream or a scoop of vanilla ice cream for added indulgence.
- Garnish with fresh berries or mint leaves for a pop of color and freshness.
- Present on a festive platter with holiday-themed decorations for a cheerful display.
- Slice into wedges and plate with a drizzle of chocolate sauce for an elegant touch.
FAQs about Little Debbie Christmas Tree Cheesecake
I often find myself answering questions about my favorite holiday treat, so let’s tackle some frequently asked ones together! This should help you as you whip up your own Little Debbie Christmas Tree Cheesecake.
Can I make this cheesecake ahead of time?
Absolutely! In fact, I recommend making it a day in advance. The flavors develop beautifully overnight, and it makes your day of entertaining so much easier!
How do I store leftovers?
Store leftover cheesecake in the refrigerator, covered with plastic wrap or in an airtight container. It can last up to five days, but I doubt it will last that long in your house!
Can I freeze the cheesecake?
Yes, you can freeze it! Just wrap it tightly in plastic wrap and then foil. It should be good for up to three months. When you’re ready to enjoy, thaw it in the fridge overnight.
What if I don’t have a springform pan?
If you don’t have one, you can use a regular round cake pan. Just be cautious when removing your cheesecake. Line it with parchment paper to make the removal easier!
Can I use different flavors of Little Debbie Cakes?
Of course! While I adore the Christmas Tree Cakes for this recipe, you could use any cake varieties for a fun twist. The chocolate versions could lend a nice flavor too!
With these answers, I hope you feel more prepared to tackle your Little Debbie Christmas Tree Cheesecake journey. It’s sure to be a crowd-pleaser in your home this holiday season!
Final Thoughts
Creating a Little Debbie Christmas Tree Cheesecake isn’t just about whipping up a delicious dessert; it’s about bringing warmth, joy, and nostalgia to your holiday gatherings.
As you slice into this creamy delight, you’ll find smiles all around from family and friends, igniting cherished memories while crafting new ones. This cheesecake not only satisfies sweet cravings but also sparks conversations at your table.
So, embrace the holiday spirit! With every bite, you’re serving up a slice of happiness that’s simply unforgettable. Enjoy the moments, and happy baking!
PrintLittle Debbie Christmas Tree Cheesecake steals the show!
A delicious cheesecake inspired by Little Debbie’s Christmas Tree Cakes, perfect for festive gatherings.
- Prep Time: 20 minutes
- Cook Time: 60 minutes
- Total Time: 5 hours 20 minutes
- Yield: 12 servings 1x
- Category: Dessert
- Method: Baking
- Cuisine: American
- Diet: Vegetarian
Ingredients
- 1 ½ cups graham cracker crumbs
- 6 tablespoons butter, melted
- 3 packs cream cheese, softened
- ½ cup granulated sugar
- 3 tablespoons all-purpose flour
- 1 teaspoon vanilla extract
- ½ cup heavy whipping cream
- 2 eggs
- 7 Little Debbie Christmas Tree Cakes
- 1 cup white chocolate
- 1/3 cup heavy whipping cream
- Green sprinkles
- Red buttercream frosting
Instructions
- Preheat oven to 325°F (163°C).
- Mix graham cracker crumbs and melted butter until well combined. Press mixture firmly into the bottom of a 9-inch springform pan to form the crust.
- In a large bowl, beat the softened cream cheese until smooth. Add granulated sugar and flour, mixing until combined.
- Stir in vanilla extract and heavy whipping cream.
- Add eggs one at a time, beating after each addition until just combined.
- Chop 5 of the Little Debbie Christmas Tree Cakes into small pieces and fold them gently into the filling.
- Pour filling over the crust in the springform pan and spread evenly.
- Bake for 50-60 minutes or until the edges are set and the center is slightly jiggly. Turn off oven, open door slightly, and let cheesecake cool inside for 1 hour.
- Remove from oven and cool completely at room temperature, then refrigerate for at least 4 hours or overnight.
- To prepare ganache, heat heavy whipping cream in a small saucepan until just simmering. Pour over white chocolate in a heatproof bowl and let sit for 2 minutes. Stir until smooth and glossy.
- Pour ganache over chilled cheesecake and spread evenly.
- Decorate with green sprinkles and red buttercream frosting to mimic Christmas tree ornaments.
- Garnish with remaining 2 Little Debbie Christmas Tree Cakes on top or on the side when serving.
Notes
- Use room temperature cream cheese to avoid lumps for a smoother filling.
- Chill cheesecake overnight for best texture and easier slicing.
Nutrition
- Serving Size: 1 slice
- Calories: 420