Introduction to Mint Chocolate Cheesecake
There’s something undeniably magical about a slice of Mint Chocolate Cheesecake. The moment you sink your fork into that velvety slice, you’ll understand why it’s a favorite in my house. This dessert isn’t just a treat; it’s an experience that can turn even the busiest day into something special. With layers of rich chocolate wrapped in a refreshing mint embrace, this cheesecake is perfect for any occasion, whether you’re celebrating a birthday or just need a little pick-me-up. Trust me, this is one indulgent delight your loved ones will adore!
Why You’ll Love This Mint Chocolate Cheesecake
This Mint Chocolate Cheesecake is the perfect blend of flavors that will leave your taste buds dancing with joy! It’s incredibly easy to whip up, making it a wonderful choice for busy moms like us. Plus, the breathtaking presentation of each slice will impress your guests at any gathering. Rich, creamy, and refreshingly minty, it’s a dessert that pleases every palate. You’ll find yourself making this again and again!
Ingredients for Mint Chocolate Cheesecake
Let’s gather the delightful components that make up this heavenly Mint Chocolate Cheesecake. You’ll need a mix of classic and minty Oreo cookies for a crunchy base. Cream cheese is essential for that rich, creamy texture, while granulated sugar adds sweetness. Don’t forget vanilla and mint extracts for flavor depth.
Eggs bind it all together, and sour cream and heavy cream create that indulgent mouthfeel. For the chocolate lovers, chopped chocolate bars and milk chocolate chips add marvelous richness. Lastly, the whipped cream topping includes powdered sugar and mint extract for extra decadence. You can find exact measurements at the bottom of the article for easy reference!

How to Make Mint Chocolate Cheesecake
Step 1: Prepare the Crust
First things first, let’s dive into that delicious crust! Start by preheating your oven to 325 degrees. It’s like getting the warm-up started for an exciting baking adventure!
Grab a food processor, and toss in the Oreos. You want to pulse them until you have fine crumbs. This is where the magic begins! Add the melted butter to the crumbs and pulse again until they’re coated, like a cozy chocolate hug.
Transfer the mixture into a 9-inch springform pan. Press it firmly into the bottom with the back of a measuring cup or your hands. Bake the crust for about 10 minutes, then let it cool. This will create a firm base for the creamy filling that’s to come!
Step 2: Make the Cheesecake Filling
Now, onto the star of the show—the cheesecake filling! In a large mixing bowl, beat the cream cheese until it’s super creamy and smooth, like a soft cloud on a sunny day.
Gradually add in the granulated sugar. Beat until they are well combined, and don’t forget to scrape down the sides of the bowl. Next, mix in both vanilla and mint extracts as well as the eggs—one at a time. This process is crucial for a silky texture, so take your time.
Once combined, blend in the sour cream and heavy cream. Feel free to add a few drops of green gel food coloring if you want a fun minty hue! Finally, fold in those chopped chocolate bars. The chunks of chocolate will melt slightly into the filling, creating gooey surprises in every bite.
Step 3: Bake the Cheesecake
Now, let’s get baking! To prevent water from seeping in as it bakes, wrap the bottom of the springform pan with heavy tin foil. Then, place it in a larger pan filled with 1 to 2 inches of hot water. This water bath helps the cheesecake cook gently, preventing cracks.
Carefully pour the cheesecake batter over your cooled crust. It’s a beautiful layer of chocolate mint goodness! Bake for about 1 hour and 20 minutes. You’ll know it’s done when you gently wiggle the cheesecake, and it jiggles just slightly in the center. Perfection!
Once baked, turn off the oven and let the cheesecake cool inside with the door ajar. This step helps avoid sudden temperature changes that can cause cracks.
Step 4: Chill and Prepare Ganache
After cooling, refrigerate your cheesecake for at least 4 hours, but overnight is best. This waiting period is crucial for allowing the flavors to marry together beautifully.
While it chills, let’s whip up that luscious ganache! In a microwave-safe bowl, combine the chocolate chips with heavy cream. Microwave for 1 minute, stirring afterward, then heat for another 30 seconds until it’s smooth and shiny. The ganache will be like a silky waterfall, just waiting to cascade over your cheesecake.
Once everything is ready, pour the ganache lovingly over the chilled cheesecake. Return it to the fridge for about 30 minutes to set. Patience is key, my friends!
Step 5: Whip the Cream and Assemble
Finally, the grand finale! For the whipped cream, start by beating the heavy cream until soft peaks form—think of fluffy little clouds.
Add in powdered sugar, a splash of mint extract, and a drop or two of green gel food coloring for a hint of color. Beat until you reach stiff peaks; this will give you a delightful topping for your cheesecake.
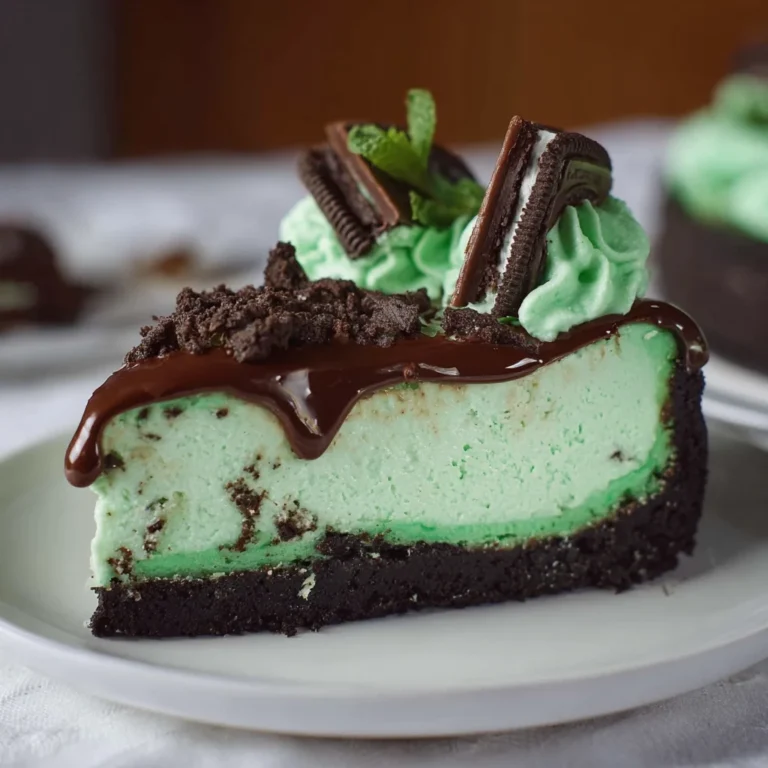
Pipe swirls of whipped cream on top of your cheesecake for a finishing touch. Add some Andes mints for that decorative flair, and watch as everyone’s eyes light up at your masterpiece!
Now, slice it up, serve it with love, and watch your loved ones savor each delicious bite of this stunning Mint Chocolate Cheesecake. Enjoy!
Tips for Success
- Always use room temperature ingredients for a smoother batter.
- Double-wrap your springform pan to avoid water leaks.
- Let the cheesecake cool in the oven to prevent cracks.
- Chill the cheesecake overnight for the best flavor.
- Use a sharp knife to slice through the cheesecake easily.
Equipment Needed
- 9-inch springform pan (a regular cake pan can work but won’t give the same clean edges)
- Food processor (a zip-top bag and rolling pin can substitute for crushing cookies)
- Mixing bowls (any size will do)
- Whisk or hand mixer (a regular whisk can work, but it requires more effort)
- Microwave-safe bowl (or a small saucepan over low heat for the ganache)
Variations of Mint Chocolate Cheesecake
- For a healthier twist, use low-fat cream cheese and Greek yogurt instead of sour cream.
- Change it up by adding crushed peppermint candies into the cheesecake filling for a sweeter crunch.
- If you’re gluten-free, replace the Oreo cookies with gluten-free chocolate cookies for the crust.
- Try adding a layer of mint chocolate ganache between two layers of cheesecake for an extra chocolatey experience.
- For a festive touch, decorate with holiday-themed sprinkles or colored chocolate shavings.
Serving Suggestions for Mint Chocolate Cheesecake
- Pair with fresh berries, like strawberries or raspberries, for a pop of color and freshness.
- Serve alongside a scoop of vanilla ice cream to enhance the mint chocolate experience.
- For drinks, consider a mint-infused iced tea or a rich hot cocoa.
- Presentation tip: drizzle extra ganache over the cheesecake for an eye-catching finish.
- Garnish with mint leaves or chocolate shavings for that professional touch!
FAQs about Mint Chocolate Cheesecake
Here are some questions I often get asked about this delightful Mint Chocolate Cheesecake.
Can I make this cheesecake in advance? Absolutely! In fact, it tastes even better when chilled overnight. Just keep it covered in the fridge.
Can I freeze Mint Chocolate Cheesecake? Yes, you can! Wrap individual slices tightly in plastic wrap and foil, then freeze for up to 2 months. Just thaw in the fridge before serving.
What can I substitute for the cream cheese? You can use mascarpone cheese for a lighter alternative, but keep the texture in mind.
Is it difficult to make a cheesecake? Not at all! With a little patience, you’ll create an impressively delicious Mint Chocolate Cheesecake, perfect for any gathering.
Can I use another type of cookie for the crust? Certainly! Any chocolate cookie will work; feel free to get creative!
Final Thoughts
Creating this Mint Chocolate Cheesecake is more than just baking; it’s about sharing joy with those you love. Each slice offers a delightful balance of minty freshness and rich chocolate, making it an instant favorite. As the flavors meld together, you’ll find that it sparks smiles and happy memories around the table. Plus, the sense of accomplishment when you serve it to friends and family is truly unmatched. I hope this recipe inspires you to take a moment from your busy life to indulge in something sweet and special. Enjoy every decadent bite!
PrintMint Chocolate Cheesecake

A luxurious Mint Chocolate Cheesecake that combines minty freshness with rich chocolate flavor, perfect for any occasion.
- Prep Time: 30 minutes
- Cook Time: 1 hour 20 minutes
- Total Time: 5 hours 50 minutes (including chilling time)
- Yield: 12 servings 1x
- Category: Dessert
- Method: Baking
- Cuisine: American
- Diet: Vegetarian
Ingredients
- 14 Oreo cookies
- 8 mint Oreo cookies
- 4 tablespoons butter, melted
- 24 ounces cream cheese, room temperature
- 1 1/4 cups granulated sugar
- 1/2 teaspoon vanilla extract
- 1 teaspoon mint extract
- 4 large eggs
- 1 cup sour cream
- 1/2 cup heavy cream
- 6 Hershey’s 1.55 ounce Milk Chocolate Candy Bars, chopped
- 2 to 4 drops green gel food coloring
- 3/4 cup milk chocolate chips
- 1/2 cup heavy cream (for ganache)
- 1 cup heavy cream (for whipped cream)
- 2 tablespoons powdered sugar
- 1/4 teaspoon mint extract (for whipped cream)
- 2 to 3 drops green gel food coloring (for whipped cream)
- Andes Chocolate Mints
Instructions
- Preheat oven to 325 degrees.
- In a food processor, add in the Oreo cookies. Pulse until fine crumbs.
- Add the melted butter to the crumbs and pulse until coated.
- Dump the cookie crumbs into a 9-inch springform pan and press into the bottom.
- Bake for 10 minutes, then let cool.
- In a large bowl, beat cream cheese until creamy, scrape down sides.
- Beat in sugar until incorporated, scrape down sides.
- Mix in vanilla, mint extract, and eggs one at a time.
- Add sour cream, heavy cream, and food coloring; beat until evenly mixed.
- Stir in the chopped chocolate.
- Wrap the bottom of the springform pan with heavy tin foil. Place in a larger pan filled with 1 to 2 inches of hot water.
- Pour the cheesecake batter over the crust.
- Bake for 1 hour 20 minutes. Check doneness by wiggling; if it jiggles slightly in the middle, it’s done.
- Turn off the oven and let it cool inside with the door open.
- Chill in the fridge for at least 4 hours or preferably overnight.
- For ganache, microwave chocolate chips and heavy cream for 1 minute; stir and then microwave for 30 seconds more until smooth.
- Pour ganache over the cheesecake and chill for 30 minutes.
- For whipped cream, beat heavy cream until soft peaks form.
- Add powdered sugar, mint extract, and food coloring; beat until stiff peaks form.
- Pipe swirls of whipped cream on top and add Andes mints.
- Slice and serve! Store in the fridge.
Notes
- For best results, refrigerate the cheesecake overnight.
- Double wrap the springform pan to prevent water from leaking during baking.
- Use room temperature ingredients for a smoother batter.
Nutrition
- Serving Size: 1 slice
- Calories: 400
- Sugar: 25g
- Sodium: 250mg
- Fat: 28g
- Saturated Fat: 16g
- Unsaturated Fat: 8g
- Trans Fat: 0g
- Carbohydrates: 34g
- Fiber: 2g
- Protein: 6g
- Cholesterol: 90mg