
Introduction to Red Velvet Crinkle Cookies
Have you ever craved something delicious yet delightful enough to impress your family and friends? These Red Velvet Crinkle Cookies are just the treat you need! With their rich red hue and sugary crinkle, they not only taste amazing but look stunning, too. As a busy mom, I know just how valuable quick and easy recipes can be, especially ones that dazzle everyone. Whether it’s a surprise for the kids after school or a sweet addition to a potluck, this cookie recipe is bound to become a favorite!
Why You’ll Love This Red Velvet Crinkle Cookies
These Red Velvet Crinkle Cookies are the perfect blend of simplicity and elegance. They come together quickly, making them ideal for busy schedules. Plus, their rich flavor and soft, chewy texture are simply irresistible. You won’t need fancy equipment or skills; just some love and a little patience. Trust me, these cookies will bring smiles to your loved ones and provide a sweet moment of joy in your day!
Ingredients for Red Velvet Crinkle Cookies
To create these delightful Red Velvet Crinkle Cookies, you’ll need a range of ingredients that work together to create their signature taste and stunning appearance. Here’s what you’ll need:
- Unsalted Butter: Room temperature butter adds richness and a creamy texture to the cookie dough.
- Granulated Sugar: This sweetener provides the base sweetness and aids in achieving that crinkled surface.
- Large Eggs: Eggs contribute moisture and act as a binding agent, ensuring a chewy cookie.
- Whole Milk: A splash of milk enhances the dough’s consistency and flavor.
- Lemon Juice or Vinegar: This adds a slight tang, balancing the sweetness while also activating the baking soda.
- Vanilla Extract: A classic ingredient that brings depth and aroma to your cookies.
- Red Gel Coloring: Essential for that vibrant red hue, gel coloring is a must for stunning visuals.
- All-Purpose Flour: The foundation of your cookie, providing the necessary structure and texture.
- Cocoa Powder: It enriches the flavor with a hint of chocolate without overpowering the red velvet essence.
- Baking Powder & Baking Soda: These leavening agents make the cookies rise beautifully and create that iconic crinkle.
- Granulated and Powdered Sugar: For rolling the dough balls, these sugars give the cookies a sweet exterior and delightful finish.
For those looking to customize or substitute, you can use coconut oil for a dairy-free alternative or swap in gluten-free flour for a gluten-free version. All ingredient measurements are detailed at the bottom of the article, making it easy for you to print out the recipe and get baking!
How to Make Red Velvet Crinkle Cookies
Now that we have our ingredients ready, let’s dive into the fun part: making these gorgeous Red Velvet Crinkle Cookies! I promise the steps are simple, and I’ll walk you through each of them. Grab your mixing bowls and let’s get started!
Step 1: Cream Butter and Sugar
First things first: In a large mixing bowl, beat together the room temperature unsalted butter and granulated sugar. Use a hand mixer or stand mixer for this part, whipping until the mixture gets light and fluffy. This process usually takes about 2-3 minutes. It’s like the beginning of a dreamy relationship; you want it to be smooth and loving!
Step 2: Mix the Wet Ingredients
Next, add in the eggs, whole milk, lemon juice or vinegar, vanilla extract, and a few drops of that vibrant red gel coloring. Mix everything together until it’s completely smooth. Don’t rush this step; it’s when the magic starts to happen, creating a beautiful blend of flavors and a stunning color!
Step 3: Combine Dry Ingredients
In a separate bowl, whisk together the all-purpose flour, cocoa powder, baking powder, and baking soda. This is crucial for an even distribution of your leavening agents and ensures your cookies rise just right. It’s like preparing the right foundation before building a house; every bit matters!
Step 4: Incorporate Dry Ingredients
Now, dump that dry mixture into the wet one. Gently stir until everything is just combined. Be cautious not to over-mix, as we want our cookies to stay soft and chewy. It should still look a bit rustic— the perfect cookie dough is never overly polished!
Step 5: Chill the Dough
Here comes the waiting game. Cover the dough with plastic wrap and let it chill in the refrigerator for at least 2 hours or, even better, overnight. Chilling the dough helps enhance the flavors and makes it easier to form cookie balls. Plus, this gives you a good excuse to plan a movie night while you wait!
Step 6: Form Cookie Balls
Once your dough is nicely chilled, it’s time to play! Scoop small portions of the dough and roll them into balls. Each ball should be about the size of a tablespoon. This part is fun— getting your hands a little messy is part of the process!
Step 7: Roll in Sugar and Bake
Now it’s showtime! First, roll each dough ball in granulated sugar, followed by powdered sugar. This ensures that iconic crinkle effect we all love. Place your cookie balls on a baking tray lined with parchment paper, leaving enough space between each one. Bake them in a preheated oven at 350 degrees for about 10-12 minutes, or until the edges are firm but the centers are still soft. Your kitchen will smell heavenly!
And voilà! Let them cool slightly on the tray before transferring them to a wire rack. You’ve just created beautiful Red Velvet Crinkle Cookies that are sure to shine at any gathering!
Tips for Success
- Always use room temperature butter for easier creaming and a fluffier texture.
- Don’t skip the chilling step; it enhances the flavor and texture of the cookies.
- Use quality gel food coloring to achieve that vibrant red hue.
- Ensure your oven is preheated for even baking; an oven thermometer can help!
- For the best crinkle effect, roll the dough balls generously in both sugars.
Equipment Needed
- Mixing Bowls: Use medium to large bowls; sturdy plastic ones work great!
- Hand Mixer or Stand Mixer: A good old whisk can also do the job; it just takes a little more elbow grease!
- Baking Tray: A standard baking sheet, preferably lined with parchment paper.
- Scooper or Spoon: A cookie scoop makes portioning easy, but a spoon works just fine.
- Wire Rack: Essential for cooling; you can also use a plate if you’re in a pinch!
Variations
- Chocolate Chip Addition: For a delightful twist, add semi-sweet chocolate chips to the dough before chilling! It’s like having a cozy hug in every bite.
- Nutty Crunch: Incorporate chopped walnuts or pecans for a delightful crunch that pairs beautifully with the soft cookie texture.
- Gluten-Free Version: Use a gluten-free all-purpose flour blend to make these cookies celiac-friendly, without sacrificing taste!
- Dairy-Free Option: Substitute coconut oil for butter and almond milk for whole milk to create a vegan version that still tastes divine!
- Spiced Variation: Add a dash of cinnamon or nutmeg to the dry ingredients for a warm, aromatic twist on the classic flavor.
Serving Suggestions
- Pair with Ice Cream: Serve warm cookies with a scoop of vanilla or cream cheese ice cream for an indulgent dessert.
- Festive Presentation: Arrange cookies on a colorful platter or tiered stand for gatherings; a sprinkle of extra powdered sugar adds a lovely finishing touch.
- Complement with Drinks: Serve alongside a hot cup of cocoa or a chilled glass of milk for a comforting treat!
FAQs about Red Velvet Crinkle Cookies
As you embark on your journey to create these scrumptious Red Velvet Crinkle Cookies, you may have a few questions. Don’t worry! I’ve got you covered with some answers to common queries.
Can I use regular food coloring instead of gel?
While you can use regular food coloring, I highly recommend gel food coloring for that vibrant, eye-catching red hue. Gel coloring provides a more intense color without adding extra liquid to the dough.
How do I know when the cookies are done baking?
Keep an eye on the edges of the cookies. They should be firm and slightly set, while the centers should still look soft. Remember, the cookies will continue to firm up as they cool on the baking tray!
What should I do if my dough seems too sticky?
If the dough feels sticky, simply chill it for a bit longer in the refrigerator. Cold dough is easier to handle, and it will help you form those lovely cookie balls without making a mess.
Can I freeze these cookies?
Absolutely! You can freeze both the dough and the baked cookies. For dough, shape it into balls, freeze them on a tray, and then transfer to a zip-top bag. Baked cookies can be stored in an airtight container in the freezer for up to a month.
What pairs well with Red Velvet Crinkle Cookies?
These cookies are perfect for pairing with a glass of milk, a hot cup of coffee, or even a dollop of whipped cream! They make an indulgent treat, whether at a festive gathering or a cozy night in.
Final Thoughts
In the busy rhythm of life, finding joy in simple pleasures can be a game changer. These Red Velvet Crinkle Cookies provide that sweet escape, combining beautiful looks with delightful taste. Whether you serve them at a gathering or enjoy them during a quiet moment, these cookies are sure to create smiles and happy memories. Plus, they offer a fun baking adventure that you can share with your loved ones. So roll up your sleeves and bake a batch; I promise you’ll feel the warmth of home and heart in every delicious bite!
PrintRed Velvet Crinkle Cookies
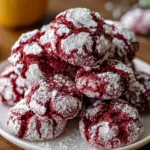
Delicious and visually stunning red velvet crinkle cookies that are sure to impress your guests.
- Prep Time: 20 minutes
- Cook Time: 12 minutes
- Total Time: 2 hours 32 minutes
- Yield: 24 cookies 1x
- Category: Dessert
- Method: Baking
- Cuisine: American
- Diet: Vegetarian
Ingredients
- ¾ cup Butter Unsalted, Room temperature
- 1⅓ cups Granulated sugar
- 3 Eggs Large
- 1 tablespoon Whole milk
- 2 teaspoon Lemon juice Or vinegar
- 2 teaspoon Vanilla extract
- Red gel coloring
- 3 cups All-purpose flour
- ¼ cup Cocoa powder
- 2 teaspoon Baking powder
- ¼ teaspoon Baking soda
- 1 cup Granulated sugar For rolling cookie dough balls
- 1 cup Powdered sugar For rolling cookie dough balls
Instructions
- In a mixing bowl, cream together butter and granulated sugar until mixture is light and fluffy.
- Add eggs, milk, lemon juice or vinegar, and red gel coloring and mix until smooth.
- In a separate mixing bowl, whisk together the flour, cocoa powder, baking powder and baking soda.
- Dump the dry mixture into the wet mixture and mix until just combined. Do not over-mix!
- Chill the dough for 2 hours or overnight.
- Scoop out small portions of the dough and make small balls. Roll them in granulated sugar first and then, roll in powdered sugar. Place them on a baking tray, lined with parchment paper.
- Bake at 350 degrees for 10-12 minutes or until the cookies are firm around the edges. Enjoy!
Notes
- Allow the cookies to cool on the tray for a few minutes before transferring them to a wire rack.
- For best results, use gel food coloring for vibrant color.
- The dough can be frozen for later use.
Nutrition
- Serving Size: 1 cookie
- Calories: 150
- Sugar: 14g
- Sodium: 80mg
- Fat: 6g
- Saturated Fat: 4g
- Unsaturated Fat: 1g
- Trans Fat: 0g
- Carbohydrates: 21g
- Fiber: 1g
- Protein: 2g
- Cholesterol: 30mg