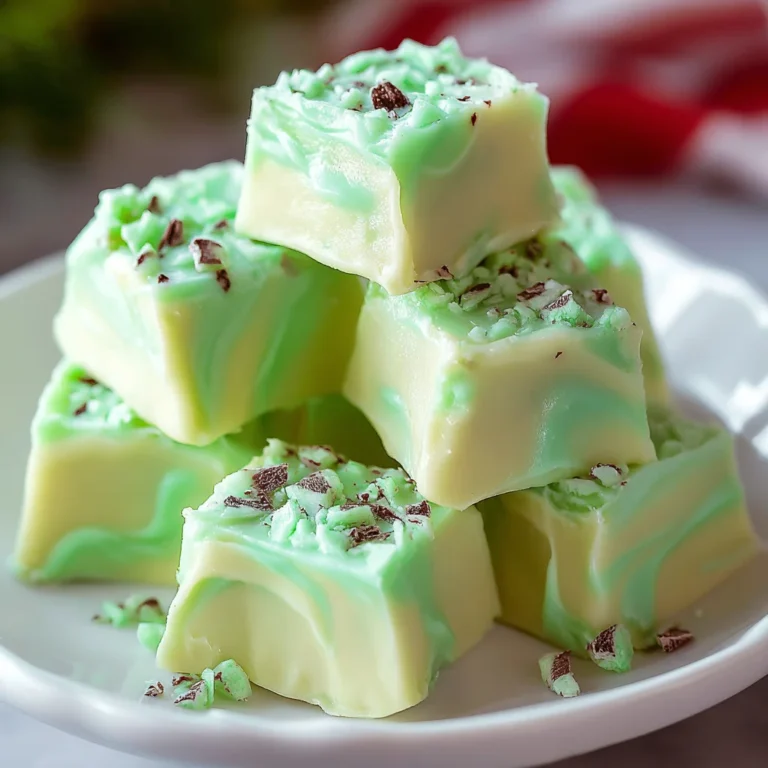
Introduction to White Chocolate Mint Fudge
Hey there, fellow food lovers! If you’re like me—always rushing between work, kids, and a million tasks—then the simple joy of making White Chocolate Mint Fudge can truly brighten your day. This creamy, dreamy treat will not only satisfy a sweet tooth but also become a delightful bonding experience for the entire family. Picture this: melting chocolate, the cool zing of mint, and sweet aromas wafting through your kitchen. Trust me, this is one recipe that will become a cherished tradition, perfect for those busy moments when you still want to indulge!
Why You’ll Love This White Chocolate Mint Fudge
This White Chocolate Mint Fudge is a lifesaver! It’s incredibly easy to whip up, taking just about 10 minutes of hands-on time. The best part? Kids can help, making it a fun family activity! With every creamy, refreshing bite, you’ll experience a delightful balance of sweetness and minty goodness. It’s the perfect treat to share, whether for a festive gathering or a cozy night in. You truly can’t go wrong with this fast, satisfying dessert!
Ingredients for White Chocolate Mint Fudge
To create this luscious White Chocolate Mint Fudge, you’ll need a handful of simple ingredients that come together beautifully. Let’s break these down:
- White chocolate chips: The star of the show! They provide the rich, creamy base that melts beautifully.
- Sweetened condensed milk: This thick, sweet nectar adds a luscious texture and helps the fudge set perfectly.
- Peppermint extract: Just a touch elevates the flavor with a fresh, minty pop. You can adjust to your taste—more for a stronger mint experience!
- Green food coloring (optional): If you want your fudge to have that festive twist, a few drops of this vibrant color does the trick. It makes the fudge visually appealing, especially for special occasions!
- Pinch of salt (optional): Salt can enhance flavors, making the sweetness pop and creating a delightful balance.
Feel free to get creative with substitutions. Dark chocolate chips can provide a rich twist, while a different essence—like vanilla—can change the flavor profile altogether. Remember, I always believe in experimenting a little in the kitchen!
If you’re eager to get cooking, you can find the exact quantities of these ingredients at the bottom of the article, perfect for printing out and taking to the store.

How to Make White Chocolate Mint Fudge
Ready to dive into the delicious world of White Chocolate Mint Fudge? Follow these simple steps, and you’ll have a delectable treat ready in no time! Trust me; it’s easier than it looks and a fun way to spend some quality time in the kitchen.
Step 1: Prepare the Baking Dish
First things first! Grab an 8×8-inch square baking dish and line it with parchment paper or wax paper. This little trick makes removing the fudge a breeze later on. Leave some extra paper hanging over the sides; it acts as a helpful handle for lifting the creaminess out once it’s set. Now you’ll have a smooth surface to pour your fudge onto, making for a perfect presentation!
Step 2: Melt the Chocolate and Sweetened Condensed Milk
Next, let’s get the magic started! In a medium saucepan, combine the white chocolate chips and the sweetened condensed milk. Place it over medium heat and stir continuously. The goal is to melt the mixture slowly without burning it. You want to achieve a smooth, velvety texture. Avoid rushing this step, and keep an eye on the mixture as it transforms into a dreamy blend of sweetness!
Step 3: Incorporate Flavor
Once your mixture is silky smooth, remove it from the heat. Here comes the fun part! Stir in the peppermint extract. This tantalizing flavor adds a delightful kick to your fudge. If you chose to use a pinch of salt, now’s the time to toss that in. It enhances the sweetness and offers a perfect counterbalance, making every bite a burst of flavor!
Step 4: Add Color for Presentation
If you want to take your fudge to the next level, consider adding a few drops of green food coloring. Just a splash will do! Stir until it’s well incorporated, and watch as your fudge takes on a cheerful hue. It’s amazing how a little color can bring festive vibes to your dessert, especially during the holiday season!
Step 5: Pour and Spread
Now, pour that luscious fudge mixture into your prepared baking dish. Use a spatula to spread it evenly, smoothing out the top. Take your time here; a smooth top looks so enticing! If you want to impress your friends or family, this is your moment to shine. Little touches like these showcase your care and enthusiasm for crafting a delightful treat!
Step 6: Chill Until Set
It’s time to chill! Pop your fudge-filled dish into the refrigerator. Let it chill for at least 2 hours or until it’s firm to the touch. You’ll know it’s ready when the top is set and feels solid. Patience is key, but oh, the reward is worth it! Imagine that first bite of cool, minty fudge.
Step 7: Serve and Enjoy
Once set, carefully lift the fudge using the parchment paper edges. Place it on a cutting board and slice it into squares. As you serve, you might want to present it on a colorful platter or in paper candy cups for added flair. Whether it’s a holiday gathering or just an everyday treat, your homemade fudge will surely impress everyone!
Tips for Success
- Use high-quality white chocolate chips for the creamiest fudge.
- Stir continually while melting to prevent scorching.
- Make sure your baking dish is well-lined to avoid sticky situations!
- Chill the fudge long enough—rushing this step can lead to a gooey mess.
- Don’t skip the pinch of salt; it enhances the flavors wonderfully.
Equipment Needed
- 8×8-inch square baking dish: Essential for shaping the fudge. Any similar-sized dish works too!
- Medium saucepan: For melting the chocolate and sweetened condensed milk together.
- Spatula: Perfect for stirring the mixture and spreading fudge into the dish.
- Parchment paper or wax paper: Helps with easy removal of the fudge once set.
- Cutting board: Great for slicing your tasty treat into perfect squares.
Variations
- Chocolate Mint Swirl: Drizzle melted dark chocolate over the top before chilling for an eye-catching design and a rich twist.
- Nutty Delight: Fold in chopped nuts like pecans or walnuts for added crunch and flavor.
- Cookie Crumble: Mix in crushed Oreos or even Thin Mints to bring in some fun texture.
- Different Extracts: Experiment with almond or vanilla extract if you’re in the mood for a flavor change!
Serving Suggestions
- Pretty Platter: Arrange the fudge on a vibrant serving platter for a pop of color at gatherings.
- Pair with Coffee: A warm cup of coffee or hot chocolate complements the minty flavor perfectly.
- Add Fresh Berries: Fresh strawberries or raspberries add a refreshing contrast that enhances the dessert.
- Dress it Up: Top with a sprinkle of crushed peppermint candies for added flair and festive appeal!
FAQs about White Chocolate Mint Fudge
Can I make White Chocolate Mint Fudge ahead of time?
Absolutely! You can make this delicious fudge a few days in advance. Store it in an airtight container at room temperature for about a week, or keep it in the fridge for up to two weeks. Just don’t be surprised if it disappears quickly!
What if I don’t have peppermint extract?
No problem at all! If peppermint isn’t available, you can use vanilla extract or even almond extract for a unique flavor twist. Each will create a different vibe but will still be a tasty treat!
How should I store leftover fudge?
To keep your White Chocolate Mint Fudge fresh, store it in an airtight container. You can keep it at room temperature for about a week or place it in the fridge to prolong its life. Just make sure it’s well-covered to prevent drying out!
Can I freeze the fudge?
Yes, you can! To freeze, wrap the fudge tightly in plastic wrap and then place it in an airtight container. It’ll keep well for about two months. When you’re ready to enjoy it, let it thaw in the refrigerator overnight.
What can I add for extra flavor or texture?
There are countless ways to customize your White Chocolate Mint Fudge! Consider adding crushed peppermint candies, chopped nuts, or even swirls of melted dark chocolate on top. Each addition will create a unique treat just for you!
Final Thoughts
Creating White Chocolate Mint Fudge is more than just making a dessert; it’s about building memories in the kitchen. Picture the laughter of your kids helping you stir and pour, the delightful fragrance filling your home, and the warm smiles as everyone gathers to indulge in this sweet treat. This no-bake recipe is a breeze to whip up, giving you that instant satisfaction of a homemade delight. Whether you’re sharing it at a party or keeping it all to yourself, nothing beats the joy of creating something special to savor and celebrate with loved ones!
PrintWhite Chocolate Mint Fudge

Indulge in this creamy and refreshing White Chocolate Mint Fudge, perfect for the sweetest occasions.
- Prep Time: 10 minutes
- Cook Time: 10 minutes
- Total Time: 2 hours 20 minutes
- Yield: 16 squares 1x
- Category: Dessert
- Method: No-Bake
- Cuisine: American
- Diet: Vegetarian
Ingredients
- 2 cups white chocolate chips
- 1 can sweetened condensed milk
- ½ teaspoon peppermint extract
- 2–3 drops green food coloring (optional)
- Pinch of salt (optional)
Instructions
- Line an 8×8-inch square baking dish with parchment paper or wax paper for easy removal.
- In a saucepan, melt the white chocolate chips with the sweetened condensed milk over medium heat. Stir frequently until smooth.
- Remove from heat and stir in peppermint extract. Add a pinch of salt if desired.
- Optional: Add 2-3 drops of green food coloring and stir until incorporated.
- Pour the fudge mixture into the prepared baking dish and spread evenly.
- Refrigerate for at least 2 hours, or until firm and set.
- Once firm, remove the fudge from the dish and cut into squares.
- Serve and enjoy.
Notes
- For a chocolate twist, add a layer of melted dark chocolate on top of the mint fudge before refrigerating.
- Customize with crushed peppermint candies, chocolate chips, or crushed cookies for added texture.
- If needed, the fudge can be stored in an airtight container at room temperature for up to 1 week or refrigerated for up to 2 weeks.
Nutrition
- Serving Size: 1 square
- Calories: 120
- Sugar: 15g
- Sodium: 50mg
- Fat: 7g
- Saturated Fat: 4g
- Unsaturated Fat: 3g
- Trans Fat: 0g
- Carbohydrates: 14g
- Fiber: 0g
- Protein: 1g
- Cholesterol: 5mg