
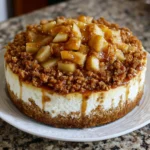
Introduction to Apple Crisp Cheesecake
When the leaves turn and the air gets cold, warm comfort desserts always sound good to me, and so when I found Apple Crisp Cheesecake, I knew this was destined to be a favorite in my house. It’s like a creamy cheesecake with that warm apple crisp kick kind of feel to it. Really, it’s not all that about indulging; rather, it’s an instant indulging solution on those busy days when you want to make some love for your loved ones. Think of your whole family sitting around a table full of such yummy dishes. This is how you usher in fall, with one piece at a time!
Why You’ll Love This Apple Crisp Cheesecake
This Apple Crisp Cheesecake is the happy marriage of flavors that makes it a dessert you will look forward to. Prep is super easy, even on your busiest day. The creamy texturing from the cheesecake actually goes along with the crunchy crisp topping. Every bite is a taste of fall that warms your heart. And, it’s a total people pleaser so get ready to impress next time you need to bring something to the party!
Ingredients for Apple Crisp Cheesecake
Gathering the right ingredients is the first step toward making this delightful Apple Crisp Cheesecake. Here’s what you need:
- Crushed graham crackers: These form the base of your crust, providing a sweet and crunchy foundation.
- Unsalted butter: This binds the crust together, giving it a rich flavor. Feel free to use coconut oil for a dairy-free version.
- Cream cheese: The star of the cheesecake! Softened, it creates that velvety texture we love.
- Granulated sugar: Sweetens the filling and balances the tartness of the apples.
- Eggs: These aid in binding the cheesecake, lending it stability and a delightful creaminess.
- Vanilla extract: Just a splash adds lovely depth and a fragrant aroma to the filling.
- Apples: Tart apples, like Granny Smith, shine in this dish. They provide a lovely contrast to the creamy cheesecake.
- Cinnamon: This warm spice enhances the apple flavor, evoking the essence of fall.
- Brown sugar: Adds a hint of caramel flavor for an extra layer of sweetness to the topping.
- Rolled oats: These create the crunchy crisp topping, giving it texture and heartiness.
- Flour: Just a touch helps to bind the crisp mixture, ensuring it holds together beautifully.
- Chopped nuts (optional): For a bit of crunch, consider adding walnuts or pecans. They add delightful nuttiness!
For exact quantities, check the bottom of the article where you’ll find a printable version of the recipe. This will make your shopping and preparation a breeze!
How to Make Apple Crisp Cheesecake
Now, let’s dive into making this sensational Apple Crisp Cheesecake. Follow these simple steps, and you’ll be one step closer to a delightful dessert that celebrates fall!
Step 1: Preheat the Oven
First things first, set your oven to preheat at 325°F (160°C). This ensures that the cheesecake bakes evenly and reaches that perfect creamy texture. Plus, the aroma wafting through your kitchen will make your family eagerly anticipate dessert.
Step 2: Prepare the Crust
In a cozy mixing bowl, combine your crushed graham crackers with melted butter. Mix until it resembles wet sand, and then press this mixture firmly into the bottom of a springform pan. This crust will form a sweet, crunchy foundation for the cheesecake, so make sure it’s well-packed.
Step 3: Mix the Cheesecake Filling
In another bowl, beat together the softened cream cheese and granulated sugar until the mixture is smooth and creamy. The aim is to eliminate any lumps! Add in the eggs one at a time, mixing thoroughly after each addition. Finally, stir in the vanilla extract for that warming flavor. This cheesecake filling is what dreams are made of!
Step 4: Layer the Apples
Now it’s time for the star of the dish—the apples! Toss your peeled and diced apples with cinnamon to coat them evenly. Layer these spiced apples generously on top of the cheesecake batter. Each bite will be a delightful surprise of apple goodness!
Step 5: Prepare the Crisp Topping
In a separate bowl, combine the brown sugar, rolled oats, flour, and chopped nuts (if you’re using them). Mix until crumbly and sprinkle this delicious topping evenly over the apples. This is where the crunch factor comes into play!
Step 6: Bake the Cheesecake
Carefully place your springform pan into the preheated oven. Bake for 60-70 minutes, or until the cheesecake is set and lightly browned on top. The aroma will fill your kitchen, teasing your taste buds. Once baked, let the cheesecake cool completely before removing it from the pan; this will help it set perfectly!
Tips for Success
- Use room temperature cream cheese for a smoother filling.
- Don’t overmix the batter after adding eggs to prevent cracks.
- Cool the cheesecake gradually in the oven for the best texture.
- Opt for tart apples to balance the sweetness.
- Let the cheesecake sit overnight in the fridge for enhanced flavor.
Equipment Needed
- Springform pan: Perfect for easy removal. A regular pie dish works too!
- Mixing bowls: You’ll need a few for mixing ingredients. Grab any size you have.
- Electric mixer: Ideal for a smooth cheesecake batter. A whisk can work in a pinch.
- Spatula: For scraping down the bowl and smoothing the batter.
- Measuring cups and spoons: Accurate ingredients make for the best flavors!
Variations
- Gluten-Free: Substitute graham crackers with gluten-free alternatives and use oat flour for the topping.
- Dairy-Free: Try vegan cream cheese and use coconut oil in place of butter for the crust.
- Add Spice: Mix in nutmeg or allspice with the cinnamon for extra warmth and depth.
- Fruit Mix: Incorporate other fruits like pears or cranberries for a unique twist on flavor.
- Caramel Drizzle: Top with a drizzle of caramel sauce after baking for an extra indulgent treat.
Serving Suggestions
- Pair with a scoop of vanilla ice cream for a creamy contrast.
- Serve with a dollop of freshly whipped cream for a touch of elegance.
- Complement with a warm spiced cider for a cozy fall vibe.
- Garnish with a sprinkle of cinnamon on top for a beautiful presentation.
- Consider adding a few apple slices as decoration for a pop of color!
FAQs about Apple Crisp Cheesecake
It’s always helpful to address any lingering questions you might have about this delicious Apple Crisp Cheesecake. Here are some common queries I often hear from fellow bakers just like you:
Can I use any kind of apples for this cheesecake?
Absolutely! While tart apples like Granny Smith work beautifully, you can experiment with other varieties. Just keep the sweetness balance in mind to ensure a delightful flavor!
How long can I store the Apple Crisp Cheesecake?
You can store this cheesecake in the refrigerator for up to five days. It actually tastes even better after a day in the fridge as the flavors meld together!
Can I make this cheesecake ahead of time?
Yes! In fact, I recommend it. Making it the day before allows all those lovely flavors to develop beautifully. Plus, it saves you time on the big day!
Can I freeze Apple Crisp Cheesecake?
Yes, you can! Just ensure it’s well-wrapped in plastic wrap and aluminum foil. It can last in the freezer for up to two months. Thaw it overnight in the fridge before serving for the best texture.
What can I serve with Apple Crisp Cheesecake?
For a delightful pairing, consider serving it with fresh whipped cream, vanilla ice cream, or even a spiced apple cider. It makes for a cozy, comforting treat that everyone will love!
Final Thoughts
Making this Apple Crisp Cheesecake is not just about baking a dessert. It’s all about creating treasured family memories in the kitchen. The warm, fragrant smell of it cooking will draw your family together… the sharing of stories and laughter. Each slice is not a serving but a celebration of fall-the flavor says it all! Trust me you will be happy with each bite of that creamy, crisp delight when it hits your teeth. So roll your sleeves up and make your oven ready because now the oven has to do the magic and you have to relish in this delicious autumn masterpiece!
PrintApple Crisp Cheesecake
A delightful fusion of classic apple crisp and creamy cheesecake, perfect for fall gatherings.
- Prep Time: 20 minutes
- Cook Time: 60-70 minutes
- Total Time: 1 hour 30 minutes
- Yield: 10 servings 1x
- Category: Dessert
- Method: Baking
- Cuisine: American
- Diet: Vegetarian
Ingredients
- 1 ½ cups crushed graham crackers
- ½ cup unsalted butter, melted
- 2 cups cream cheese, softened
- 1 cup granulated sugar
- 3 large eggs
- 1 tsp vanilla extract
- 2 cups apples, peeled and diced
- 1 tsp cinnamon
- ½ cup brown sugar
- 1 cup rolled oats
- ½ cup flour
- ½ cup chopped nuts (optional)
Instructions
- Preheat the oven to 325°F (160°C).
- In a bowl, mix crushed graham crackers with melted butter and press into the bottom of a springform pan.
- In another bowl, beat together cream cheese and granulated sugar until smooth.
- Add eggs one at a time, mixing well after each addition.
- Stir in vanilla extract and pour the mixture over the crust.
- Toss diced apples with cinnamon and layer on top of the cheesecake batter.
- In a separate bowl, combine brown sugar, oats, flour, and nuts (if using) to create the topping.
- Sprinkle the topping evenly over the apples.
- Bake for 60-70 minutes until set and lightly browned.
- Let cool completely before removing from the springform pan.
Notes
- For best results, use tart apples such as Granny Smith.
- Allow cheesecake to sit overnight in the fridge before serving for enhanced flavor.
Nutrition
- Serving Size: 1 slice
- Calories: 350
- Sugar: 20g
- Sodium: 200mg
- Fat: 18g
- Saturated Fat: 10g
- Unsaturated Fat: 5g
- Trans Fat: 0g
- Carbohydrates: 40g
- Fiber: 2g
- Protein: 5g
- Cholesterol: 90mg