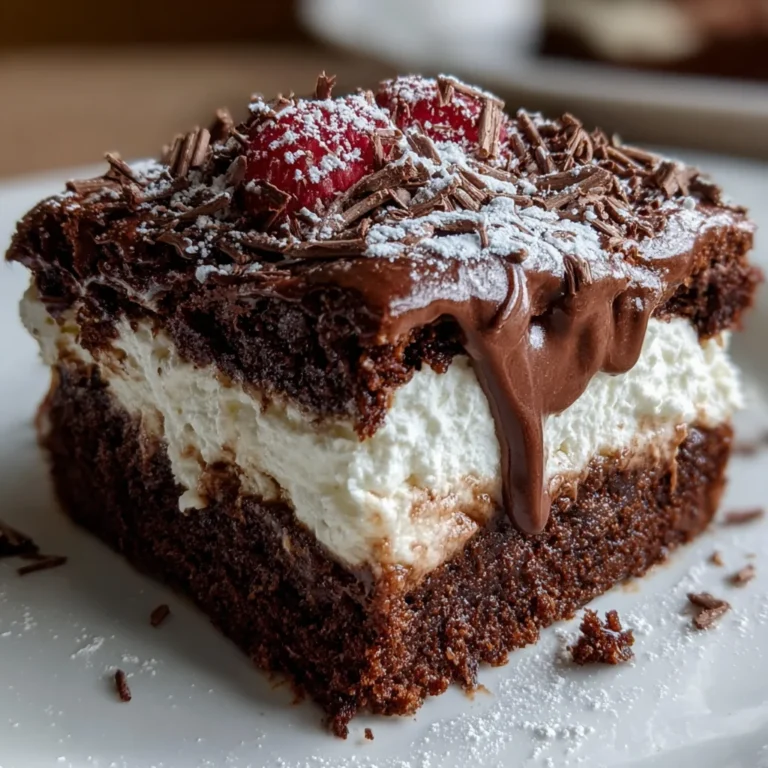
Introduction to Brownie Refrigerator Cake
Have you ever had those days when dessert feels like a daunting task? Well, let me introduce you to my favorite lifesaver: the Brownie Refrigerator Cake! This no-bake treat is perfect for busy moms like us, delivering sweet satisfaction without the baking time. Imagine layers of fudgy brownies with a creamy filling nestled in a cool, luscious pudding masterpiece. Whether it’s a family gathering or a simple weeknight treat, this delightful cake is sure to impress your loved ones. And the best part? It’s a breeze to whip up, making it an ideal choice for any occasion!
Why You’ll Love This Brownie Refrigerator Cake
This Brownie Refrigerator Cake checks all the boxes for a busy lifestyle. It’s incredibly easy to make and requires no baking time, which means you can spend those precious minutes with your family instead of slaving in the kitchen. Each heavenly bite combines rich chocolate flavors with a creamy texture that will have everyone asking for seconds. Trust me, this dessert is not only a crowd-pleaser but also a time-saver that you’ll want to keep in your recipe arsenal!
Ingredients for Brownie Refrigerator Cake
Gathering the right ingredients is a crucial first step in creating this delicious Brownie Refrigerator Cake. Here’s what you’ll need:
- Cold milk: Essential for the pudding mix, giving it that creamy texture. Whole or 2% milk work best.
- Powdered sugar: This adds sweetness and smoothness to the cream cheese layer, making it absolutely delightful.
- Vanilla extract: A splash of this fragrant essence enhances the flavor of the cream cheese mixture.
- Brownie mix: Choose your favorite box mix! The brownie layer is the hero of this dessert, so go for quality.
- Cream cheese: A key player in the cake’s luscious filling, it brings richness and a slight tang to balance the sweetness.
- Whipped topping: Think Cool Whip! This fluffy topping adds a lightness that contrasts beautifully with the dense brownies.
- Instant chocolate pudding mix: This mix thickens into a smooth layer that’s chocolatey heaven, while being a time-saving star!
- Chocolate chips or shavings: For garnish, these add a visual appeal as well as an extra crunch to your dessert.
As you prepare to create your masterpiece, feel free to customize it! You can swap the whipped topping for a dairy-free alternative if you’re accommodating lactose intolerances. For added delight, consider adding fruits or nuts to your layers. Each ingredient plays a vital role, and don’t worry—the exact quantities can be found at the bottom of the article for easy reference and printing.

How to Make Brownie Refrigerator Cake
Now that we have all our ingredients ready, let’s dive into the step-by-step process of making this delightful Brownie Refrigerator Cake. Trust me, you’ll be enjoying it in no time!
Step 1: Bake the Brownies
Prepare and bake the brownies according to the package instructions. Once they’re baked, let them cool completely. Then, cut them into squares or break them into crumbles—whichever you fancy. Crumbled brownies create a more layer-like effect, while squares give you a chunkier bite!
Step 2: Make the Cream Cheese Layer
In a large bowl, beat the softened cream cheese, powdered sugar, and vanilla extract together until smooth. The mixture should be creamy and fluffy. Then, gently fold in half of the whipped topping. This step is crucial for achieving that airy texture we all crave!
Step 3: Prepare the Pudding
In another bowl, whisk together the instant chocolate pudding mix and the cold milk. Keep whisking until it thickens, which should take about 2 minutes. Let this sit for a few minutes to ensure it fully sets, creating that luscious layer we’re after.
Step 4: Assemble the Cake
Grab a 9×13-inch dish and layer half of the brownie pieces on the bottom. Next, spread the cream cheese mixture evenly over those brownies. Now, pour your chocolate pudding layer on top of that creamy cloud, making sure to cover it completely!
Step 5: Top It Off
Spread the remaining whipped topping over the pudding layer with a gentle hand, smoothing it out. For that final touch, sprinkle chocolate chips or chocolate shavings on top. Not only does this add a bit of glamour, but it also enhances the chocolate experience!
Step 6: Chill & Serve
Cover your masterpiece and pop it in the refrigerator. Allow it to chill for at least 4 hours, or even better, overnight. This step lets all the flavors meld together beautifully. Once chilled, slice and enjoy your delicious Brownie Refrigerator Cake—trust me, it’s worth the wait!
Tips for Success
- Make sure your brownies cool completely before assembling the cake; this helps maintain structure.
- Use room temperature cream cheese for a smoother blend—no one likes lumps!
- Chill the cake overnight for the best flavor and texture; this is a must!
- Try adding chopped nuts for an extra crunchy layer, or swap in fresh berries for a fruity twist.
Equipment Needed
- 9×13-inch baking dish: Essential for assembling the cake. A glass or metal dish works well.
- Mixing bowls: Use a large bowl for the cream cheese layer and another for the pudding.
- Whisk or electric mixer: A whisk is great for mixing by hand, but an electric mixer saves time.
- Spatula: Perfect for spreading layers smoothly and folding ingredients together.
Variations
- Nutty Delight: Add chopped walnuts or pecans between layers for a crunchy surprise!
- Berry Burst: Layer fresh strawberries or raspberries for a fruity twist. They’ll add color and refreshing flavor.
- Peanut Butter Swirl: Mix in creamy peanut butter with the cream cheese layer for a nutty indulgence that pairs perfectly with chocolate.
- Gluten-Free Option: Use a gluten-free brownie mix to make this dessert suitable for gluten-sensitive friends and family.
- Dairy-Free Delight: Substitute cream cheese and whipped topping with their dairy-free alternatives for a vegan-friendly treat.
Serving Suggestions for Brownie Refrigerator Cake
- Pair with Fresh Berries: Serve alongside a bowl of mixed fresh berries for a burst of color and freshness.
- Creamy Ice Cream: Top each slice with a scoop of vanilla or mint chocolate chip ice cream for extra indulgence.
- Garnish Elegantly: Drizzle chocolate sauce or caramel over individual slices for a stunning presentation.
- Complementing Drinks: Offer with a cold glass of milk, hot coffee, or rich hot chocolate for a cozy treat.
FAQs about Brownie Refrigerator Cake
Can I make Brownie Refrigerator Cake ahead of time?
Absolutely! In fact, making this cake a day in advance is highly recommended. Chilling it overnight allows all those delicious flavors to meld together perfectly.
What can I use instead of whipped topping?
If you’re looking for a substitution, homemade whipped cream works wonderfully! Just whip heavy cream with a bit of sugar and vanilla until it forms soft peaks.
How long can I store leftovers?
Your Brownie Refrigerator Cake can be stored in the fridge for up to 3-4 days. Just make sure it’s covered securely to keep it fresh!
Can I freeze Brownie Refrigerator Cake?
Yes, you can freeze this cake! Just slice it into pieces, wrap them tightly in plastic wrap, and store them in an airtight container. It keeps well in the freezer for about a month.
What should I serve with my Brownie Refrigerator Cake?
This dessert pairs beautifully with fresh berries, a scoop of ice cream, or a drizzle of chocolate sauce. It’s all about adding those finishing touches!
Final Thoughts
This Brownie Refrigerator Cake isn’t just a dessert; it’s an experience stitched together with layers of love and indulgence. As I watch my family savor each bite, I feel the joy that comes from sharing something delicious, even on my busiest days. It’s a reminder that simple pleasures can bring us together. The laughter, the smiles, and the satisfied sighs will make the effort feel worth it every single time. So why not whip up this delightful no-bake treat? Trust me, you’ll create sweet memories along the way, one slice at a time!
PrintBrownie Refrigerator Cake: A Delicious No-Bake Treat!
Brownie Refrigerator Cake is a delicious no-bake treat that combines layers of brownie, cream cheese, and chocolate pudding, all topped with whipped topping and chocolate for a delightful dessert.
- Prep Time: 15 minutes
- Cook Time: 0 minutes
- Total Time: 4 hours 15 minutes
- Yield: 12 servings 1x
- Category: Dessert
- Method: No-Bake
- Cuisine: American
- Diet: Vegetarian
Ingredients
- 2 cups cold milk
- 1 cup powdered sugar
- 1 teaspoon vanilla extract
- 1 box brownie mix (plus ingredients listed on the package)
- 1 (8 oz) package cream cheese, softened
- 1 (8 oz) tub whipped topping (such as Cool Whip), thawed
- 1 (3.9 oz) box instant chocolate pudding mix
- ½ cup chocolate chips or chocolate shavings (for garnish)
Instructions
- Bake the Brownies: Prepare and bake the brownies according to package instructions. Let them cool completely, then cut them into squares or break them into crumbles, depending on your preferred texture.
- Make the Cream Cheese Layer: In a large bowl, beat the softened cream cheese, powdered sugar, and vanilla extract until smooth. Gently fold in half of the whipped topping until well combined.
- Prepare the Pudding: In another bowl, whisk together the chocolate pudding mix and cold milk until thickened, about 2 minutes. Let it sit for a few minutes to set.
- Assemble the Cake: In a 9×13-inch dish, layer half of the brownie pieces on the bottom. Spread the cream cheese mixture over the brownies, followed by a layer of the chocolate pudding.
- Top It Off: Spread the remaining whipped topping over the pudding layer. Garnish with chocolate chips or chocolate shavings.
- Chill & Serve: Cover and refrigerate for at least 4 hours or overnight to allow the flavors to meld together. Slice and enjoy chilled!
Notes
- For best results, allow the cake to chill overnight for optimal flavor.
- This cake can be customized with additional toppings, such as nuts or fruit.
Nutrition
- Serving Size: 1 slice
- Calories: 380